![CSS-CMYK-logo-2015-2.png]](https://go.christiansteven.com/hs-fs/hubfs/social-suggested-images/CSS-CMYK-logo-2015-2.png?height=40&name=CSS-CMYK-logo-2015-2.png)
Before You Begin
Before configuring IntelliFront BI settings, ensure that:
- You can sign in to IntelliFront BI.
- Your user account has the appropriate administrative permissions.
- You have the necessary configuration information available for the settings you intend to modify.
- You understand that changes to application settings may affect other IntelliFront BI users.
Access Application Settings
- Sign in to IntelliFront BI.
- From the main navigation menu, expand Administration.
- Select Settings.
- The Settings page opens, displaying the available configuration tabs.

Available Settings
|
Tab |
Description |
|---|---|
|
Colors |
Customize the colors used throughout the IntelliFront BI interface. |
|
|
Configure email-related settings used by IntelliFront BI. |
|
Tag Manager |
Manage tags used within the application. |
|
Style Editor |
Customize application styling and visual presentation. |
|
Sign in With Microsoft |
Access settings associated with Microsoft sign-in. |
|
Misc |
Configure Canvas update intervals, dashboard auto-save frequency, PDF page size, and dashboard sharing preferences. |
Settings - Administration
- Go to Administration and select Settings.
- Or select Settings from the card on the home screen.

Colors
- Use colors to filter your Crystal and SSRS reports.
For Example, Financial reports may be red.
Email Settings

- From the drop down menu select the email account that will be used for sending all system notifications.
- Once the account has been selected a complete message will be displayed showing that the account has been saved.
Tag Manager

- This section is to manage the tags used throughout the software. You can edit the name of a tag, remove a tag that is unused, or select a color of a tag.
Style Editor

- Use the Style editor to change the color of the Highlights, Confirm Buttons, Secondary Buttons and Selection Accents to personalize IntelliFront BI.
For Example:

Customize Images

- Upload your own Company Logos to complete the personalized look of IntelliFront BI.
Configure Miscellaneous Settings in IntelliFront BI
The Misc tab in IntelliFront BI allows administrators to configure general application preferences related to Canvas updates, dashboard auto-saving, PDF page size, and dashboard sharing.
These settings help control how frequently Canvas content updates, how dashboard changes are saved, and how dashboards can be exported and shared.
Step 1: Access Miscellaneous Settings
- Sign in to IntelliFront BI.
- From the main navigation menu, expand Administration.
- Select Settings.
- Select the Misc tab at the top of the Settings page.
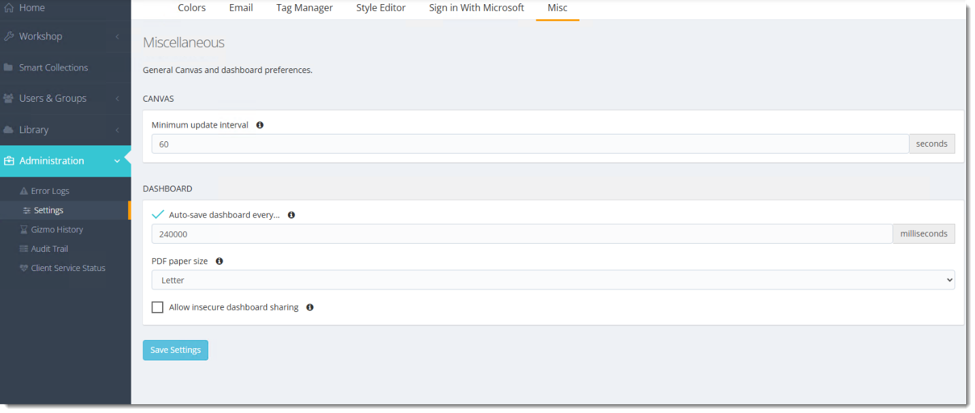 The Miscellaneous settings are organized into two sections: Canvas and Dashboard.
Step 2: Configure Canvas Settings
The Canvas section contains the following option:
|
Setting |
Description |
|---|---|
|
Minimum update interval |
Defines the minimum interval, in seconds, between Canvas updates. |
- Locate Minimum update interval.
- Enter the required interval in seconds.
- The example screenshot shows a value of 60 seconds.
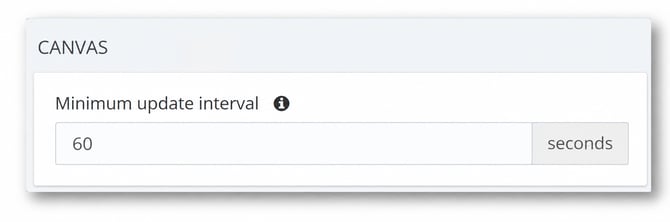
Note: This setting establishes a minimum update interval. Consider the frequency at which your data changes and the potential impact of frequent updates when choosing a value.
Step 3: Configure Dashboard Settings
The Dashboard section provides options for controlling automatic saving, PDF output, and dashboard sharing.
|
Setting |
Description |
|---|---|
|
Auto-save dashboard every... |
Enables automatic saving of dashboard changes at the configured interval, measured in milliseconds. |
|
PDF paper size |
Specifies the default paper size used when generating dashboard PDF output. |
|
Allow insecure dashboard sharing |
Enables the option to share dashboards using an insecure sharing method. |
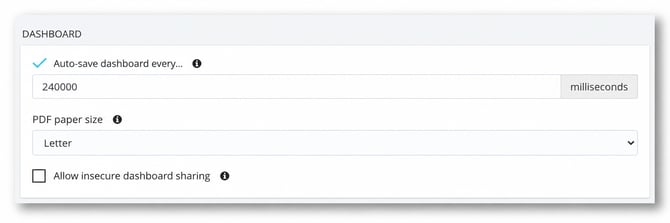
Auto-save Dashboard
- Select the checkbox beside Auto-save dashboard every... to enable automatic saving.
- Enter the required interval in milliseconds.
- The example screenshot shows 240000 milliseconds (4 minutes).
PDF Paper Size
- Locate PDF paper size.
- Open the dropdown menu.
- Select the required paper size.
The example screenshot shows Letter as the selected paper size.
Allow Insecure Dashboard Sharing
- Locate Allow insecure dashboard sharing.
- Select the checkbox to enable this option, if required.
- Leave the checkbox unchecked if insecure dashboard sharing is not permitted.
Important: Enabling insecure dashboard sharing may allow dashboards to be accessed without the normal security protections. Only enable this setting after reviewing your organization's security requirements and understanding how the sharing method works.
Step 4: Save the Settings
- Review the configured Canvas and Dashboard settings.
- Confirm that the values meet your organization's requirements.
- Select Save Settings to save the configuration.
Note: Changes to these settings may affect how dashboards and Canvas content behave for users of IntelliFront BI.
Troubleshooting
Email or Exchange Account Cannot Be Verified
Possible cause: The email account configuration, authentication details, or connection settings may be incorrect.
Resolution:
- Navigate to Administration → Settings → Email.
- Review the configured email account.
- Verify the mail server address and connection settings.
- Confirm that the authentication method and credentials are appropriate for the email service.
- Check whether the mail server requires authentication or supports relay without credentials.
- Attempt to verify the account again.
Reported error: Exchange Account could not be verified
MFA Emails Fail to Send Despite Successful SMTP Verification
Possible cause: The email delivery process may be timing out even though the SMTP account passes its configuration test.
Resolution:
- Navigate to Administration → Settings → Email.
- Confirm that the SMTP account is configured and verifies successfully.
- Check the configured sender information.
- Attempt to send the MFA instructions again.
- Record any timeout errors.
Note: Successful SMTP verification does not necessarily confirm that every email operation will complete successfully.
Dashboard Data Does Not Refresh as Expected
Possible cause: The dashboard's underlying dataset refresh or expiration configuration may not match the expected update frequency.
Resolution:
- Navigate to Administration → Settings → Misc.
- Review the Minimum update interval under Canvas.
- Confirm that the configured value meets your requirements.
- If dashboard data remains outdated, contact your IntelliFront BI administrator to review the underlying dataset refresh configuration.
Important: The Canvas minimum update interval and the server-side dataset refresh interval are different settings. Changing the Canvas interval alone may not make the underlying data refresh more frequently.
Dashboard PDF Export Fails
Possible cause: The PDF export process may encounter a report-specific or application-level issue.
Resolution:
- Navigate to Administration → Settings → Misc.
- Review the configured PDF paper size.
- Attempt to export the dashboard or report again.
- Check whether the same content can be exported using another supported format.
- Determine whether the issue affects one report or multiple reports.
A Tag Cannot Be Created or Assigned
Possible cause: The tag may already exist, or the application may be rejecting the tag during dashboard configuration.
Resolution:
- Navigate to Administration → Settings → Tag Manager.
- Review the existing tags.
- Check whether the intended tag is already in use.
- If an appropriate tag exists, use it rather than creating a duplicate.
- If the application continues to display an error, record the exact message and contact ChristianSteven Support.
Reported error: tag is also already used
Microsoft Sign-In Requires Repeated Authentication
Possible cause: The application's authentication session may be expiring unexpectedly, or the Microsoft sign-in configuration may require further investigation.
Resolution:
- Navigate to Administration → Settings → Sign in With Microsoft.
- Review the configured Microsoft sign-in settings.
- Confirm that the affected users are using the intended authentication method.
- Record how frequently users are required to sign in again.
- Ask your administrator to review the authentication and session configuration.
Shared Dashboards Can Be Accessed Without the Expected Authentication
Possible cause: Dashboard sharing settings may permit access through shared links without requiring the recipient to authenticate in the expected manner.
Resolution:
- Navigate to Administration → Settings → Misc.
- Locate Allow insecure dashboard sharing.
- Ensure this option is disabled unless insecure sharing is explicitly required and approved.
- Review existing dashboard-sharing arrangements.
- Avoid distributing links containing sensitive information or authentication tokens.
Need Additional Help?
If you continue to experience issues after following the troubleshooting steps above, please contact ChristianSteven Support for further assistance.