Welcome to ATRS
Once you have configured your database, the ATRS Wizard will appear to guide you through the next steps.

Step 1: Click on the Next button to get started with ATRS.

Step 2 - Creating an Admin User
When logging into ATRS for the first time, it is necessary to create an Administrator account. This must be done in the Welcome to ATRS Wizard. Your security credentials determine your access privileges, including what actions you can perform and which schedules you can view.
Once you are logged on as an Administrator, you can use the User Manager to:
- Set up additional Administrators and Users.
- Set ATRS to log on automatically using a specified user.
- Assign specific folders and schedules to specific users.
- And so much more!
To set up an Administrator account, just enter the necessary details in the fields provided under the "Create Admin User" section of the Welcome to ATRS Wizard (displayed below). Click Save to continue.

Make note of the username and password you set up as the Administrator. You will need these again to use ATRS. If you forget the administrator credentials, you will have to log a support ticket with our Technical Support Help Desk in order to have the password reset.
Step 3 - Configure Messaging (Optional)
-1.png?width=688&height=519&name=image%20(7)-1.png)
- To configure the messaging section is to insert the main mail you will use for the software.
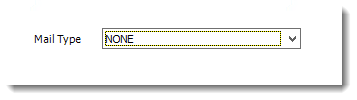
- The software allows you to put four options of Mail type that are: MAPI, SMTP, GROUPWISE, and NONE. This part is optional; you may skip it by selecting the NONE option and clicking the next button.
- Select the Mail type of your preference.
MAPI
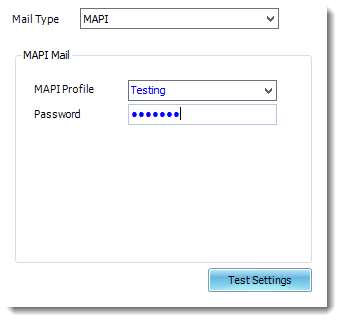
- After putting all the information required, click on the Test Settings button.
- After clicking the Test Settings button, a pop-up window will ask you to put a valid email address to send to. After entering the email address click on the OK button.
SMTP
- After putting all the information required, click on the Test Settings button.
- After clicking the Test Settings button, a pop-up window will ask you to put a valid email address to send to. After entering the email address click on the OK button.
%202.png?width=364&height=134&name=image%20(3)%202.png)
NONE
After selecting the Mail type options on Configure messaging, click the OK button.
- Click Next
Step 4 - Scheduler Set up
The scheduler within ATRS plays a crucial role in determining the timing and execution of tasks. Unlike relying on the Windows Task Scheduler, ATRS utilizes ChristianSteven's unique scheduler, enhancing reliability and efficiency in scheduling tasks. This bespoke scheduler ensures a dedicated and dependable system for managing task execution.
.png?width=688&height=519&name=image%20(39).png)
Within ATRS, the following scheduling options are available:
- Background application scheduling
- Windows NT Service
- No Scheduling Required
How to configure Background application scheduling
Background application scheduling is a windows application which monitors ATRS and fires off reports when they become due.
The background scheduler operates independently from ATRS, meaning that it will cease functioning if the user logs off or the server is shut down. To ensure uninterrupted scheduling even when logging off the server, it is recommended to install and utilize the Windows (NT) Service Scheduler.
To configure the background application scheduler, perform the following:
- Choose the option to utilize the background scheduling application by selecting the radio button next to it.
- Click on "Apply Setting" to save your selection.
- To activate the scheduler, click on "Start Service".
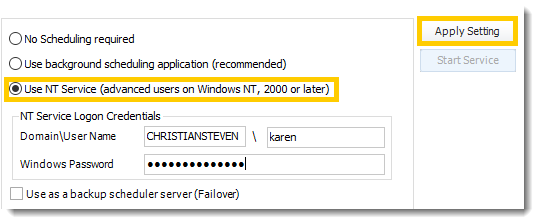
How to configure the NT Service (advanced users on Windows NT, 2000 or later)
The NT service is a specialized Windows service that integrates into the Windows "Services" control panel. Being a Windows service, it functions independently, allowing scheduled reports to run seamlessly even when there is no active user logged onto the PC.
WARNING
Avoid installing the NT service and configuring ATRS through remote control using Windows XP remote capabilities or Terminal Services. These tools do not save settings on the actual PC but rather in a virtual "session" which can lead to inconsistent results like services not running properly or schedules executing incorrectly. If remote access is necessary, consider using software like PC Anywhere or VNC for a smoother setup process.
Prior to selecting the NT Service option as your Scheduler, you must ensure that the following pre-requisites are met:
- You are logged onto the server as the NT Service user.
- The above listed NT Service user must have following windows security rights on the PC you are installing it on:
- Act as part of the operating system
- Log on a Service
- Is a member of the Local Administrators security group.
IMPORTANT:
If you are using MS Exchange Server, the above listed NT Service user must have full rights to the designated email account. These security requirements are required by Windows. If you are unsure how to set up Windows security settings, your system administrator will be able to help.Setting up the NT Service
Once you have ensured that the above prerequisites have been met, perform the following:
- Choose the option to Use NT Service (advanced users on Windows NT, 2000, or later) by selecting the corresponding radio button.
- Provide the necessary NT Service login credentials.
- Enter the following credentials:.
-Domain: Enter your network domain name when prompted. If you are utilizing MS Exchange Server, ensure that this domain matches your network domain to allow ATRS to establish a connection with your Exchange server.
-User Name: Provide the username for the user mentioned above.
-Password: Input the password for the user mentioned above.
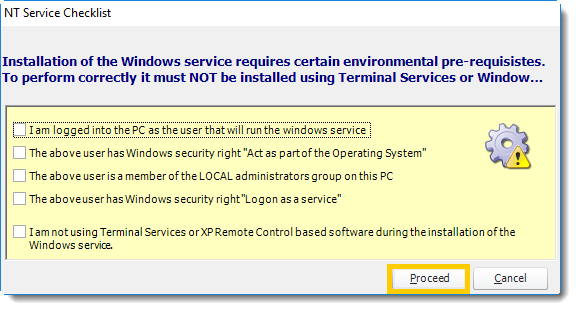
ATRS will prompt you to verify that all prerequisites are met before proceeding with the installation and configuration of the NT service. Once you have confirmed that all requirements are in place, simply proceed with the installation to complete the setup.
The NT Service will now install.
After installation, you can find the service in the Windows "Services" control panel labeled as ATRS. Additionally, you will see ATRS Monitor, a monitoring service that ensures the continuous operation of the ATRS service.
You can proceed by clicking on Start Service. If the option is greyed out, it indicates that the service has already started. To verify this, access the Control Panel - Services and locate ATRS. Ensure that this service is running. If it isn't, you can click on it and choose Start Service from there.
If any of the above credentials are changed (e.g. the password is changed or times out), the service will stop running. Under these circumstances, you will have to uninstall it and re-install it ensuring you enter the new credentials correctly. We recommend that your system administrator ensures that the NT user's credentials never change and never time out.
The server MUST be powered on in order for the NT Service to work. If the server is not on, the NT Service cannot run and schedules will not kick-off as scheduled.
No Scheduling Required
Choose this option if you plan to set up the scheduler at a later date.
Proceed by clicking on the Next button to save the scheduling settings and progress to the final step of the Welcome Wizard.
Step 5 - Finish
To complete the registration process complete all the required fields with valid contact information. Enter your first name, last name, company name, valid email address, company website, and phone number in the provided fields.
-1.png?width=688&height=519&name=image%20(40)-1.png)
Step 6: After filling out the required fields with your contact information, click on the "Finish" button to save your details and continue to access the software.

Step 7: Upon Clicking OK to continue, the following screen will prompt you to enter the Administrator user credentials that you set up during the Welcome to ATRS Wizard in order to access ATRS for the first time.
The basic software configuration has now been completed and you may begin using ATRS. Useful Articles to start Scheduling include
- How do I write a Single Report Schedule Wizard
- How do I write a Package Report Schedule Wizard