![CSS-CMYK-logo-2015-2.png]](https://go.christiansteven.com/hs-fs/hubfs/social-suggested-images/CSS-CMYK-logo-2015-2.png?height=40&name=CSS-CMYK-logo-2015-2.png)
CRD API Overview
The CRD API provides a RESTful interface for integrating CRD with other applications and automating CRD operations. Using the API, developers and administrators can interact with CRD through HTTP requests and receive responses in JSON format.
The CRD API can be used to perform operations such as:
- Start and stop the CRD Scheduler.
- Check whether the CRD Scheduler is running.
- Execute CRD schedules programmatically.
- Create and manage schedules.
- Update schedule parameters and destinations.
- Create and manage bursting schedules.
- Integrate CRD scheduling functionality with external applications and workflows.
You can interact with the CRD API using any programming language or application capable of sending HTTP requests.
For testing and troubleshooting API requests, an API development tool such as Postman can be used to send requests, configure authentication, and review API responses.
Before using the CRD API, it must be installed and configured on the CRD server and the CRD API Service must be running.
Before You Begin
This article is intended for users who have a basic understanding of REST APIs, HTTP requests, JSON responses, and API testing tools.
Before working with the CRD API, make sure you have:
- Access to CRD with the appropriate permissions to configure system options.
- Windows credentials for the server where the CRD API will be installed.
- A basic understanding of REST APIs and API authentication.
- An API testing tool such as Postman for sending and troubleshooting API requests.
- Access to the applications or systems that will communicate with the CRD API.
The CRD API is a RESTful API that uses HTTP requests and JSON responses. You can interact with the API using any programming language or application capable of sending HTTP requests.
For testing and troubleshooting, Postman is recommended and is used for the examples throughout this article.
Important: Unless otherwise specified for an individual endpoint, set the
Content-Typerequest header to:
application/x-www-form-urlencoded
The CRD API Service must be installed, configured, and running on the CRD server before API requests can be processed.
You will configure the protocol and port used by the CRD API during setup. Any port numbers shown in this article or accompanying screenshots are provided for illustration purposes only. Use the port appropriate for your environment and network configuration.
Install and Configure the CRD API
The CRD API must be installed and configured before it can be used to communicate with CRD.
To access the CRD API settings:
- Open CRD.
- From the main menu, select Options.
- Select REST API.
- The REST API configuration window opens.
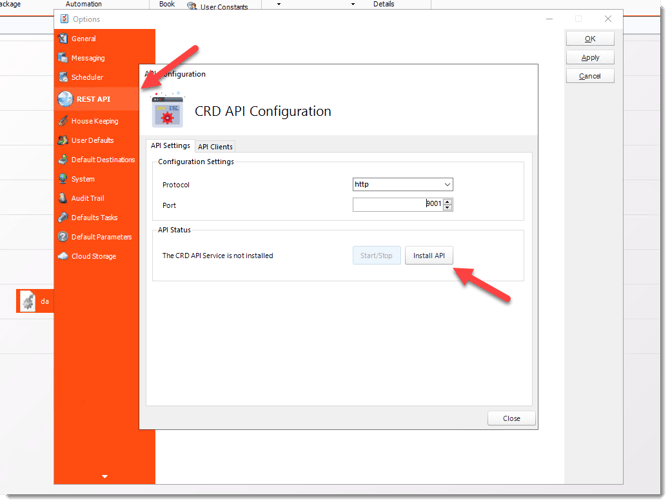
- Select Install API to begin installing and configuring the CRD API Service.
During setup, you will configure the connection details and credentials required by the API Service.
Note: If the CRD API is already installed, you can use this screen to review its configuration and manage the API Service.
Install the CRD API Service
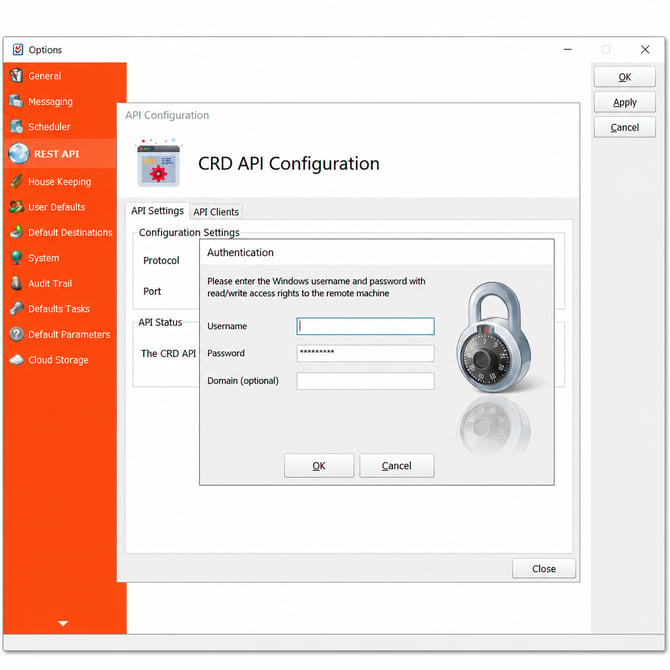
After selecting Install API, you will be prompted to provide the Windows credentials that will be used to install the CRD API Service.
- Enter the required Windows credentials.
- Click OK.
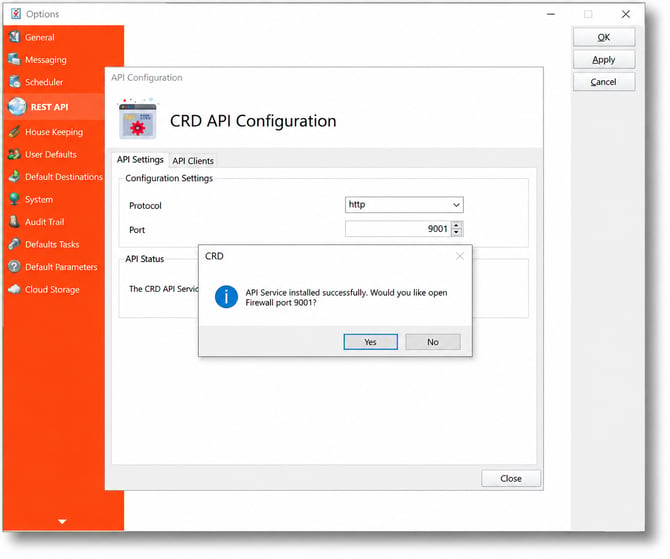
- When prompted to confirm the installation, click Yes.
- Once the installation is complete, click OK to close the confirmation message.
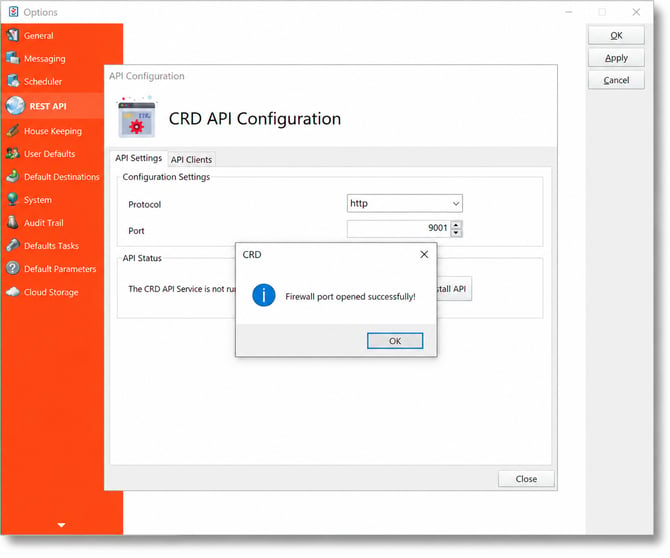
The CRD API Service is now installed.
- Click Start to start the CRD API Service.
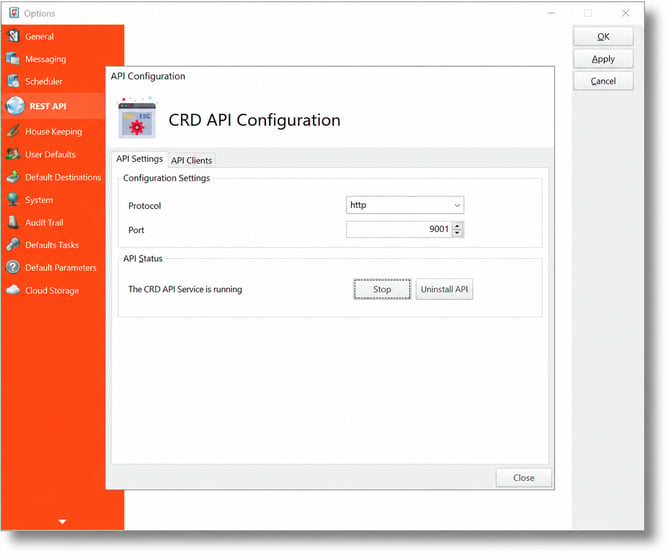
Once started, verify that the CRD API Service shows as running before continuing with the API configuration.
Configure API Clients
API Clients allow applications and services to authenticate with the CRD API using OAuth2 Client Credentials.
To configure an API Client:
- From the CRD API Configuration window, select the API Clients tab.
- Click Add to create a new API Client.
- Enter a descriptive name for the client. Use a name that makes it easy to identify the application or integration that will use the API.
- CRD automatically generates the Client ID and Client Secret for the API Client.
- Securely record the Client ID and Client Secret. These credentials are used when requesting an access token from the CRD API.
- Save the API Client.
Important: Treat the Client Secret as a password. Do not include it in publicly accessible documentation, source code, screenshots, or other unsecured locations.
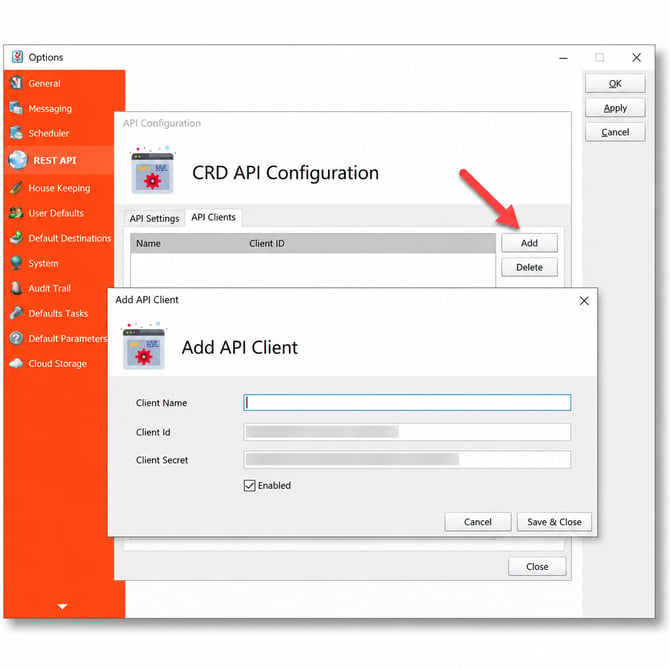
Once the API Client has been created, its credentials can be used to authenticate with the CRD API and obtain an access token.
Verify the CRD API Is Running
After installing and starting the CRD API Service, verify that the API can be reached before attempting to execute other API requests.
The Ping endpoint can be used to confirm that the CRD API Service is available and responding.
Use the following endpoint:
GET /api/service/ping
The Ping endpoint does not require an access token, making it useful for verifying the initial API configuration.
Construct the request using the protocol, server name or IP address, and port configured for your CRD API installation.
For example:
http://<server>:<port>/api/service/ping
Replace <server> and <port> with the values appropriate for your environment.
You can send the request using an API testing tool such as Postman, a web browser where appropriate, or another application capable of sending HTTP requests.
A successful response confirms that the CRD API Service is installed, running, and accessible from the system making the request.
Note: If the Ping request is unsuccessful, verify that the CRD API Service is running and that the configured port is accessible through the firewall before continuing.
How do I use the CRD API?
Getting Started
This documentation is designed for readers who possess a fundamental understanding of API functionality and are familiar with API testing tools like Postman.
CRD's API allows you to run schedules as well as control the scheduling services. You can use any programming language of your choice to query the API.
The CRD API is a RESTful API based on HTTP requests and JSON responses. The easiest way to start using the CRD API is by using Postman, a free tool which helps developers run and debug API requests, and is the source of truth for this documentation.
Unless otherwise specified, all requests must be made with the Content-Type set to application/x-www-form-urlencoded in the request header.
Authentication and Authorization
The CRD API can use OAuth2 Client Credentials or Username and Password authentication and authorization flow. All API endpoints except the /api/service/ping require a valid access token for authorization.
Get Token
Username and Password Flow
To request an access token using the credentials of a CRD user, make a POST request as follows:
http://[crdserver]:9000/login/token
POST http://[crdserver]:9000/login/token
POST Body
string username
string password
Example Result
{
    "UserId": "jd",
    "FirstName": "John",
    "LastName": "Doe",
    "role": "Administrator",
    "ExpiryDateEpoch": 1617803400,
    "token": "VEw+8f/9N1D8ZiJOmOses38Wad0RD/NU9jUDIVVK8CeUcmIjErSZDn965NVmSlEZJd3gfRbkUajd5dCNm87c295S1TO4RKbeJUho6t6XEJUdiJSs1T4WY2xEaR75RqufM3Xi3u55Pp3AsQX0jmN0wcOe/26k1y3feM8hZmnjffbDYZT7azIpiebLBPaXhY6dAA==",
    "token_type": "custom"
}
Client Credentials Flow
In order to obtain an access token, you must first add the Client application to CRD. This is done under the Configuration/CRD API screen.
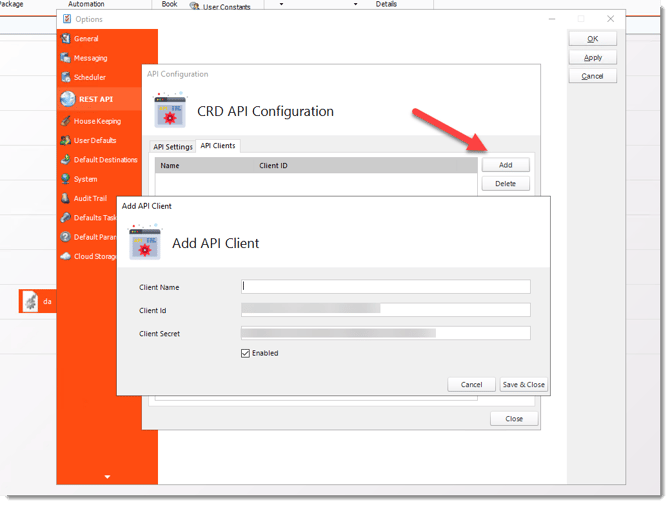
You only need to provide the Client name as the Client ID and Secret are automatically generated by CRD.
To request an access token, make a POST request as follows:
http://[crdserver]:9000/oauth2/token
POST http://[crdserver]:9000/oauth2/token
POST Body
string grant_type: client_credentials
string client_id
string client_secret
Result
{
string access_token
string token_type: bearer
int expires_in
}
Below is an example of what a successful authentication result looks like:
{

  "access_token": "AQAAANCMnd8BFdERjHoAwE_...",

  "token_type": "bearer",

  "expires_in": 86399
}
CRD API tokens expire in 24 hours.
Once the access token has been obtained, it must be included as part of your API request headers.
For the username and password flow, the request header must include:
Authorization: token {access_token}
For client credentials flow include:
Authorization: bearer {access_token}
EndPoints
The API is accessed by making HTTP requests to a specific URL endpoint, in which GET or POST variables contain information about what you wish to access. Every endpoint is accessed via the port and protocol configured in CRD. The CRD API Service must also be running on the CRD server.
The default starting endpoint for the API is:
http://[crdserver]:9000/api
Service EndPoint
The Service Endpoint allows you to query and control the CRD services.
Ping
To check if the API is up and running, you can use Ping. The call will return 1 when the API is running.
GET /api/service/ping
Result:
The call will return 1 when the API is running or a 0 if it is not.
int 1
IsSchedulerRunning
To check if the CRD scheduler is running:
GET /api/service/isschedulerrunning
Result:
True if the CRD Scheduler is running
False if the CRD Scheduler is not running.
{
true
}
StartScheduler
To start the CRD Scheduler:
If you are using client credentials you will need to use the Authorization type of Bearer Token before entering the API call,.
GET /api/service/startscheduler
Result:
Ok 200
StopScheduler
To Stop the CRD Scheduler:
GET /api/service/stopscheduler
Result:
Ok 200
GetConfigPath
To get the path to the CRD config file:
GET /api/service/getconfigpath
Result:
{
string Result
}
Schedule Endpoint
The Schedule endpoint allows you to control CRD schedules. Where a schedule type must be specified, the following are valid:
-
"report" or “single”: all Single and Data-Driven Schedules
-
"automation": all Automation schedules
-
"package": all Single and Data-Driven Package schedules
-
"event": all Event-Based schedules
-
“event-package" or “eventpackage”: all Event-Based Package schedules
- "bursting": all Bursting schedules
The schedule’s unique Id can be obtained from the schedule’s properties screen in the application GUI.
ExecuteSchedule
Synchronously kicks off a schedule and waits for its completion.
POST api/schedule/executeschedule
POST Body
string ScheduleType
int UniqueId
string RunBy
Result
The result will be true or false. If the Schedule failed to execute there should be an error message and error number displayed.
{
bool Result
string ErrorMessage
int ErrorNumber
}
ExecuteScheduleOnTimeAsync
Asynchronously kicks off the schedule as if it is being run by the scheduler. At completion, the schedule’s NextRun date will be incremented.
POST api/schedule/executescheduleontimeasync
POST Body
string ScheduleType
int UniqueId
string RunBy
Result
{
string ExecutionId
}
ExecuteScheduleAsync
Asynchronously kicks off a schedule and does not wait for its completion. The resulting ExecutionId can be used to query the execution status
POST api/schedule/executescheduleasync
POST Body
string ScheduleType
int UniqueId
string RunBy
Result
{
string ExecutionId
BurstingSchedule Endpoints
The BurstingSchedule endpoint provides the functionality to discover report columns, retrieve distinct group values, and create bursting schedules that automatically distribute report output to multiple recipients based on data groups.
Get Report Columns
Retrieve all available columns from a Crystal Report for use in bursting configuration.
GET /api/bursting/getreportcolumns
Parameters:
-
reportPath (string, required) - Full path to the Crystal Report file (e.g., "C:\Reports\Sales.rpt")
Example Call:
{
    "ReportPath": "C:\\Program Files (x86)\\ChristianSteven\\CRD\\Samples\\samplerpt.rpt"
}
Response:
{
  "Columns": [
    "Customers.CompanyName",
    "Customers.ContactName",
    "Customers.Country",
    "Orders.OrderDate",
    "Orders.ShipCity"
  ]
}
Get Group Values
Retrieve distinct values for a specific column in a Crystal Report. These values are used to define individual burst groups.
GET /api/bursting/getgroupvalues
Parameters:
-
ReportPath (string, required) - Full path to the Crystal Report file
-
ColumnName (string, required) - The column name to retrieve values from (e.g., "Customers.CompanyName")
-
UseReportCredentials (bool, optional) - Use credentials stored in the report (default: true)
-
ServerName (string, optional) - Database server name (required if UseReportCredentials = false)
-
DatabaseName (string, optional) - Database name (required if UseReportCredentials = false)
-
UserID (string, optional) - Database username (required if UseReportCredentials = false and UseIntegratedSecurity = false)
-
Password (string, optional) - Database password (required if UseReportCredentials = false and UseIntegratedSecurity = false)
-
UseIntegratedSecurity (bool, optional) - Use Windows integrated authentication (default: false)
Example Call:
{
  "ReportPath": "C:\\Reports\\Sales.rpt",
  "ColumnName": "Customers.CompanyName",
  "UseReportCredentials": false,
  "ServerName": "SQL-SERVER-01",
  "DatabaseName": "SalesDB",
  "UserID": "reportuser",
  "Password": "password123",
  "UseIntegratedSecurity": false
}
Response:
{
  "GroupValues": [
    "Around the Horn",
    "Bon app'",
    "Bottom-Dollar Markets",
    "Consolidated Holdings",
    "Eastern Connection"
  ]
}
Create Bursting Schedule
Create a new bursting schedule with either SIMPLE or ADVANCED mode configuration.
POST /api/bursting/createburstingschedule
Parameters:
-
ScheduleName (string, required) - Name of the schedule
-
ReportPath (string, required) - Full path to the Crystal Report
-
BurstMode (int, required) - 0 = SIMPLE (1-to-1 burst-to-destination), 1 = ADVANCED (all bursts to all destinations)
-
Schedule (object, required) - TimeScheduleBaseModel (see schedule fields below)
-
BurstDefinitions (array, required) - Array of burst definitions (at least 1 required)
-
GroupColumn (string, required) - Column to burst by (from GetReportColumns)
-
GroupValue (string, required) - Value to burst on (from GetGroupValues)
-
AutoBurst (int, optional) - 0 = Manual, 1 = Auto-detect values (default: 0)
-
EmailDestination (object, optional) - Email destination (SIMPLE mode only)
-
DestinationName (string, required) - Destination name
To (array of strings, required) - Recipient email addresses -
Subject (string, required) - Email subject
OutputFormat (string, required) - Report output format (see formats below) -
Body (string, optional) - Email body content
-
CC (array of strings, optional) - CC recipients
-
BCC (array of strings, optional) - BCC recipients
-
BodyFormat (string, optional) - "TEXT" or "HTML" (default: "TEXT")
-
EmbedReport (bool, optional) - Embed report in email body (default: false)
-
CustomOutputFileName (string, optional) - Custom filename without extension
-
-
DiskDestination (object, optional) - Disk destination (SIMPLE mode only)
-
DestinationName (string, required) - Destination name
-
OutputPath (string, required) - Full path ending with pipe (|)
-
OutputFormat (string, required) - Report output format
-
CustomOutputFileName (string, optional) - Custom filename without extension
-
AppendDateTime (bool, optional) - Append timestamp to filename (default: false)
-
DateTimeFormat (string, optional) - DateTime format string
-
-
-
EmailDestinations (array, optional) - Email destinations (ADVANCED mode only)
Same fields as EmailDestination above -
DiskDestinations (array, optional) - Disk destinations (ADVANCED mode only)
-
Same fields as DiskDestination above
-
-
FolderPath (string, optional) - Folder to place schedule in (default: root)
-
Description (string, optional) - Schedule description
-
Keywords (string, optional) - Keywords for filtering
-
RptUserID (string, optional) - Database login username
-
RptPassword (string, optional) - Database login password
-
RptServer (string, optional) - Database server name
-
UseLogin (bool, optional) - Use database login (default: false)
-
CheckBlank (bool, optional) - Enable blank report detection (default: false)
-
Tasks (array, optional) - Post-execution tasks
-
BlankReportAlert (object, optional) - Blank report alert configuration
Example Call SIMPLE Mode:
{
  "ScheduleName": "Monthly Sales by Customer",
  "ReportPath": "C:\\Reports\\Sales.rpt",
  "FolderPath": "Sales Reports",
  "Description": "Burst sales report by customer",
  "Keywords": "bursting,sales,customers",
  "BurstMode": 0,
  "Schedule": {
    "Frequency": "Monthly",
    "StartDate": "2026-03-01",
    "HasEndDate": false,
    "ExecutionTime": "08:00:00",
    "Enabled": true
  },
  "BurstDefinitions": [
    {
      "GroupColumn": "Customers.CompanyName",
      "GroupValue": "Around the Horn",
      "EmailDestination": {
        "DestinationName": "Around the Horn - Email",
        "To": ["sales@aroundthehorn.com"],
        "Subject": "Your Monthly Sales Report",
        "Body": "Please find your report attached.",
        "OutputFormat": "Acrobat Format (*.pdf)"
      }
    },
    {
      "GroupColumn": "Customers.CompanyName",
      "GroupValue": "Bon app'",
      "DiskDestination": {
        "DestinationName": "Bon app - Disk",
        "OutputPath": "C:\\Reports\\Output\\|",
        "OutputFormat": "Acrobat Format (*.pdf)",
        "CustomOutputFileName": "BonApp_Report"
      }
    }
  ]
}
Example Call ADVANCED Mode:
{
  "ScheduleName": "Sales by Region - ADVANCED",
  "ReportPath": "C:\\Reports\\Sales.rpt",
  "BurstMode": 1,
  "Schedule": {
    "Frequency": "Weekly",
    "StartDate": "2026-03-01",
    "ExecutionTime": "08:00:00",
    "Enabled": true
  },
  "BurstDefinitions": [
    {
      "GroupColumn": "Customers.Country",
      "GroupValue": "USA"
    },
    {
      "GroupColumn": "Customers.Country",
      "GroupValue": "Canada"
    },
    {
      "GroupColumn": "Customers.Country",
      "GroupValue": "Mexico"
    }
  ],
  "EmailDestinations": [
    {
      "DestinationName": "Sales Team Email",
      "To": ["sales@company.com"],
      "Subject": "Regional Sales Report",
      "OutputFormat": "Acrobat Format (*.pdf)"
    },
    {
      "DestinationName": "Management Email",
      "To": ["management@company.com"],
      "Subject": "Regional Sales Summary",
      "OutputFormat": "Excel (*.xlsx)"
    }
  ],
  "DiskDestinations": [
    {
      "DestinationName": "Archive",
      "OutputPath": "C:\\Archive\\|",
      "OutputFormat": "Acrobat Format (*.pdf)"
    }
  ]
}
Response:
{
  "Success": true,
  "ScheduleId": 824041158,
  "ScheduleName": "Monthly Sales by Customer"
}
SingleSchedule Endpoint
The SingleSchedule endpoint provides the functionality to perform Create, Read, Update, and Delete (CRUD) operations for managing CRD single schedules efficiently.
If you are using client credentials you will need to use the Authorization type of Bearer Token before entering the API call,.
Create
Creating Single Schedules
* denotes a required field.
POST api/singleschedule/CreateSingleReport
Update Schedule Parameters
Update parameter values for an existing schedule.
POST api/singleschedule/updateparameter
Request:
POST /api/singleschedule/UpdateParameter
Authorization: token YOUR_ACCESS_TOKEN
Content-Type: application/json

{
  "UniqueId": 793372073,
  "ReportParameter": [
    {
      "ParameterName": "Analyst",
      "ParameterValue": "Ted"
    },
    {
      "ParameterName": "Service Type",
      "ParameterValue": "Labor ¦ Programming ¦ QA ¦ Customer Service"
    }
  ]
}
Parameters:
- UniqueId (int, required) - Schedule ID from CRD GUI properties
- ReportParameter (array, required) - Array of parameter name/value pairs to update
- ParameterName (string, required) - Exact name of parameter as defined in the report
- ParameterValue (string, required) - New value for the parameter
Response:
true
Errors:
- Schedule not found: "Report not found. Check the UniqueId"
- No parameters to update: "Report does not have any parameters to update."
Update Email Destination
Update an email destination in single schedules.
POST api/schedule/UpdateEmailDestination
Example Body:
{
  "DestinationId": 810811158,
  "Subject": "Updated Monthly Sales Report",
  "To": [
    "newrecipient@example.com"
  ],
  "Body": "Updated email body content"
}
Delete Email Destination
Delete an email destination in single schedules.
POST api/schedule/DeleteEmailDestination?destinationId={id}
Add Multiple Destinations
Create a schedule with multiple destinations via the CRD API.
POST api/singleschedule/createsinglereport
Example Body:
{
    "ReportPath": "",
    "ScheduleName": "Create Single Demo With Emails",
    "FolderPath": "QA",
    "Description": "This report is created via the CRD API",
    "Keywords": "CRD API",
    "useSavedData": 0,
    "Schedule": {
        "Frequency": "Daily",
        "StartDate": "2025-11-24",
        "HasEndDate": false,
        "EndDate": "3004-04-09",
        "ExecutionTime": "13:00:00",
        "Repeat": false,
        "RepeatInterval": 0.25,
        "RepeatUnit": "hours",
        "RepeatUntil": "14:00:00",
        "Enabled": true,
        "Description": "This report has one parameter",
        "Keywords": "",
        "DailyRepeatInterval": 1,
        "WeeklyOptions": {
            "WeeklyRepeatInterval": 1,
            "SelectedDaysOfWeek": []
        },
        "MonthlyOptions": {
            "UseOptions": false,
            "NthDayOfMonth": "First",
            "SelectedDayOfMonth": "Day",
            "SelectedMonthsOfyear": []
        },
        "OtherOptions": {
            "RepeatInterval": 6,
            "IntervalType": "Days"
        }
    },
    "EmailDestinations": [
        {
            "DestinationName": "Email Destination via API",
            "OutputFormat": "Acrobat Format (*.pdf)",
            "CustomOutputFileName": "",
            "CustomOutputExtension": "",
            "Enabled": true,
            "To": [""],
            "CC": [],
            "BCC": [],
            "Subject": "Here's a test subject",
            "Body": "Here is an email body",
            "BodyFormat": "TEXT",
            "EmbedReport": false,
            "EmbedFormat": "IMAGE",
            "CustomSenderName": "",
            "CustomerSenderAddress": ""
        }],
    "DiskDestinations": [
        {
            "OutputPath": "C:\\CRD API Testing\\|",
            "DestinationName": "APIDisk",
            "DestinationType": "Disk",
            "OutputFormat": "Acrobat Format (*.pdf)",
            "CustomOutputFileName": "",
            "CustomOutputExtension": "",
            "Enabled": true
        }
    ],
    "ReportParameter": [
        {
            "ParameterName": "Cmpny'sname",
            "ParameterValue": ""
        }
    ],
    "PackId": 0,
    "Owner": "",
    "ClientDestinations": []
}
Dependent Models
RenderingSettingsModel
|
Field |
Type |
Description |
|---|---|---|
|
MinLoadingTime |
int |
The minimum amount of time that CRD will wait before proceeding to render a crystal report to file. |
|
MaxLoadingTime |
int |
The maximum amount of time that CRD will wait before proceeding to render a Crystal report to file. |
|
PageWidth |
int |
The width of the Crystal report. |
|
PageHeight |
int |
The height of the Crystal report. |
|
PageOrientation |
int |
The orientation of the crystal report. Valid values are:
|
|
PagesToRender |
string |
The range of pages to render e.g. 1,2,3,5-10. Leave blank for all pages. |
|
MarginLeft |
int |
The page’s left side margin. |
|
MarginRight |
int |
The page’s right side margin. |
|
ViewStyle |
int |
The Crystal report fit style. Valid values are:
|
|
RenderingMethod |
int |
The method to use for rendering the Crystal report. Valid values are:
|
|
TransparentBackground |
boolean |
Indicates whether the rendered report should include the background image. |
|
MinReportSize |
int |
An optional size that CRD will use to determine whether or not a report was rendered successfully. If the report output size is less than this value, then the report will be re-rendered. |
|
CropPdf |
boolean |
Indicates if CRD should crop the PDF output. |
|
CropLeft |
int |
The mount of pixels to crop the PDF by from the left edge. |
|
CropRight |
int |
The mount of pixels to crop the PDF by from the right edge. |
|
CropTop |
int |
The mount of pixels to crop the PDF by from the top edge. |
|
CropBottom |
int |
The mount of pixels to crop the PDF by from the bottom edge. |
|
PDFCompression |
int |
How much compression to apply to the rendered PDF. Valid values are:
|
BasicFilterModel
This model inherits from the FilterBaseModel.
|
Field |
Type |
Description |
|---|---|---|
|
BasicValues |
[string] |
An array of one or more values for the filter. |
|
Operator |
string |
The basic filter operator. Value can be either “In” or “NotIn”. Default value is “In”. |
AdvancedFilterModel
This model inherits from the FilterBaseModel.
|
Field |
Type |
Description |
|---|---|---|
|
Operator |
string |
The filter operator. Valid values are:
|
|
FirstCondition |
key-value pair of string and string |
A key-value pair of the operator and the value for the advanced filter condition. |
|
SecondCondition |
key-value pair of string and string |
A dictionary of the operator and the value for the advanced filter condition. |
TimeScheduleBaseModel
|
Field |
Type |
Description |
|---|---|---|
|
Description |
string |
The schedule’s description. |
|
Enabled |
boolean |
Indicates if the schedule should be enabled. |
|
EndDate |
string |
If applicable the schedule’s end date in the format yyyy-MM-dd. |
|
ExecutionTime |
string |
The schedule’s execution time in the format HH:mm e.g. 14:00 for 2PM. |
|
Frequency |
string |
The frequency of the schedule. Valid values are:
|
|
HasEndDate |
boolean |
Indicates if the schedule has an end date. |
|
Keywords |
string |
The schedule’s keywords. |
|
NextRunEpochUtc |
readonly int |
The schedule’s next run date represented as Unix date. |
|
Repeat |
bool |
Indicates if the schedule should repeat after the execution time. |
|
RepeatInterval |
double |
The repetition interval. |
|
RepeatUnit |
string |
The repeat interval. Valid values are:
|
|
RepeatUntil |
string |
When the schedule will repeat until in the format HH:mm. |
|
StartDate |
string |
The start date of the schedule in the format yyyy-MM-dd e.g. 2021-04-07 for April 7th 2021. |
DataDriverModel
|
Field |
Type |
Description |
|---|---|---|
|
KeyField* |
string |
The name of the field that uniquely identifies each record in the data-driver. |
|
ValuesJson* |
string |
A valid JSON string representing the multiple objects to be used to data-drive the schedule. |
Troubleshooting
Use the following troubleshooting steps if you experience problems installing, connecting to, authenticating with, or using the CRD API.
CRD API Service Does Not Start
If the CRD API Service does not start:
- Open Options > REST API and confirm that the API Service has been installed.
- Verify that the Windows credentials used to install and run the service are valid.
- Confirm that the configured port is not already being used by another application or service.
- Check that the service account has the permissions required to run the CRD API Service.
- Review the CRD error log for additional information.
Unable to Connect to the CRD API
If an API request cannot connect to CRD:
- Confirm that the CRD API Service is running.
- Verify that the request is using the correct protocol, server name or IP address, and port.
- Confirm that the configured port is open in the Windows Firewall and any other network firewalls between the client and CRD server.
- Use the Ping endpoint to determine whether the CRD API can be reached.
- If the request works locally on the CRD server but not from another computer, check the network and firewall configuration.
Note: Any port numbers shown in this article are for illustration purposes only. Use the port configured for the CRD API in your environment.
Authentication Fails
If CRD rejects an authentication request:
- Verify that the username and password, or Client ID and Client Secret, are correct.
- If using Client Credentials, confirm that the API Client is enabled in Options > REST API > API Clients.
- Make sure the correct authentication endpoint is being used.
- Check that the request contains all required authentication values.
- If using a previously generated access token, obtain a new token and retry the request.
Unauthorized or Access Token Errors
If an endpoint returns an authorization or access-token error:
- Confirm that an access token has been obtained successfully.
- Verify that the token has been added to the request's Authorization header.
- Make sure you are using the authorization format required by your authentication method.
- If the token has expired, request a new access token and retry the API request.
Invalid Request or Unexpected API Response
If an API request returns an error or unexpected response:
- Verify that you are using the correct HTTP method and endpoint.
- Check that all required parameters have been supplied.
- Verify that parameter names and values match those documented for the endpoint.
- Unless otherwise specified, make sure
Content-Typeis set toapplication/x-www-form-urlencoded. - For endpoints that require JSON, make sure the request body contains valid JSON and that
Content-Typeis set appropriately. - Review the response body for additional error information.
Schedule Does Not Execute
If an API request is accepted but the schedule does not execute:
- Confirm that the CRD Scheduler is running.
- Verify that the Schedule Type is correct.
- Confirm that the Unique ID belongs to the schedule you are attempting to execute.
- Open the schedule in CRD and verify that its reports, parameters, destinations, and other required settings are valid.
- Try running the schedule directly from CRD to determine whether the problem is with the schedule or the API request.
- Review the CRD error log for errors generated during execution.
Still Experiencing Problems?
If the issue persists, review the CRD error log for additional details. When contacting ChristianSteven Support, provide the relevant error message and details of the API operation you were attempting to perform. Do not include passwords, Client Secrets, or active access tokens.
Need Additional Help?
If you continue to experience issues with the CRD API after following the troubleshooting steps above, our Support team is available to help.
When submitting your request, include as much information as possible about the issue, including any relevant error messages, the API endpoint or operation you are using, and the troubleshooting steps you have already completed.
Do not include passwords, Client Secrets, or active access tokens in your support request.