![CSS-CMYK-logo-2015-2.png]](https://go.christiansteven.com/hs-fs/hubfs/social-suggested-images/CSS-CMYK-logo-2015-2.png?height=40&name=CSS-CMYK-logo-2015-2.png)
Before You Begin
Before managing schedules in the PBRS Web Application, ensure that:
- You can sign in to the PBRS Web Application.
- Your user account has permission to access the required schedules and folders.
- You have the appropriate group permissions for actions such as editing, executing, sharing, or deleting schedules.
Manage Schedules Using the Context Menu
The updated Schedule Context Menu in the PBRS Web Application provides quick access to the most commonly used schedule management functions.
To access the menu, locate the required schedule and select its options menu.
Available Context Menu Options
|
Option |
Description |
|---|---|
|
Preview |
Generates a preview of the selected report, allowing you to review its output. |
|
Enable |
Enables the schedule so it can execute automatically according to its configured settings. When enabled, this option may change to Disable. |
|
Execute Schedule |
Manually executes the selected schedule without waiting for its next scheduled run. |
|
Edit Schedule |
Opens the schedule configuration so you can modify its settings. |
|
Clone Schedule |
Creates a copy of the selected schedule that can be modified independently of the original. |
|
Share |
Allows you to share the selected schedule with other PBRS users, subject to their access permissions. |
|
History |
Displays the schedule's execution history, allowing you to review previous executions and their results. |
|
Delete Schedule |
Deletes the selected schedule from PBRS. |
Important: The options available in the context menu may depend on the user's permissions and the selected schedule type


Create a Folder
Step 1: Select Create Folder in the desired folder you would like to create another folder in.

Step 2: Give the new folder a name.

Step 3: Select OK. You will now see a pop up signifying the creation of a new folder.

Preview a Schedule
The Preview option in the PBRS Web Application allows you to review a report's output before executing the schedule.
This is useful when verifying that the correct report has been selected and checking its appearance before distributing it to recipients.
- Navigate to the folder containing the schedule you want to preview.
- Locate the required schedule in the schedule list.
- Under Action, select the three-dot menu (⋮) beside the schedule.
- Select Preview from the context menu.
- Review the report preview to confirm that the content and formatting are as expected.
- Close the preview when you have finished reviewing the report.
Important: Previewing a report is intended to help verify its output before execution. It should not be treated as confirmation that the schedule's configured delivery destinations will work successfully.
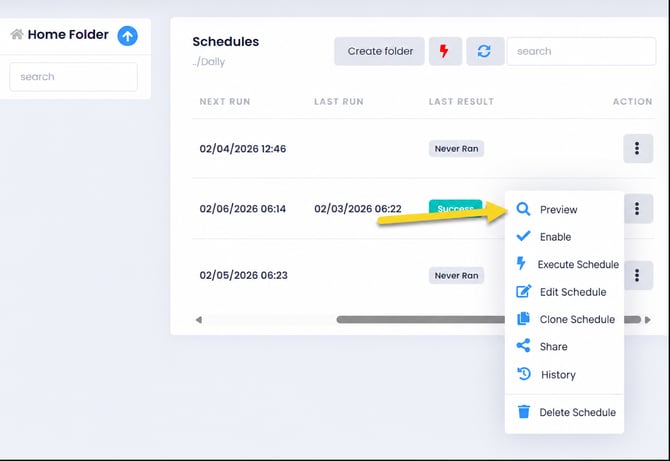

Review the Schedule Preview
After selecting Preview from the Schedule Context Menu, PBRS opens a preview window displaying the selected report.
The preview allows you to review the report's content, charts, and formatting before executing the schedule.
- Review the report displayed in the Preview window to confirm that the expected content is shown.
- Check that the report's charts, tables, and other visual elements are displayed correctly.
- If required, select the Move icon (four-directional arrows) in the upper-right corner of the preview window to reposition it on the screen.
- To close the preview, select the X in the upper-right corner.

Disable a Schedule in the PBRS Web Application
The Disable option allows you to temporarily stop a schedule from executing automatically without deleting it or losing its configuration.
This is useful when a report is no longer required temporarily, needs maintenance, or should be tested before automatic execution resumes.
- From the PBRS Web Application, select Schedules.
- Navigate to the folder containing the schedule you want to disable.
- Locate the required schedule in the schedule list.
- Under Action, select the three-dot menu (⋮) beside the schedule.
- Select Disable from the context menu.
- The schedule is disabled and will no longer execute automatically until it is enabled again.
Important: Disabling a schedule does not delete it or remove its configuration. The schedule remains available for editing, previewing, and manual execution, subject to the user's permissions.
Enable a Disabled Schedule
To resume automatic execution:
- Locate the disabled schedule.
- Under Action, select the three-dot menu (⋮).
- Select Enable.
- The schedule is re-enabled and will execute automatically according to its configured scheduling settings.
Note: The context menu displays Disable when a schedule is enabled and Enable when it is disabled.
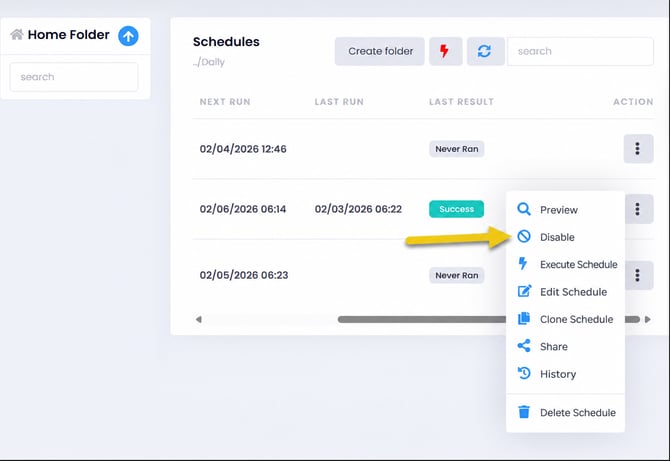
The schedule will now be disabled.
Execute a Schedule Manually
The Execute Schedule option allows you to run a schedule immediately without waiting for its next scheduled execution.
This is useful when you need to generate reports on demand, test a schedule after making configuration changes, or deliver reports outside their normal scheduling frequency.
- From the PBRS Web Application, select Schedules.
- Navigate to the folder containing the schedule you want to execute.
- Locate the required schedule in the schedule list.
- Under Action, select the three-dot menu (⋮) beside the schedule.
- Select Execute Schedule from the context menu.
- Confirm that you want to execute the schedule
- PBRS initiates the schedule execution using its configured report settings and delivery destinations.
- Review the execution status using System Monitor or the schedule's History option.
Important: Manually executing a schedule may generate and deliver reports to the configured destinations. Verify the recipients and delivery settings before executing a schedule, particularly when testing changes.
Note: Manual execution does not change the schedule's configured frequency or next automatic execution time.
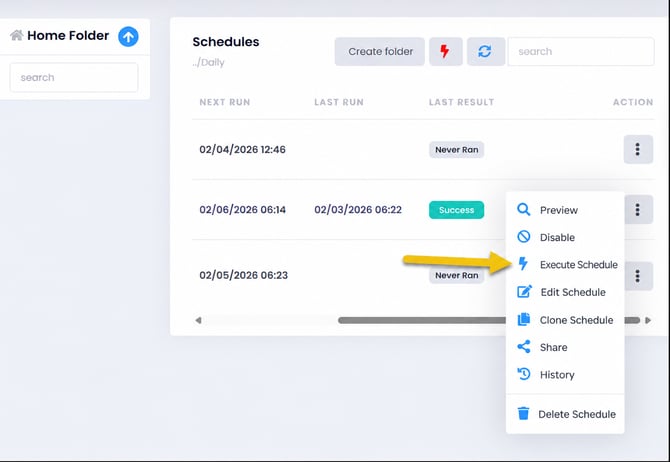
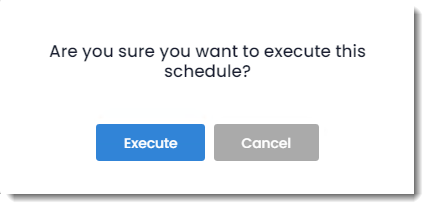
Alternatively, you may execute the contents of a Folder.
Execute Folder Contents in the PBRS Web Application
The Execute Folder Contents option allows you to manually execute schedules contained within a selected folder without waiting for their next scheduled execution.
This is useful when multiple reports need to be generated on demand or when testing schedules grouped together in a folder.
- From the PBRS Web Application, select Schedules.
- In the Home Folder panel, locate the folder containing the schedules you want to execute.
- Select the three-dot menu (⋯) beside the folder.
- Select Execute Folder Contents from the folder context menu.
- PBRS initiates execution of the schedules in the selected folder.
- Use Execution Queue, System Monitor, or the available execution history to review the results.
Important: Executing folder contents may generate reports and deliver them to their configured destinations. Confirm that the schedules and delivery settings are correct before proceeding.
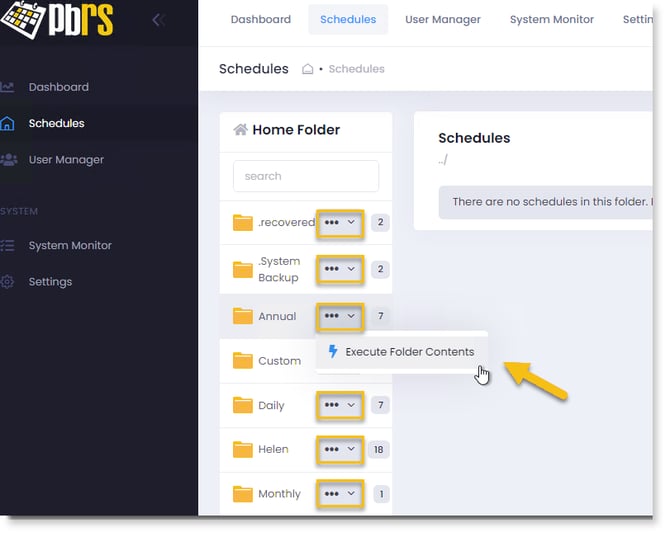
You may view all the schedules that have been manually executed from within the PBRS Web Application using the Execution Queue button.


Edit a Schedule in the PBRS Web Application
The Edit Schedule option allows you to modify an existing schedule without creating a new one.
You can update the schedule's configuration, including its report selection, scheduling frequency, parameters, output settings, and delivery destinations, depending on the schedule type.
To edit an existing schedule:
- From the PBRS Web Application, select Schedules.
- Navigate to the folder containing the schedule you want to modify.
- Locate the required schedule in the schedule list.
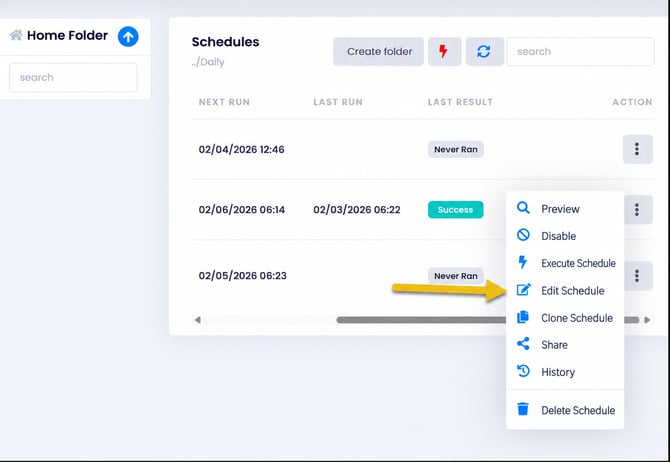
- Under Action, select the three-dot menu (⋮) beside the schedule.
- Select Edit Schedule from the context menu.
- PBRS opens the schedule configuration, allowing you to review and modify the available settings.
- Navigate to the section containing the settings you want to change.
- Make the required changes and save the updated schedule.
Important: Changes to an enabled schedule may affect its next automatic execution. Review the scheduling settings, report parameters, and delivery destinations before saving your changes.
Note: The configuration options available when editing a schedule depend on the schedule type and the user's assigned permissions.
Clone a Schedule in the PBRS Web Application
The Clone Schedule option allows you to create a copy of an existing schedule without having to configure a new schedule from scratch.
Cloning is useful when you need to create schedules with similar report settings, scheduling frequencies, or delivery destinations while retaining the original schedule.
- From the PBRS Web Application, select Schedules.
- Navigate to the folder containing the schedule you want to clone.
- Locate the required schedule in the schedule list.
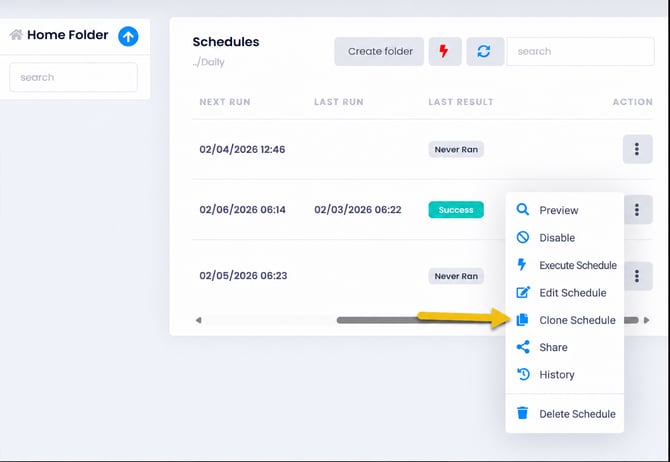
- Under Action, select the three-dot menu (⋮) beside the schedule.
- Select Clone Schedule from the context menu.
- A confirmation window appears asking, “Are you sure you want to clone this schedule?”
- Select Clone to confirm, or Cancel to return without creating a copy.
- Locate the cloned schedule and review its configuration before using it.
Important: Before enabling or executing a cloned schedule, review its report selection, parameters, scheduling frequency, and delivery destinations. This helps prevent unintended duplicate report deliveries.
Note: Cloning creates a separate schedule that can be modified independently of the original.

Share a Schedule in the PBRS Web Application
The Share option allows you to share an existing schedule with other PBRS Web Application users without creating a duplicate schedule.
This feature is useful when multiple users need access to the same report schedule for viewing or execution.
- From the PBRS Web Application, select Schedules.
- Navigate to the folder containing the schedule you want to share.
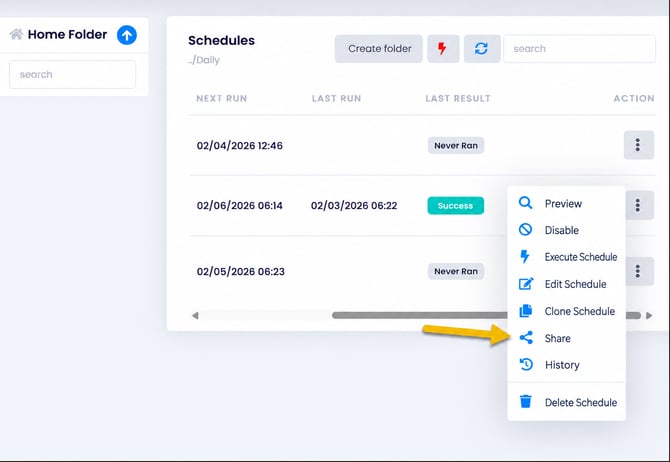
- Locate the required schedule and select the three-dot menu (⋮) under Action.
- Select Share from the context menu.
- The Share Schedule window opens, displaying the selected schedule's name and type.
- Under Share this schedule with the following users, choose a user from the Select a user dropdown.
- Select the + button to add the selected user to the sharing list.
- Repeat Steps 6–7 to share the schedule with additional users.
- To remove a user from the sharing list, select the X beside their username.
- Select Confirm to save the sharing configuration, or Cancel to exit without saving.
Important: Sharing a schedule provides access to the selected users, subject to their configured PBRS permissions. Sharing does not automatically grant administrative privileges or unrestricted access to the schedule.
Share Schedule Window Options
|
Option |
Description |
|---|---|
|
Schedule Name and Type |
Displays the schedule being shared and its schedule type. |
|
Select a user |
Allows you to choose an existing PBRS user. |
|
+ (Add User) |
Adds the selected user to the sharing list. |
|
Selected Users |
Displays users currently included in the sharing configuration. |
|
X (Remove User) |
Removes a user from the sharing list. |
|
Confirm |
Saves the sharing configuration. |
|
Cancel |
Closes the window without saving changes. |
View Schedule History in the PBRS Web Application
The History option allows you to review previous executions of a schedule, including when each execution started, when it finished, and whether it completed successfully.
Schedule History is useful for monitoring report execution, confirming that schedules have run as expected, and identifying potential execution issues.
Access Schedule History
- From the PBRS Web Application, select Schedules.
- Navigate to the folder containing the schedule you want to review.
- Locate the required schedule in the schedule list.
- Under Action, select the three-dot menu (⋮) beside the schedule.
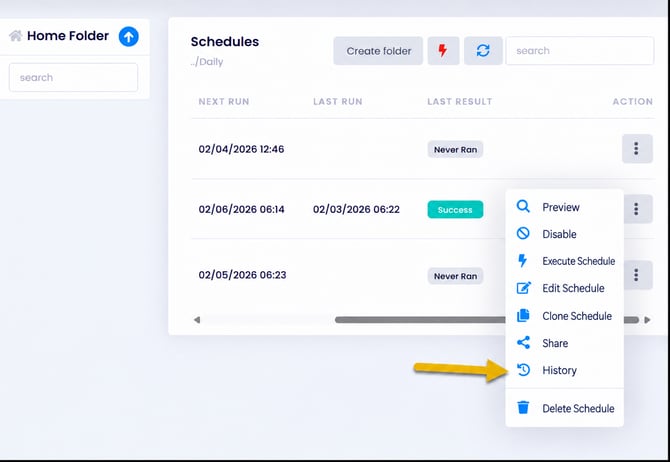
- Select History from the context menu.
- The Schedule History screen opens, displaying the execution records for the selected schedule.
Understand the Schedule History Screen
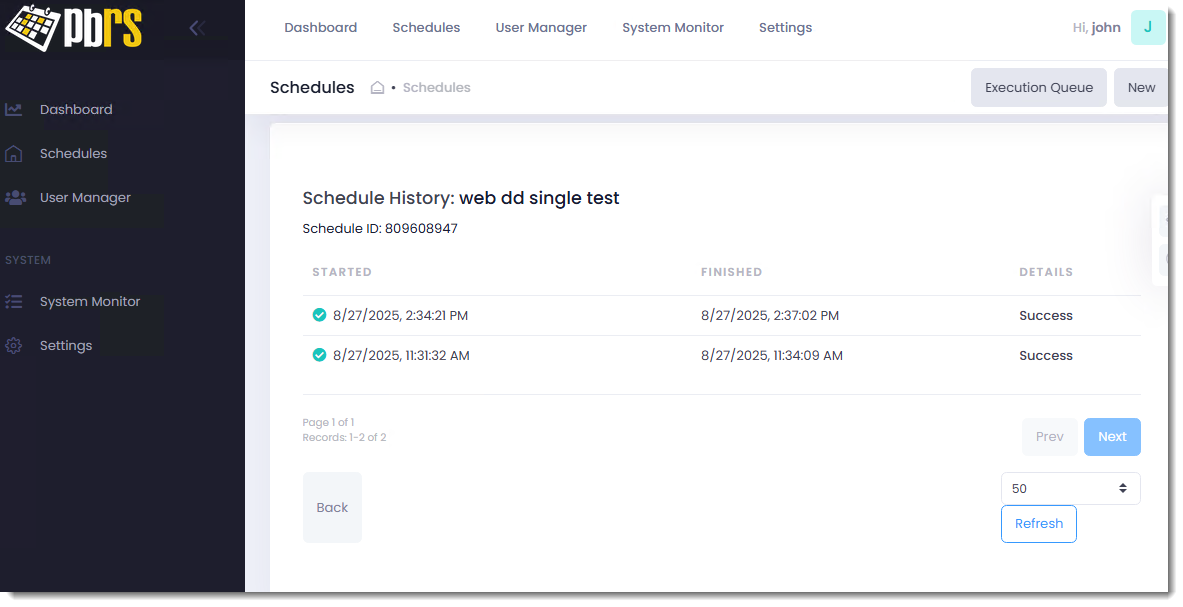
The Schedule History screen displays previous execution records for the selected schedule.
In the example, the schedule web dd single test has two recorded executions, both showing a successful result.
|
Field / Option |
Description |
|---|---|
|
Schedule History |
Displays the name of the schedule being reviewed. |
|
Schedule ID |
Displays the unique identifier assigned to the schedule. |
|
Started |
Shows the date and time the schedule execution began. |
|
Finished |
Shows the date and time the execution completed. |
|
Details |
Displays the execution result, such as Success. |
|
Prev / Next |
Allows navigation between pages of execution records. |
|
Records per page |
Controls how many execution records are displayed on each page. |
|
Refresh |
Updates the displayed execution history. |
|
Back |
Returns to the previous screen. |
Review Previous Schedule Executions
- Review the Started and Finished columns to identify when each execution took place.
- Check the Details column to determine whether the execution was successful.
- Use Prev and Next to navigate through additional execution records, where available.
- Adjust the Records per page setting if you want to display more or fewer records.
- Select Refresh to update the execution history.
- Select Back to return to the previous screen.
Note: The Schedule History screen provides a record of previous executions. If an execution fails, review the available execution details and the PBRS Error Log to investigate the cause.
Delete a Schedule in the PBRS Web Application
The Delete Schedule option allows you to permanently remove an existing schedule from the PBRS Web Application.
This is useful when a schedule is no longer required or has been replaced by another schedule.
To delete a schedule:
- From the PBRS Web Application, select Schedules.
- Navigate to the folder containing the schedule you want to delete.
- Locate the required schedule in the schedule list.
- Under Action, select the three-dot menu (⋮) beside the schedule.
- Select Delete Schedule from the context menu.
- A confirmation window appears asking, "Are you sure you would like to delete this schedule?"
- Select Delete to confirm the deletion, or Cancel to return without deleting the schedule.
Important: Deleting a schedule removes it from PBRS and stops future automatic executions. If you only need to temporarily stop a schedule, use Disable instead. Before deleting, confirm that the schedule is no longer required and that its removal will not interrupt any important report deliveries.
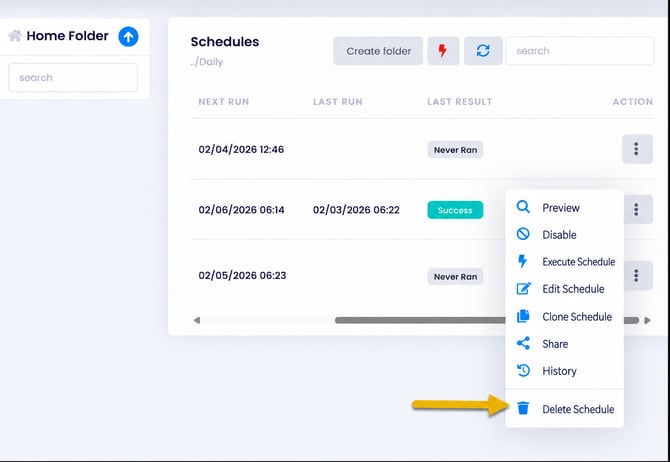
Delete Schedule Confirmation
The confirmation window provides two options:
|
Option |
Description |
|---|---|
|
Delete |
Confirms the request to delete the selected schedule. |
|
Cancel |
Closes the confirmation window without deleting the schedule. |

Rename a Schedule in the PBRS Web Application
The Rename Schedule option allows you to change the name of an existing schedule without modifying its report configuration, scheduling frequency, or delivery destinations.
This is useful when updating schedule naming conventions, correcting a schedule name, or making schedules easier to identify.
To rename a schedule:
- From the PBRS Web Application, select Schedules.
- Navigate to the folder containing the schedule you want to rename.
- Locate the required schedule in the schedule list.
- Select the Edit icon (pencil) displayed beside the schedule name.
- The Enter the new schedule name window opens.
- Enter the new name in the text field.
- Select OK to save the new schedule name, or Cancel to exit without making changes.
- Confirm that the updated schedule name appears in the schedule list.
Rename Schedule Window Options
|
Option |
Description |
|---|---|
|
Edit icon (pencil) |
Opens the window for renaming the selected schedule. |
|
New Schedule Name |
Allows you to enter a replacement name for the schedule. |
|
OK |
Saves the new schedule name. |
|
Cancel |
Closes the window without saving changes. |
Important: Renaming a schedule changes its displayed name but does not change its scheduling configuration. If the schedule name is referenced by external scripts, integrations, or other processes, review those references before making changes.

Troubleshooting
The following troubleshooting steps address common issues encountered when viewing, managing, executing, sharing, and organizing schedules in the PBRS Web Application.
A Schedule Is Not Visible in the Schedule List
Possible cause: The schedule is located in a different folder, or the user's permissions restrict access to the schedule.
Resolution:
- Open Schedules in the PBRS Web Application.
- Navigate through the available folders to locate the required schedule.
- Use the Search field to find the schedule.
- Confirm that the schedule has not been deleted or moved to another folder.
- If the schedule is still missing, ask an administrator to review the user's schedule assignments in User Manager.
- Verify that the user's group has permission to access the folder containing the schedule.
A Schedule Does Not Execute Automatically
Possible cause: The schedule is disabled, the scheduling configuration is incorrect, or the PBRS Scheduler is not running.
Resolution:
- Locate the affected schedule in the Schedules list.
- Open the three-dot menu (⋮) and check whether Enable is displayed.
- If the schedule is disabled, select Enable.
- Select Edit Schedule and review the configured start date, execution time, and frequency.
- Confirm that the PBRS Scheduler is running.
- Review the schedule's History to determine whether previous executions were successful.
- Check the PBRS Error Log for any related errors.
Note: A disabled schedule remains available in PBRS but will not execute automatically until it is enabled again.
A Schedule Fails When Executed Manually
Possible cause: The schedule contains an invalid report configuration, authentication issue, parameter error, or delivery destination problem.
Resolution:
- Locate the affected schedule and select Execute Schedule from the context menu.
- Review the execution result using History or System Monitor.
- Check the PBRS Error Log for details of the failure.
- Select Edit Schedule and review the report configuration.
- Verify the report's account credentials, parameters, and output settings.
- Confirm that the configured delivery destinations are accessible.
- Correct any identified issues and execute the schedule again.
Important: Manually executing a schedule may deliver reports to configured recipients or destinations. Review the delivery settings before testing.
A Schedule Cannot Be Previewed
Possible cause: PBRS cannot access the report, the report requires additional authentication, or the report configuration is incomplete.
Resolution:
- Locate the schedule and select Preview.
- If the preview does not open or displays an error, select Edit Schedule.
- Verify that the correct report is selected.
- Confirm that the report account has the required access permissions.
- Review any report parameters or filters.
- Check the PBRS Error Log for additional information.
- Retry the preview after correcting the issue.
A User Cannot Edit, Clone, or Delete a Schedule
Possible cause: The user's assigned group does not have the necessary schedule management permissions.
Resolution:
- Ask an administrator to open Group Manager.
- Select the affected user's group.
- Open the Permissions tab.
- Review the Create/Edit Schedules, Delete Schedules, Execute Only, and Read Only permissions.
- Confirm that the user has the appropriate permissions for the required action.
- Select Save if changes are made.
- Ask the user to sign out and sign back in before retrying.
Note: Schedule management options may be restricted by the user's group permissions.
A User Cannot Access a Shared Schedule
Possible cause: The schedule has not been shared with the correct user, or the user's group permissions restrict access.
Resolution:
- Locate the schedule and select Share from the context menu.
- Review the users included in the sharing list.
- Confirm that the required user has been added.
- If necessary, select the user from the dropdown and click +.
- Select Confirm to save the sharing configuration.
- If the user still cannot access the schedule, review their permissions in User Manager and Group Manager.
Schedule History Is Missing or Does Not Display Expected Executions
Possible cause: The schedule has not executed, the execution records are on another page, or the displayed history has not refreshed.
Resolution:
- Locate the schedule and select History.
- Select Refresh to update the execution records.
- Review the Started, Finished, and Details columns.
- Use Prev and Next to navigate through available records.
- Adjust the number of records displayed per page if necessary.
- If expected executions are missing, check System Monitor and the PBRS Error Log.
Unable to Rename a Schedule
Possible cause: The user does not have the necessary permissions, or the new schedule name has not been accepted.
Resolution:
- Locate the schedule in the Schedules list.
- Select the Edit icon (pencil) beside the schedule name, where available.
- Enter the new schedule name.
- Select OK to save the change.
- If the name is not updated, verify that the user has permission to edit schedules.
- Review any validation messages displayed by PBRS.
Need Additional Help?
If you continue to experience issues after following the troubleshooting steps above, please contact ChristianSteven Support for further assistance.