Part 1 - Install and Start the PBRS API
Step 1
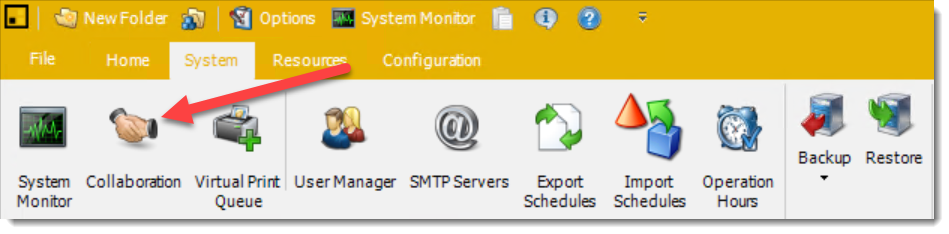
To begin, click on the "Options" tab located at the top of the application menu.

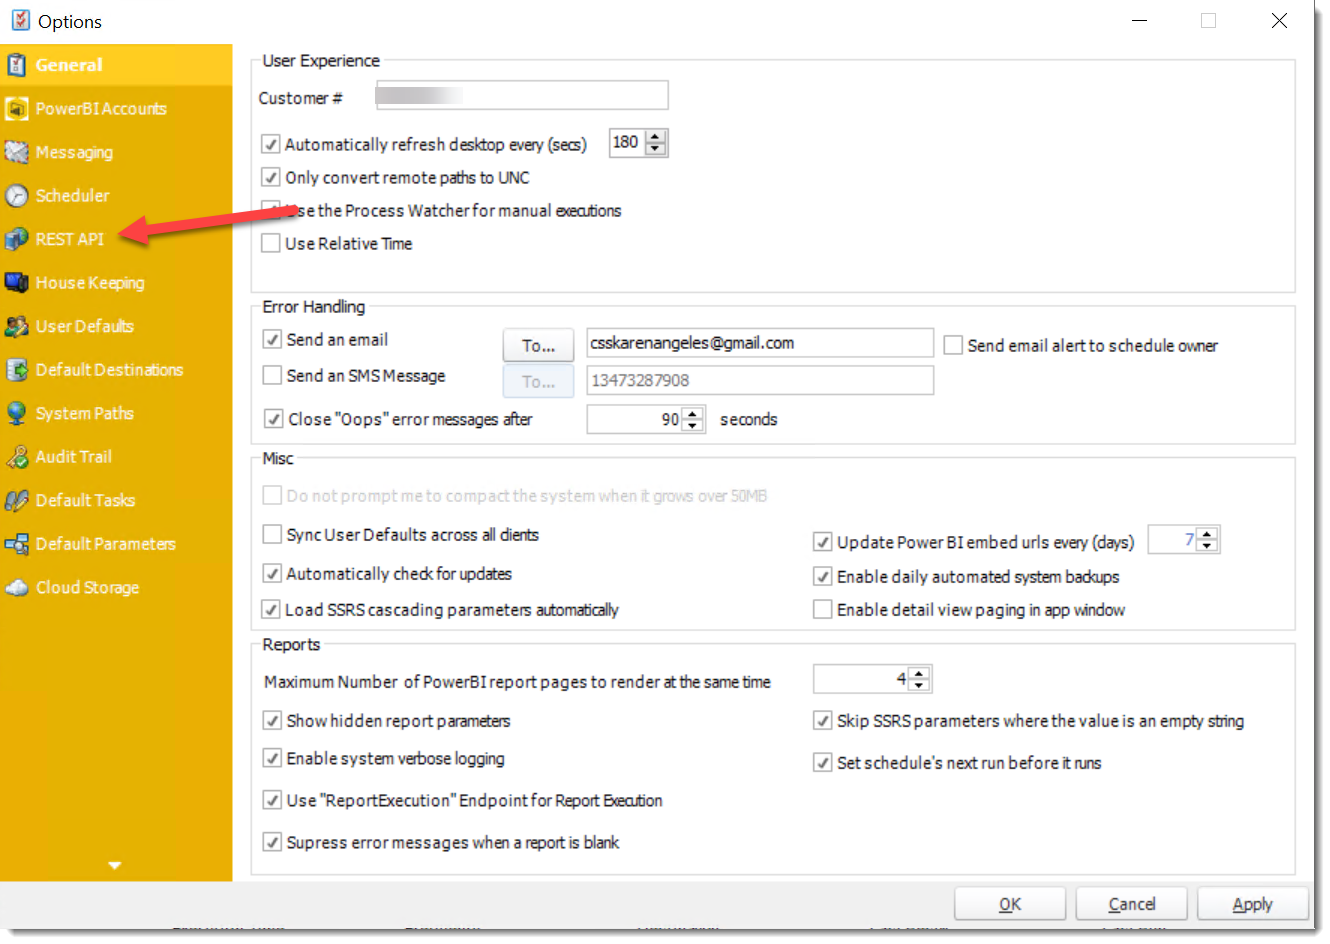
Step 2
Select the "REST API" option from the menu on the left side of the "Options" screen.
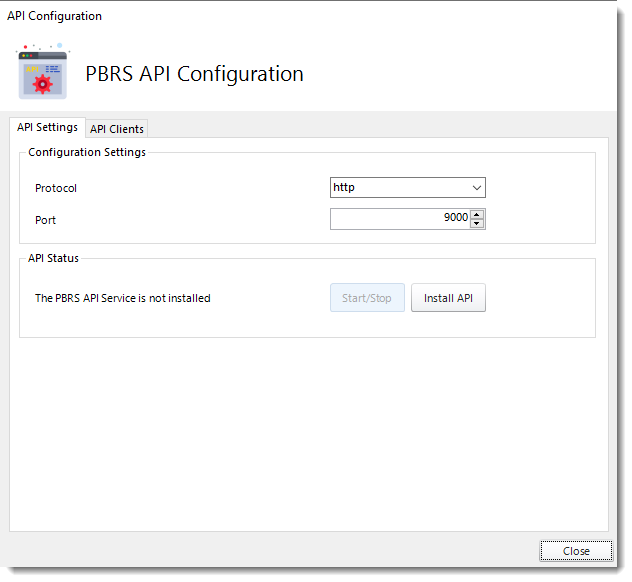
Step 3
To install the API, navigate to the "API status" section on the next screen and click on the "Install API" option.
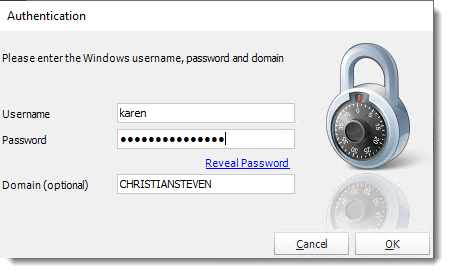
Step 4
During the installation process, you will be prompted to enter the Windows credentials for the API account. This account will be used by the API to perform various tasks. Once you have entered the credentials, simply click on the "OK" button to proceed with the installation.
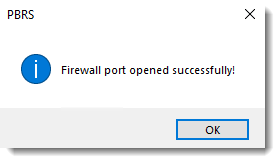
After successfully installing the API service, a popup will appear asking you to click "Yes" to open port 9000 on your firewall. This port is used by the API to communicate with other instances of PBRS.
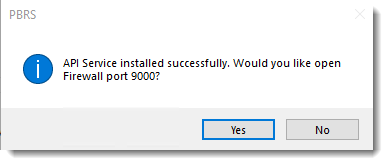
Once the port has been successfully opened, a notification will appear. Simply click "OK" to dismiss it.
Step 5
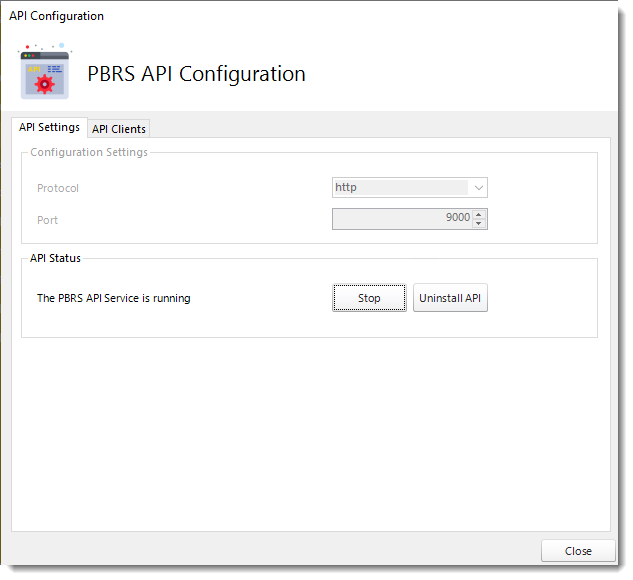
After successfully installing the PBRS API, you will need to start the API service for it to function properly. To do this, go to the API Status section and simply click on the "Start" button to initiate the service.
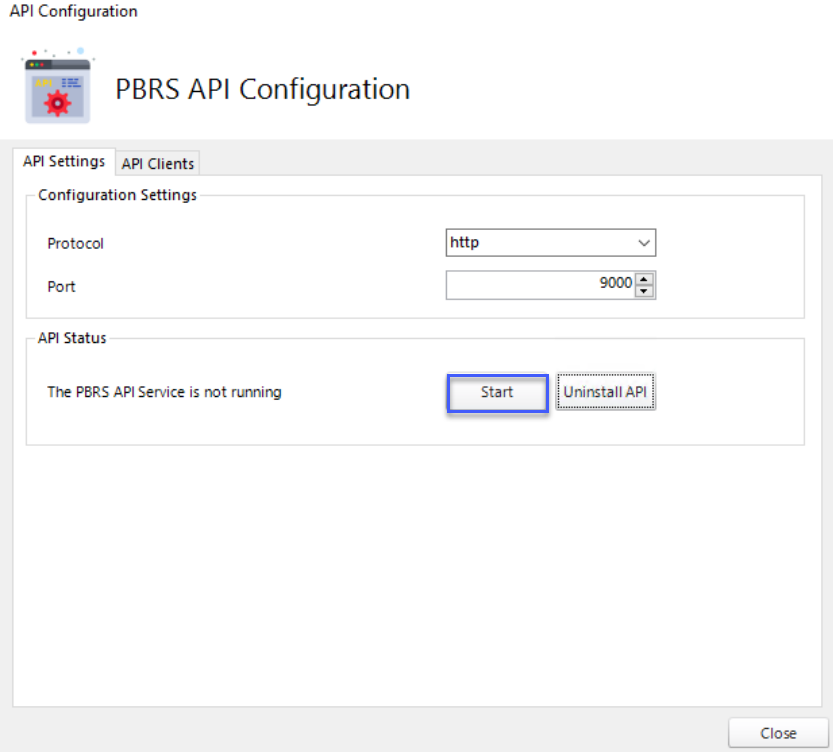
Here is how the PBRS API Configurations screen will appear:
To ensure proper functioning of Collaboration and Failover, it is important to follow Steps 1-5 on all servers. This will enable seamless coordination between servers and maintain uninterrupted scheduling and report delivery.
Part 2 - Set up and Configure "Collaboration"
Requirements
- Each PBRS instance must be accessible through the internal network.
- In order to ensure that reports and schedules are processed and delivered correctly, it is important to configure the correct email, database, and system settings on both the Collaborator servers and the Primary server. It is essential that the settings on each Collaborator server match those on the Primary Server.
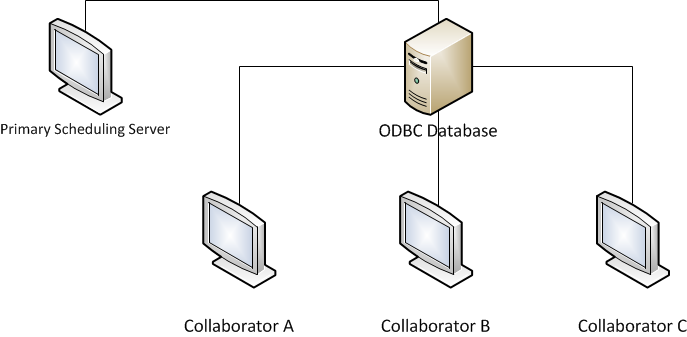
- The database of the Primary Server needs to be transferred to an instance in your Enterprise SQL Server. Moreover, it is essential for each collaborator to establish a connection with the primary scheduler's database.
Collaborator Servers in PBRS are specifically designed to handle schedules that have been assigned to them by the Primary Server. It is important to note that Collaborators do not run their own local schedules. Instead, they rely on the Primary Server for scheduling and processing tasks.
The next steps are performed on the Primary Server. By following these steps, you will be able to add the Collaboration Servers to the collaboration ring, which is managed exclusively on the Primary Server.
Step 1
On the Primary Scheduling Server Select System.

Step 2
Choose the "Collaboration" option.
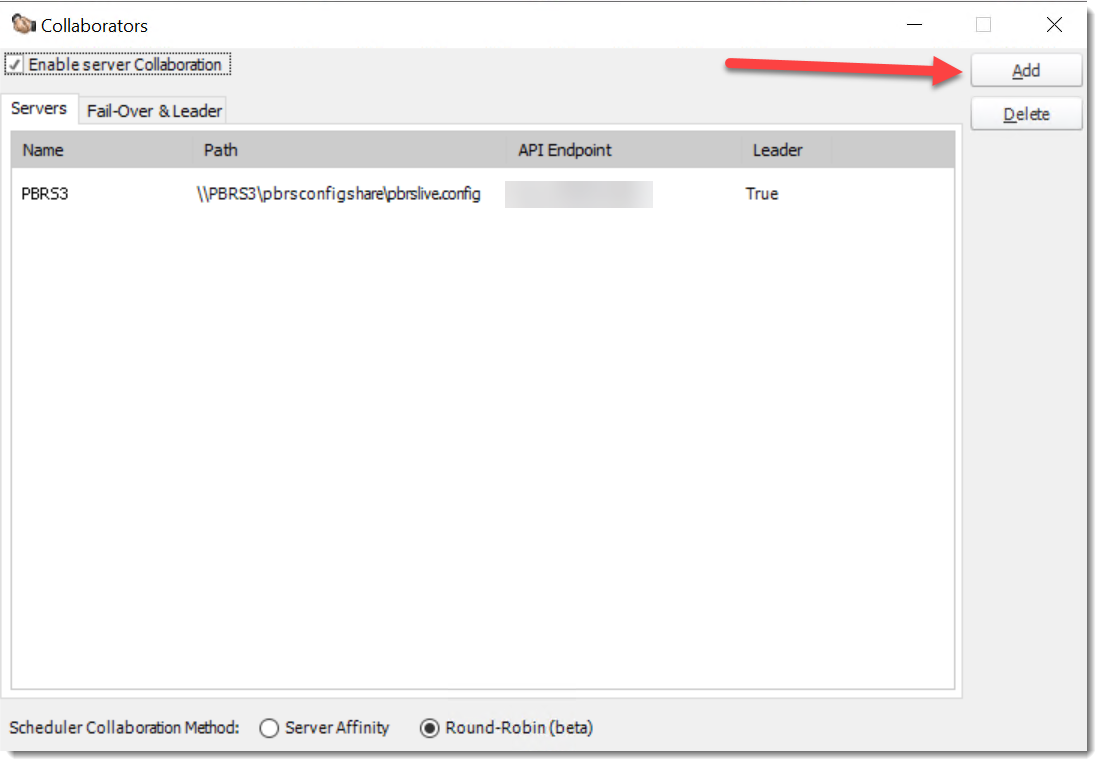
Step 3
To enable server collaboration, simply select the "Enable server Collaboration" option and then click on the "Add" button.
Step 4
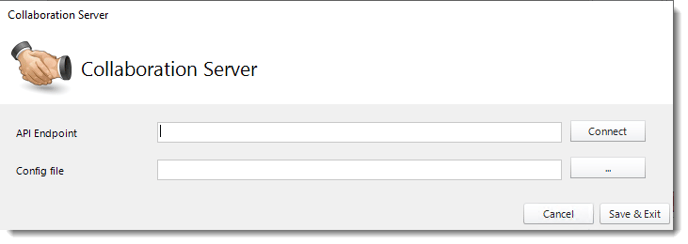
If you have the Server API Endpoint information, you have the option to manually enter it in the API Endpoint Textbox. Alternatively, you can click on the (...) button located next to the Config file Text Box. This will allow you to browse the network and select the PBRS Collaboration Server config file. Once you have selected the file, simply click the Connect button to establish the connection.
Step 5
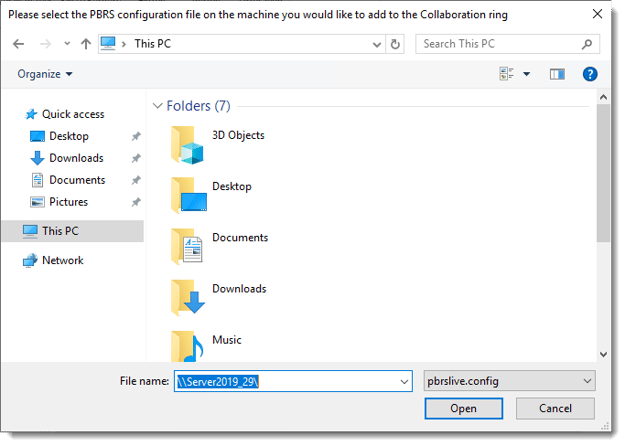
Enter the Server Name in the File Name textbox and then click on the Open button to proceed.
Step 6
Access the pbrsconfigshare folder.
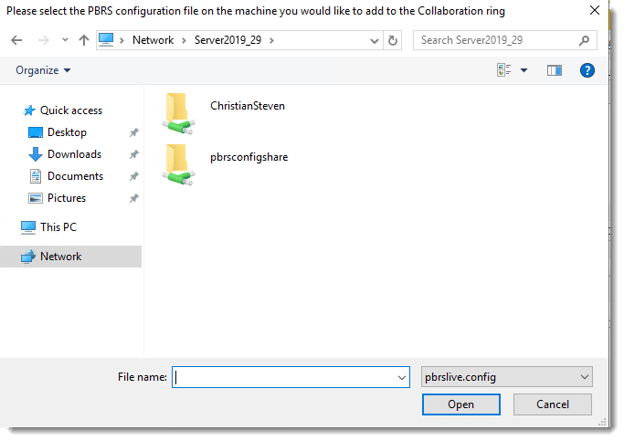
Step 7
Select the pbrslive.config file from the pbrsconfigshare folder and click on the Open button.
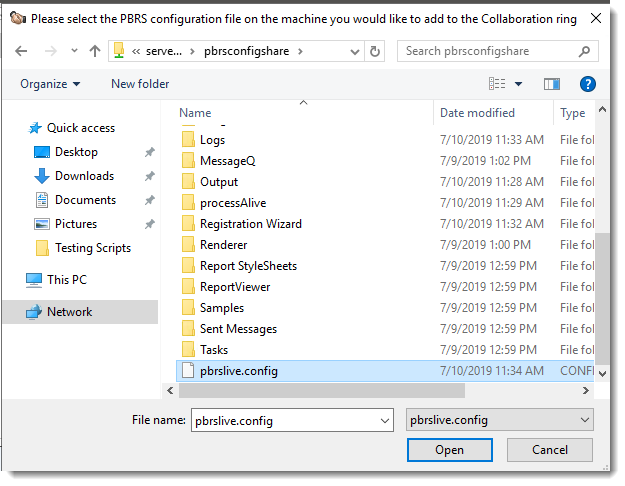
Step 8
Click on the Connect button and then Save & Exit the configuration.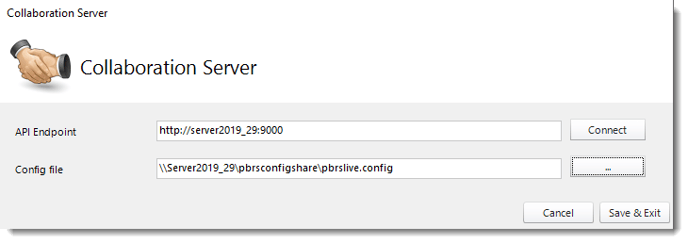
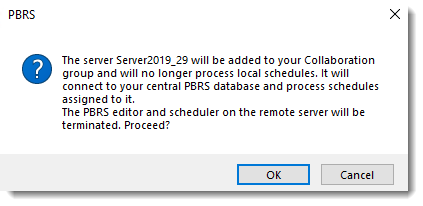
Step 9
A pop-up message will appear. Click "OK" to stop the Editor and Scheduler on the Remote Server.
Step 10
You will be asked to provide the Windows credentials that have read and write access to the remote machine. Once you have entered the credentials, click the "OK" button to continue with the collaboration set up.

A PBRS Collaborator server has been successfully added to the PBRS Primary Scheduling Server, allowing for seamless collaboration and coordination between servers.
To add additional servers to the Collaboration ring, follow Steps 4-10 for each server in the Collaboration ring.
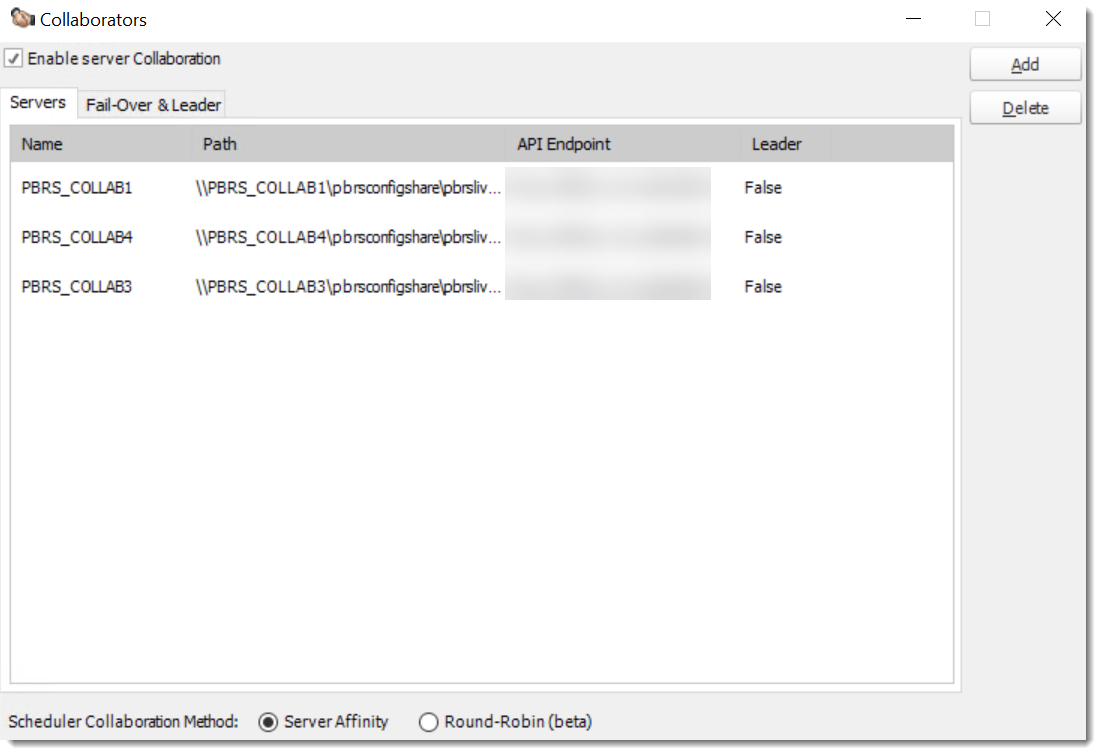
Scheduler Collaboration Method:
Server Affinity: Select this method if you want to choose a specific server to execute a schedule. By using this method, you will have the ability to personally select a server to carry out the scheduled task. This option will be available in the schedule wizard and schedule properties, giving you full control over which server is assigned to execute the schedule.
Round-Robin: This method is ideal when you do not have a specific preference for which server should execute a schedule. With Round-Robin, the schedules that are ready to run will be evenly distributed among the servers. This means that the Collaboration server affinity selected in the Schedule Wizard or schedule properties will be disregarded, and any available server will be chosen to execute the schedule.
Part 3 - Set up and Configure Failover
The Failover Server will become the Main Scheduler in the event that the Primary Server fails.
The next steps are performed on the Failover Server.
Step 1
To designate a server as the Failover Server, access the server and open the PBRS application. Then, click on the "Options" tab in the application menu.
Step 2
Navigate to the Scheduler Tab and choose the option 'Use as a backup scheduler server (Failover)'.
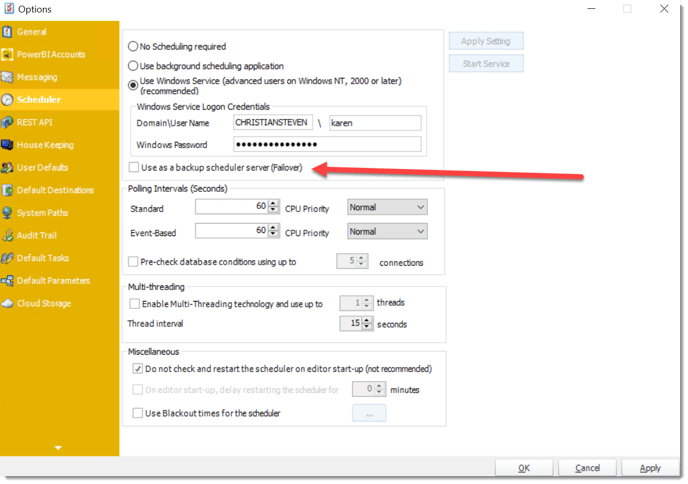
Step 3
After making this change, click on the Apply and OK buttons to save the settings.
Step 4
To complete the process, restart the Failover Server.
In summary
Once you have completed all the necessary steps, the Failover Server will be successfully set up and configured. It will now actively monitor the Primary server and be ready to take over the scheduling in the event that the Primary Server experiences a failure.