![CSS-CMYK-logo-2015-2.png]](https://go.christiansteven.com/hs-fs/hubfs/social-suggested-images/CSS-CMYK-logo-2015-2.png?height=40&name=CSS-CMYK-logo-2015-2.png)
Before You Begin
Before managing users and groups, make sure:
- You can sign in to the PBRS Web Application.
- Your account has the necessary permissions to access User Manager and Group Manager.
- You know which users and groups need to be created or updated.
- You have identified the schedules users should be able to access.
- You understand which application features, destinations, folders, and custom tasks each group should be permitted to use.
Important: Group permissions determine which PBRS features users can access. Review these permissions carefully before granting access to administrative functions or sensitive reporting resources.
Access User Manager in the PBRS Web Application
The User Manager allows administrators to manage user accounts, configure security settings, assign users to groups, and control access to schedules within the PBRS Web Application.
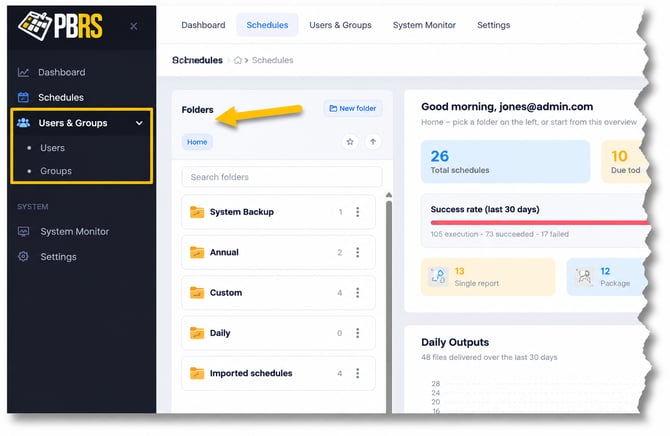
To access User Manager:
- Sign in to the PBRS Web Application using an account with the appropriate administrative permissions.
- From the left navigation menu, locate Users & Groups.
- Select Users & Groups to expand the menu.
- Select Users to open User Manager.
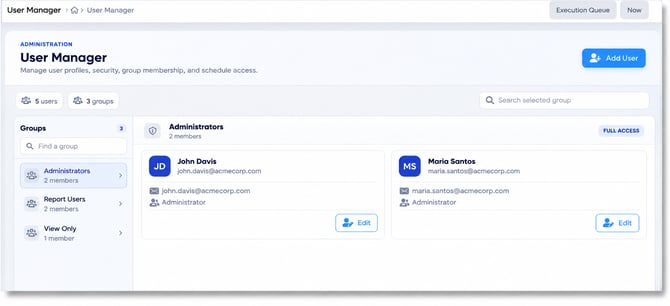
Understanding the User Manager Screen
The User Manager screen provides a central location for viewing and managing user accounts in the PBRS Web Application.
Users are organized by their assigned groups, making it easier for administrators to manage group membership, user security, and schedule access.
The User Manager screen includes the following options:
|
Option |
Description |
|---|---|
|
Users |
Displays the total number of user accounts configured in PBRS. |
|
Groups |
Displays the total number of configured user groups. |
|
Groups Panel |
Lists the available groups and the number of users assigned to each group. |
|
Find a group |
Allows you to search for a specific user group. |
|
User Cards |
Display user information, including the user's name, email address, and assigned group. |
|
Search selected group |
Allows you to search for users within the currently selected group. |
|
Edit |
Opens the selected user's configuration for modification. |
|
Add User |
Opens the Add User window to create a new user account. |
Create a New User in the PBRS Web Application
The User Manager allows administrators to create new user accounts, manage existing users, and assign users to groups within the PBRS Web Application.
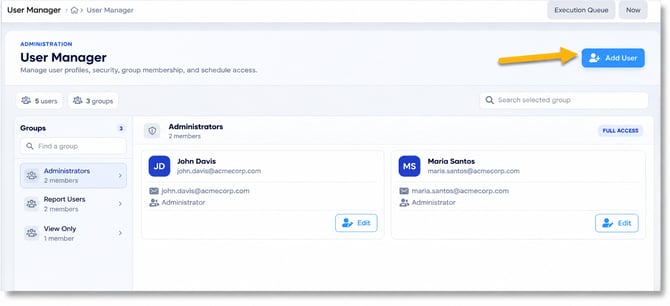
Users are organized by their assigned groups, making it easier to manage access permissions and reporting responsibilities.
To create a new user:
- From the User Manager screen, review the existing user groups displayed in the left panel.
- Select the appropriate group to view its current members.
- Select Add User in the upper-right corner of the screen.
- The Add User window opens, allowing you to enter the new user's details and configure their account.
Note: You can also manage existing users by selecting Edit on their user card. This allows you to update their account information and settings.
Configure the New User's Details
The General tab of the Add User window allows you to enter the user's account information, assign them to a group, and enable two-factor authentication (2FA) for additional security.
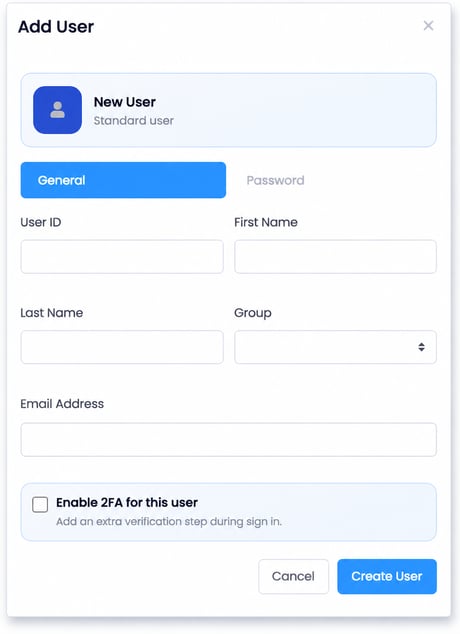
- In User ID, enter a unique username that the user will use to sign in to the PBRS Web Application.
- In First Name, enter the user's first name.
- In Last Name, enter the user's last name.
- Under Group, select the group to which the user should belong. The selected group determines the user's application permissions and access restrictions.
- In Email Address, enter the user's email address.
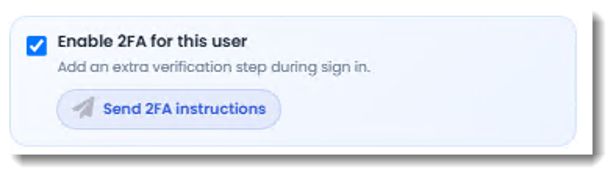
- To require an additional verification step when the user signs in, select Enable 2FA for this user. Then select Send 2FA instructions
- Once the user's information has been entered, select the Password tab to configure their password before creating the account.
Important: Assign users to the appropriate group based on the permissions they require. Avoid granting administrative permissions unless they are necessary for the user's responsibilities.
Configure the New User's Password
The Password tab allows you to set the password the new user will use to sign in to the PBRS Web Application.
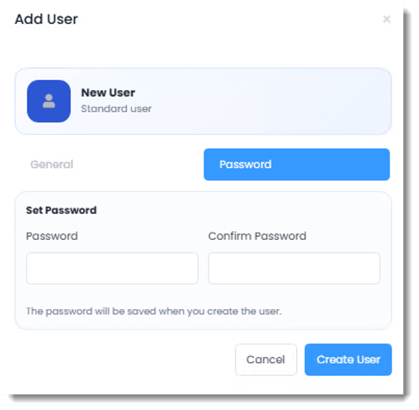
- Under Set Password, enter the user's password in the Password field.
- Re-enter the same password in Confirm Password.
- Confirm that both passwords match.
- Review the information entered under the General and Password tabs.
- Select Create User to save the new user account.
Note: The password is saved when you select Create User. Ensure that the password meets your organization's security requirements.
Important: If you enabled two-factor authentication (2FA) on the General tab, the user will also need to complete the additional verification process when signing in.
Assign Schedules to a User
The User Manager allows administrators to assign specific schedules to individual users, controlling which schedules they can access and execute within the PBRS Web Application.
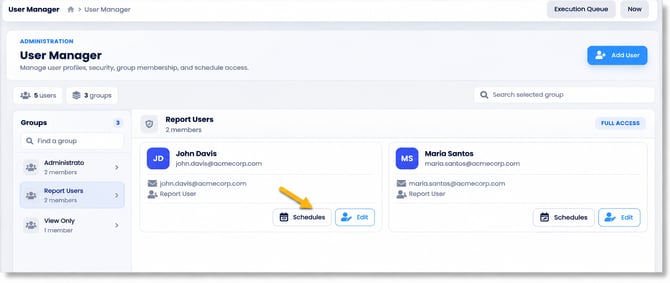
Once a user has been created, you can manage their schedule access directly from their user account.
- Open User Manager from the Users & Groups menu.
- In the Groups panel, select the group containing the user whose schedule access you want to configure.
- Locate the user in the list of group members.
- Select Schedules on the user's card.
- The User Schedules window opens, allowing you to manage the schedules assigned to that user.
Note: The Schedules button provides access to schedule assignments for the selected user. The schedules available for assignment may depend on the user's group permissions and configured access restrictions.
Configure User Schedule Assignments
The User Schedules window allows administrators to control which PBRS schedules a user can view and execute. You can assign individual schedules to a user, remove existing assignments, and optionally grant ownership of selected schedules.
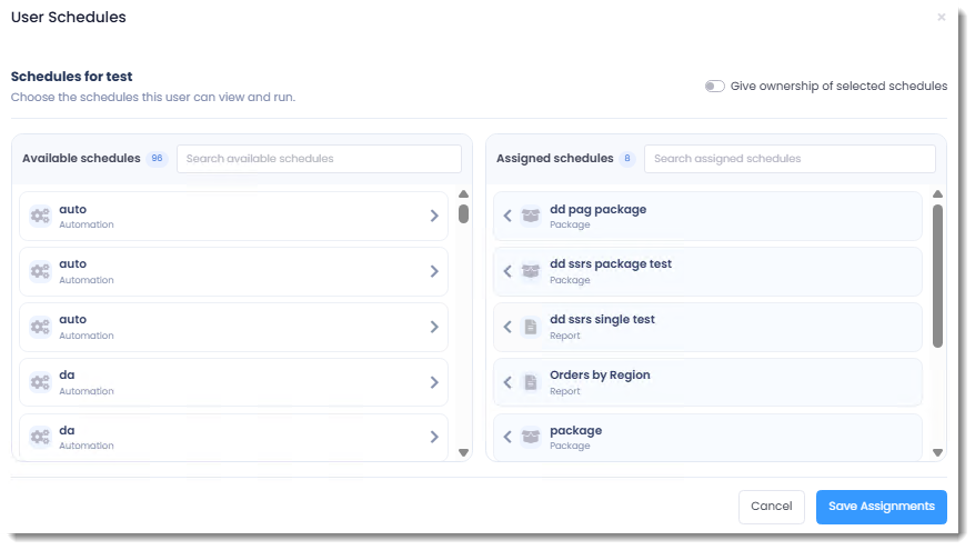
The window is divided into two panels:
|
Option |
Description |
|---|---|
|
Available schedules |
Displays schedules that are available to assign to the selected user. |
|
Assigned schedules |
Displays schedules currently assigned to the user. |
|
Search available schedules |
Searches for a specific schedule in the available list. |
|
Search assigned schedules |
Searches for a schedule already assigned to the user. |
|
Give ownership of selected schedules |
Allows the administrator to grant ownership of the selected schedules to the user. |
|
Save Assignments |
Saves the changes made to the user's schedule assignments. |
Assign or Remove Schedules
- In the User Schedules window, locate the required schedule under Available schedules.
- Select the right arrow (›) beside the schedule to move it into Assigned schedules.
- Repeat this process for any additional schedules the user should be able to access.
- To remove an assignment, select the left arrow (‹) beside the schedule under Assigned schedules.
- If required, enable Give ownership of selected schedules to grant the user ownership of the selected schedules.
- Review the Assigned schedules list to confirm the correct schedules have been selected.
- Select Save Assignments to save the changes.
Important: Assigning a schedule allows the user to access it according to their configured permissions. Granting ownership is a separate action and should only be used when the user requires ownership of those schedules.
Manage Groups in the PBRS Web Application
The Group Manager allows administrators to create and manage user groups, configure application permissions, and control access to destinations, folders, and custom tasks.
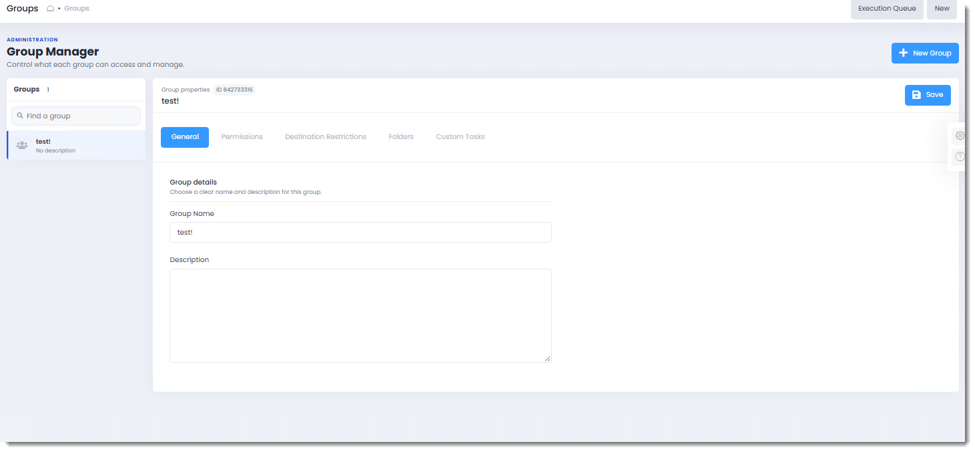
Groups help administrators manage permissions consistently across multiple users without configuring each user's access individually.
Access Group Manager
- From the PBRS Web Application navigation menu, expand Users & Groups.
- Select Groups to open Group Manager.
- The existing groups are displayed in the left panel.
- Select a group to view or modify its configuration, or select New Group to create a group.
Configure Group Details
The General tab allows you to define the group's name and description.
- In Group Manager, select an existing group from the left panel or select New Group.
- Under General, enter or update the Group Name.
- In Description, enter a brief explanation of the group's purpose or the access its members require.
- Select Save to save the group details.
Tip: Use descriptive group names that reflect the users' responsibilities, such as Report Administrators, Report Users, or Read-Only Users. This makes it easier to identify the appropriate group when creating user accounts.
Configure Group Permissions
The Permissions tab in Group Manager allows administrators to control which PBRS application features and functions are available to members of a group.
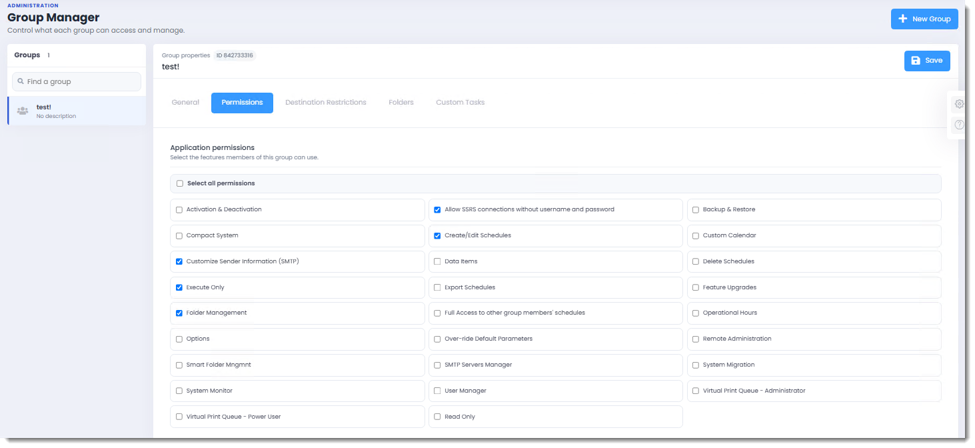
Permissions are assigned at the group level, helping ensure that users have access only to the features required for their responsibilities.
- In Group Manager, select the group you want to configure from the left panel.
- Select the Permissions tab.
- Under Application permissions, review the available permissions.
- Select the checkbox beside each permission you want to grant to members of the group.
- To grant all available permissions, select Select all permissions.
- Leave permissions unchecked when group members should not have access to those functions.
- Select Save to apply the changes.
Important: Grant permissions according to the principle of least privilege. Administrative functions such as User Manager, Backup & Restore, Remote Administration, and Delete Schedules should only be available to authorized users.
Available Application Permissions
The following permissions are displayed in the PBRS Web Application.
|
Permission |
Description |
|---|---|
|
Activation & Deactivation |
Allows access to software activation and deactivation functions. |
|
Allow SSRS connections without username and password |
Permits SSRS connections without explicitly supplying username and password credentials. |
|
Backup & Restore |
Allows access to system backup and restore functions. |
|
Compact System |
Allows access to system compaction functions. |
|
Create/Edit Schedules |
Allows users to create and modify schedules. |
|
Custom Calendar |
Allows access to custom calendar configuration. |
|
Customize Sender Information (SMTP) |
Allows users to customize sender information for email delivery. |
|
Data Items |
Allows access to PBRS Data Items. |
|
Delete Schedules |
Allows users to delete schedules. |
|
Execute Only |
Restricts users to executing schedules rather than modifying their configuration. |
|
Export Schedules |
Allows users to export schedules. |
|
Feature Upgrades |
Allows access to feature upgrade functions. |
|
Folder Management |
Allows users to manage schedule folders. |
|
Full Access to Other Group Members' Schedules |
Allows access to schedules belonging to other members of the same group. |
|
Operational Hours |
Allows access to operational hours configuration. |
|
Options |
Allows access to application options. |
|
Override Default Parameters |
Allows users to override default report parameters. |
|
Remote Administration |
Allows access to remote administration functions. |
|
Smart Folder Management |
Allows access to Smart Folder management. |
|
SMTP Servers Manager |
Allows users to manage SMTP server configurations. |
|
System Migration |
Allows access to system migration functions. |
|
System Monitor |
Allows access to system monitoring features. |
|
User Manager |
Allows access to user management functions. |
|
Virtual Print Queue – Administrator |
Grants administrative access to the Virtual Print Queue. |
|
Virtual Print Queue – Power User |
Grants power-user access to the Virtual Print Queue. |
|
Read Only |
Restricts users to read-only access where supported. |
Configure Destination Restrictions
The Destination Restrictions tab in Group Manager allows administrators to control which delivery destination types members of a group can use when configuring report schedules.
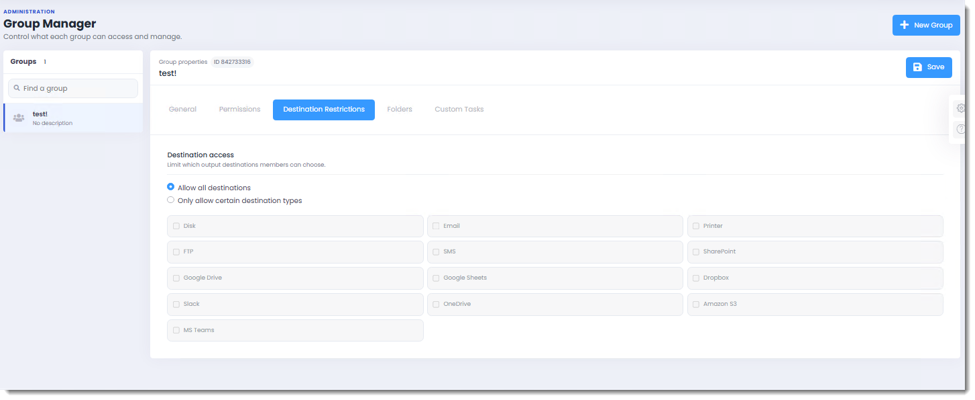
By default, a group can be configured to allow all destination types. Alternatively, administrators can restrict the group to specific delivery methods.
- In Group Manager, select the group you want to configure.
- Select the Destination Restrictions tab.
- Under Destination access, choose one of the following options:
- Allow all destinations — Members of the group can use all available destination types.
- Only allow certain destination types — Restricts members to the destination types you select.
- If you select Only allow certain destination types, check the boxes beside the destinations the group is permitted to use.
- Review the selected destination types to ensure they meet the group's reporting and delivery requirements.
- Select Save to apply the restrictions.
Available Destination Types
The screenshot shows the following destination types that can be permitted or restricted:
|
Destination Type |
Description |
|---|---|
|
Disk |
Save generated reports to a file system location. |
|
|
Deliver reports by email. |
|
Printer |
Send reports to a configured printer. |
|
FTP |
Transfer reports to an FTP destination. |
|
SMS |
Send supported report notifications or information by SMS. |
|
SharePoint |
Deliver reports to a SharePoint location. |
|
Google Drive |
Upload reports to Google Drive. |
|
Google Sheets |
Deliver supported report data to Google Sheets. |
|
Dropbox |
Upload reports to Dropbox. |
|
Slack |
Deliver supported report output or notifications through Slack. |
|
OneDrive |
Save reports to Microsoft OneDrive. |
|
Amazon S3 |
Upload reports to Amazon S3 storage. |
|
MS Teams |
Deliver supported report output or notifications through Microsoft Teams. |
Important: Destination restrictions control which delivery methods group members can select. They do not replace the authentication credentials, connection settings, or permissions required to use the destination.
Configure Group Folder Access
The Folders tab in Group Manager allows administrators to control which folders members of a group can access within the PBRS Web Application.
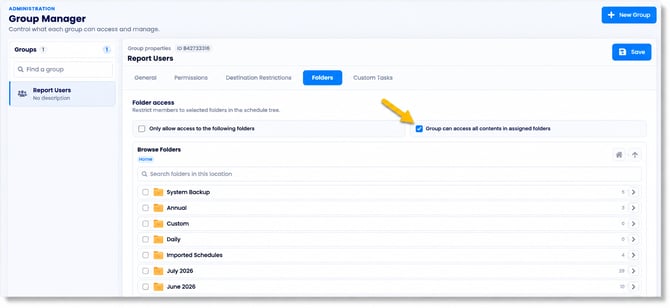
Folder restrictions help ensure that users can only access schedules and reports relevant to their responsibilities.
- In Group Manager, select the group you want to configure.
- Select the Folders tab.
- Under Folder access, enable Only allow access to the following folders to restrict the group to specific folders.
- Under Browse Folders, navigate through the available folders and select the checkbox beside each folder the group should be permitted to access.
- If required, enable Group can access all contents in assigned folders to allow group members to access all contents within the selected folders.
- Review the selected folders and access settings.
- Select Save to apply the changes.
Folder Access Options
|
Option |
Description |
|---|---|
|
Only allow access to the following folders |
Restricts group members to the folders selected under Browse Folders. |
|
Group can access all contents in assigned folders |
Allows group members to access all contents within the folders assigned to their group. |
|
Browse Folders |
Displays the available PBRS folders for selection. |
|
Search folders in this location |
Allows administrators to locate a folder within the current folder location. |
|
Folder navigation |
Allows administrators to browse the folder structure and select the required folders. |
Important: The Group can access all contents in assigned folders option provides broader access within the selected folders. Enable this option only when group members should have access to all the contents of those folders.
If this option is not enabled, access to individual schedules may need to be configured separately through the user's schedule assignments.
Configure Group Custom Task Permissions
The Custom Tasks tab in Group Manager allows administrators to control which categories of PBRS Custom Tasks members of a group can access.
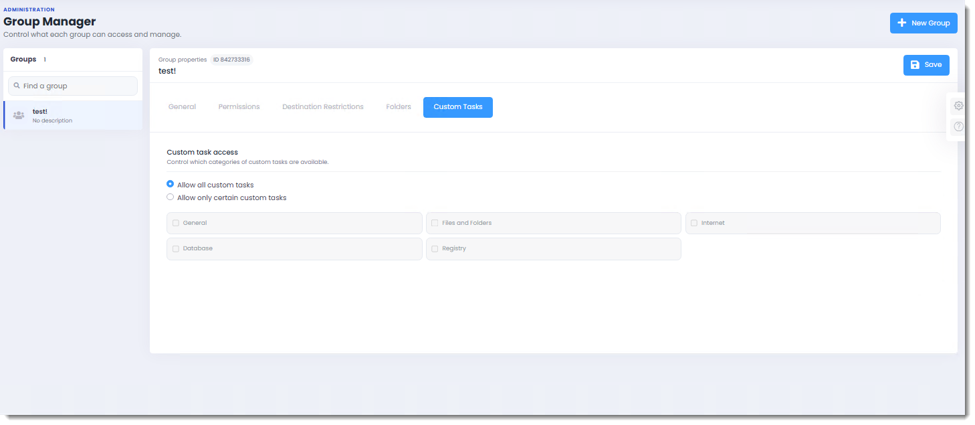
Custom Task restrictions help ensure that users can only configure and use the task types required for their reporting responsibilities.
- In Group Manager, select the group you want to configure.
- Select the Custom Tasks tab.
- Under Custom task access, choose one of the following options:
- Allow all custom tasks — Members of the group can access all available Custom Task categories.
- Allow only certain custom tasks — Restricts members to the selected Custom Task categories.
- If you select Allow only certain custom tasks, select the checkbox beside each category the group should be permitted to use.
- Review the selected categories to ensure they meet the group's requirements.
- Select Save to apply the restrictions.
Available Custom Task Categories
|
Category |
Description |
|---|---|
|
General |
Custom Tasks that perform general operations. |
|
Files and Folders |
Custom Tasks that perform file and folder operations. |
|
Internet |
Custom Tasks that perform internet-related operations. |
|
Database |
Custom Tasks that interact with databases. |
|
Registry |
Custom Tasks that perform Windows Registry operations. |
Important: Some Custom Tasks can modify files, databases, or system settings. Restrict access to these categories based on the user's responsibilities and your organization's security requirements.
Note: Custom Task permissions determine which categories are available to group members. They do not replace any operating system permissions, credentials, or network access required for the tasks to execute successfully.
Troubleshooting
The following troubleshooting steps address common issues encountered when creating users, configuring two-factor authentication (2FA), assigning schedules, and managing group permissions in the PBRS Web Application.
Unable to Access User Manager or Group Manager
Possible cause: The user's assigned group does not have permission to access the required administrative functions.
Resolution:
- Sign in using an account with administrative permissions.
- Navigate to Users & Groups > Groups.
- Select the group to which the affected user belongs.
- Open the Permissions tab.
- Confirm that the appropriate User Manager permission is enabled.
- Select Save if changes are made.
- Have the affected user sign out and sign back in, then check whether the required functionality is available.
Note: Access to administrative features depends on the permissions assigned to the user's group.
Unable to Create a New User
Possible cause: Required user information is missing, the User ID is already in use, or the password configuration is incomplete.
Resolution:
- Open User Manager and select Add User.
- Confirm that the User ID is unique.
- Complete the First Name, Last Name, and Email Address fields.
- Select the appropriate Group.
- Open the Password tab and confirm that the password and confirmation match.
- Select Create User again.
- If the user cannot be created, review any validation or error messages displayed by PBRS.
The User Cannot Complete Two-Factor Authentication (2FA)
Possible cause: The user's email address is incorrect, the 2FA instructions have not been received, or the verification process has not been completed.
Resolution:
- Open User Manager and locate the affected user.
- Select Edit to review the user's account.
- Confirm that the Email Address is correct.
- Verify that Enable 2FA for this user is selected.
- Use Send 2FA Instructions, where available, to provide the user with the setup instructions.
- Ask the user to check their inbox and junk or spam folders.
- If the instructions are not received, ask your email administrator to check whether the message was blocked or quarantined.
Important: If your organization uses restrictive email security policies, the verification message may be filtered before reaching the recipient. Review the mail security logs before assuming that PBRS has failed to send the message.
A User Cannot See an Assigned Schedule
Possible cause: The schedule has not been assigned to the user, or the user's group permissions or folder restrictions prevent access.
Resolution:
- Open User Manager.
- Select the group containing the affected user.
- Locate the user and select Schedules.
- Confirm that the required schedule appears under Assigned schedules.
- If necessary, move the schedule from Available schedules to Assigned schedules.
- Select Save Assignments.
- In Group Manager, review the group's Folders settings to confirm that the required folder is accessible.
- Check the group's application permissions to ensure the user has the appropriate schedule access.
A User Cannot Create, Edit, or Execute Schedules
Possible cause: The user's group does not have the required application permissions.
Resolution:
- Open Group Manager and select the affected user's group.
- Select the Permissions tab.
- Review the Create/Edit Schedules, Execute Only, and Read Only permissions.
- Confirm that the group has the permissions appropriate to the user's responsibilities.
- Review any additional permissions that may restrict schedule management.
- Select Save after making changes.
Note: Granting access to a schedule does not necessarily give the user permission to edit or delete it. These actions depend on the group's configured permissions.
A User Cannot Select a Delivery Destination
Possible cause: The required destination type is restricted by the user's group configuration.
Resolution:
- Open Group Manager and select the affected group.
- Select Destination Restrictions.
- Check whether Allow all destinations or Only allow certain destination types is selected.
- If destination types are restricted, confirm that the required destination is enabled.
- Select Save after making changes.
- Ask the user to reopen the schedule and verify that the destination is available.
A User Cannot Access a Folder or Its Contents
Possible cause: The folder has not been assigned to the group, or access to all contents within assigned folders has not been enabled.
Resolution:
- Open Group Manager and select the affected group.
- Select the Folders tab.
- Review Only allow access to the following folders.
- Confirm that the required folder has been selected.
- If the group should have access to all contents within its assigned folders, enable Group can access all contents in assigned folders.
- Select Save.
- If necessary, review the user's individual schedule assignments.
Important: Enabling access to all contents within assigned folders may grant broader schedule access than intended. Review the group's requirements before enabling this option.
A Custom Task Category Is Not Available
Possible cause: The user's group is restricted from accessing the required Custom Task category.
Resolution:
- Open Group Manager and select the affected group.
- Select the Custom Tasks tab.
- Review whether Allow all custom tasks or Allow only certain custom tasks is selected.
- If access is restricted, confirm that the required category is enabled.
- Select Save after making changes.
- Verify that the user can access the required Custom Task category.
Need Additional Help?
If you continue to experience issues after following the troubleshooting steps above, please contact ChristianSteven Support for further assistance.
Before contacting ChristianSteven Support, collect the following information:
- PBRS version and build number.
- The affected user and assigned group.
- The feature or permission that is not working as expected.
- Any relevant group permission, destination, folder, or Custom Task restrictions.
- The exact error message and relevant PBRS Error Log entries.
- Screenshots showing the affected configuration, with passwords and sensitive information removed.