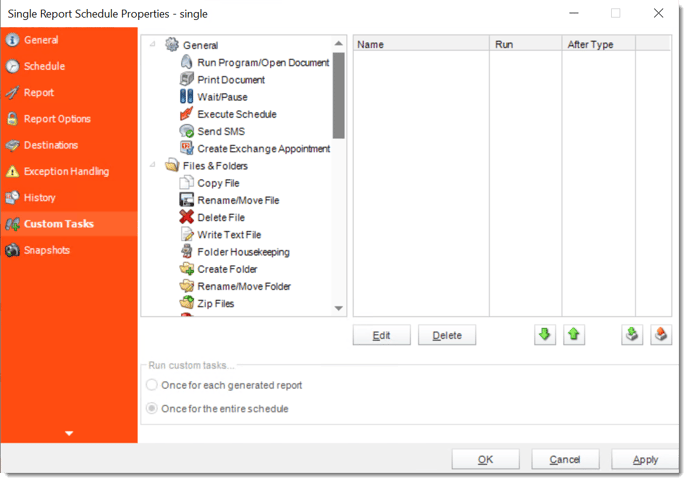
Custom Tasks - Database
- In the Schedule Wizard, go to Custom Tasks.
Database Tasks
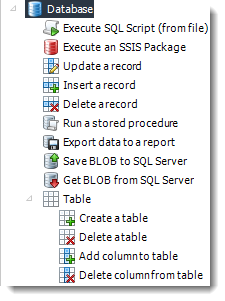
- One of the most powerful features in CRD, The Database module forms a core part of CRD's Data integration capabilities.
- With the ability to automatically update databases, create tables, and edit records, you can automate thousands of database processes.
Tip: Combine the Database Tasks with the Event Based Schedule to create database alerts and data migration processes.
IMPORTANT: These tasks will make modifications to database tables which, in some cases, may be irreversible. Please ensure that you review the resulting scripts and test them thoroughly on a Test system before committing them to your production (live) system.
Make sure you take a full backup of your database before any testing.
Execute SQL Script (from file)
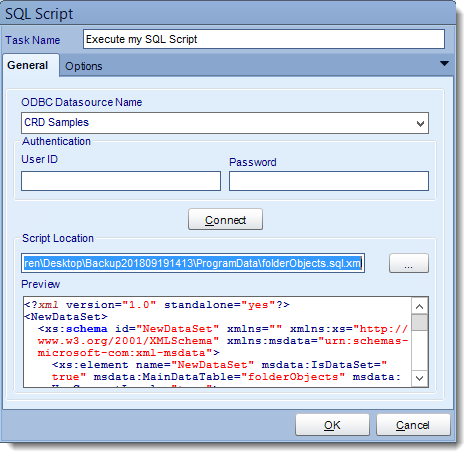
General
- ODBC Datasource Name: Drop down and select a DSN.
We strongly recommend System DSNs so that the DSN is visible to CRD even when the user associated with the DSN is logged off.
All communication to databases (including Access databases) is done through ODBC, so you must setup a system DSN to the database before you can use this facility.
When setting up DSNs we recommend (if possible) that you use Windows Authentication (Trusted Connection). This ensures that your username and password are not required to be stored in CRD (more secure) and overcomes a large number of security restrictions which Windows places on DSNs. When using Windows Authentication, make sure that the CRD NT service user (or background application service user) has full rights to the database otherwise, though you will connect when you are logged in, automated scheduling will fail if the Service user has not got rights to the database.
When setting up a DSN to a SQL server, you must ensure that the "Default Database" setting is set to the database you are connecting to (Windows defaults this to "Master").
- UserID: Enter the User ID CRD should use to log on to the database.
- Password: Enter the password associated with the above user.
- Connect: Click Connect to connect to the Database.
- Script Location: Browse to locate the script.
- Click OK to save the script.
Options
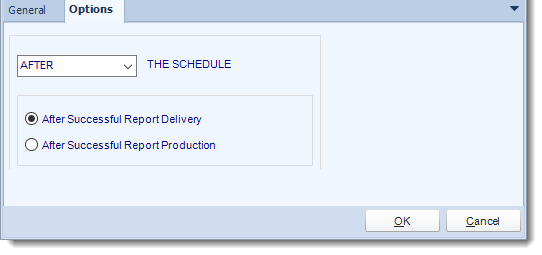
- In this section, you have the option to run this task before, after or you can choose both the schedules executes.
Execute an SSIS Package
General
SQL Server
IMPORTANT: CRD requires SQL Server Integration Services Standard or Enterprise X86 (32bit) installed on the CRD server. ***64bit is not supported***
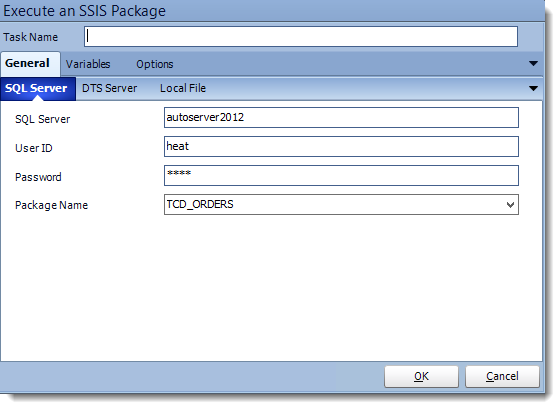
- Task Name: Give the task a name.
- SQL Server: Enter the SQL Server credentials.
- Package Name: Select the package from the drop down list.
- Click OK to save.
DTS Server

- DTS Server: Enter the DTS Server credentials.
- Package Path: Write down the package location.
- Package Name: Select the package from the drop down list.
- Click OK to save.
Local File
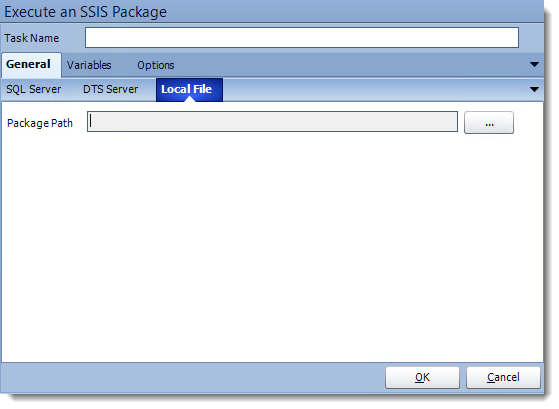
- Package Path: Click (...) to search the package location.
- Package Name: Select the package from the drop down list.
- Click OK to save.
Variables
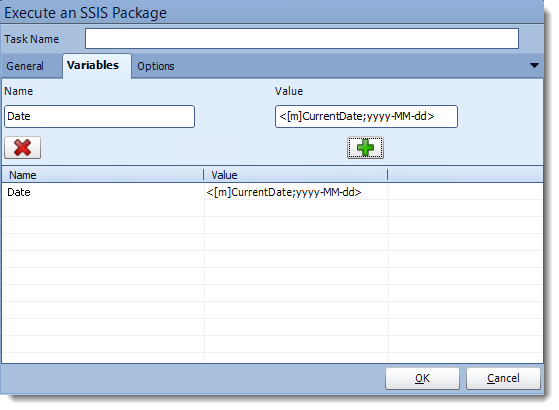
- Add and delete variables for the SSIS package.
Options
- In this section, you have the option to run this task before, after or you can choose both the schedules executes.
Update a record
General
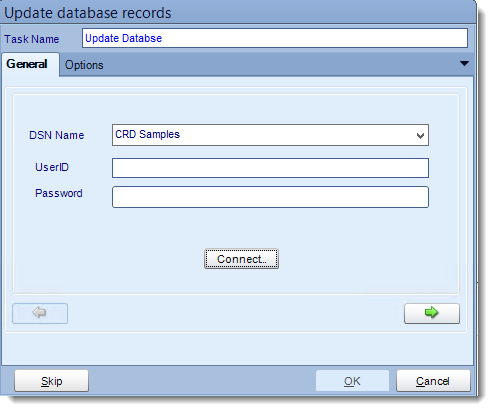
- ODBC Datasource Name: Drop down and select a DSN.
We strongly recommend System DSNs so that the DSN is visible to CRD even when the user associated with the DSN is logged off.
All communication to databases (including Access databases) is done through ODBC, so you must setup a system DSN to the database before you can use this facility.
When setting up DSNs we recommend (if possible) that you use Windows Authentication (Trusted Connection). This ensures that your username and password are not required to be stored in CRD (more secure) and overcomes a large number of security restrictions which Windows places on DSNs. When using Windows Authentication, make sure that the CRD NT service user (or background application service user) has full rights to the database otherwise, though you will connect when you are logged in, automated scheduling will fail if the Service user has not got rights to the database.
When setting up a DSN to a SQL server, you must ensure that the "Default Database" setting is set to the database you are connecting to (Windows defaults this to "Master").
- UserID: Enter the User ID CRD should use to log on to the database.
- Password: Enter the password associated with the above user.
- Connect: Click Connect to connect to the Database.
- Click green arrow to continue.
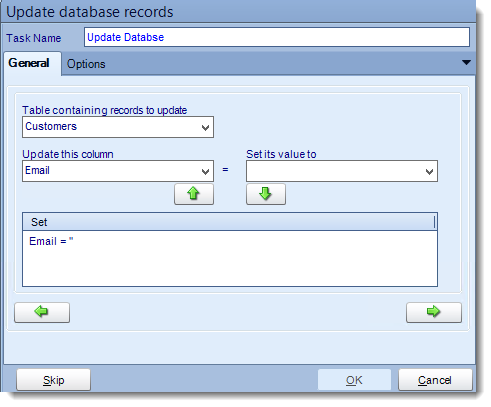
- Table: Select the table containing the record you wish to update.
- Update this column: Select the Column you wish to update.
- Set its value to: Enter the new value.
Tip: Use Event or Data Driven data to update multiple records in the table. It is as easy as drag and drop!
- Click green down arrow to add the change.
- Click green right arrow to continue.
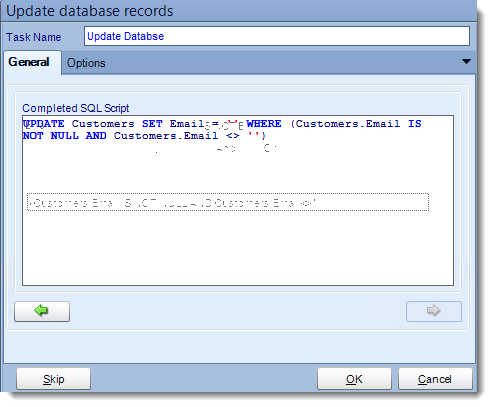
- Review the completed script and make any modifications manually where required.
- Click OK to save the task.
Options
- In this section, you have the option to run this task before, after or you can choose both the schedules executes.
Insert a record
General
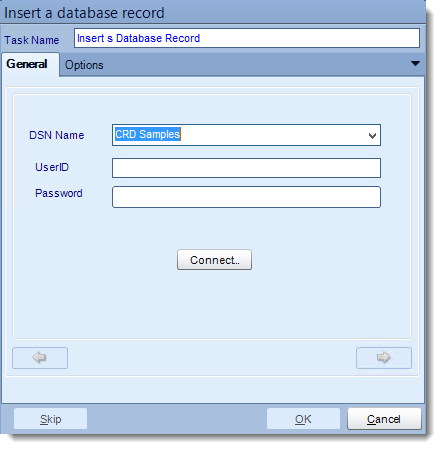
- ODBC Datasource Name: Drop down and select a DSN.
We strongly recommend System DSNs so that the DSN is visible to CRD even when the user associated with the DSN is logged off.
All communication to databases (including Access databases) is done through ODBC, so you must setup a system DSN to the database before you can use this facility.
When setting up DSNs we recommend (if possible) that you use Windows Authentication (Trusted Connection). This ensures that your username and password are not required to be stored in CRD (more secure) and overcomes a large number of security restrictions which Windows places on DSNs. When using Windows Authentication, make sure that the CRD NT service user (or background application service user) has full rights to the database otherwise, though you will connect when you are logged in, automated scheduling will fail if the Service user has not got rights to the database.
When setting up a DSN to a SQL server, you must ensure that the "Default Database" setting is set to the database you are connecting to (Windows defaults this to "Master").
- UserID: Enter the User ID CRD should use to log on to the database.
- Password: Enter the password associated with the above user.
- Connect: Click Connect to connect to the Database.
- Click green arrow to continue.
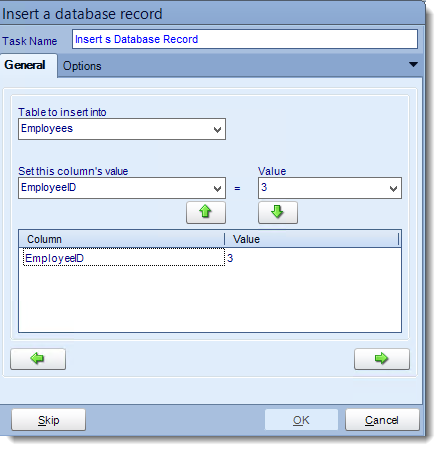
- Table: Select the table to insert the record.
- Column Value: Select a column.
- Value: Provide a value.
- Click green down arrow to add to the list.
- Click green right arrow to continue.
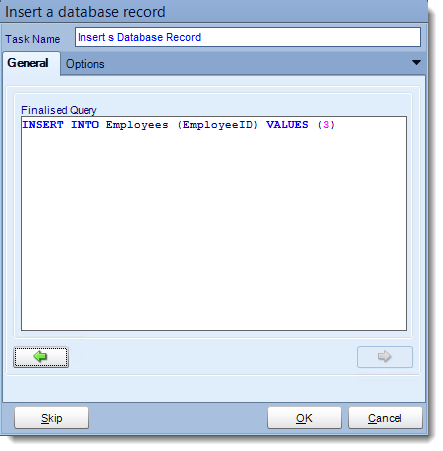
- Review the SQL statement and make modifications manually where required.
- Click OK to save the task.
Options
- In this section, you have the option to run this task before, after or you can choose both the schedules executes.
Delete a record
General
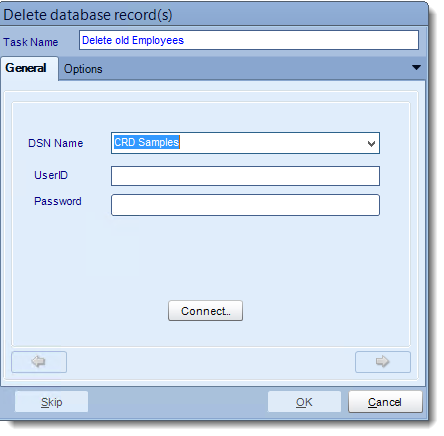
- ODBC Datasource Name: Drop down and select a DSN.
We strongly recommend System DSNs so that the DSN is visible to CRD even when the user associated with the DSN is logged off.
All communication to databases (including Access databases) is done through ODBC, so you must setup a system DSN to the database before you can use this facility.
When setting up DSNs we recommend (if possible) that you use Windows Authentication (Trusted Connection). This ensures that your username and password are not required to be stored in CRD (more secure) and overcomes a large number of security restrictions which Windows places on DSNs. When using Windows Authentication, make sure that the CRD NT service user (or background application service user) has full rights to the database otherwise, though you will connect when you are logged in, automated scheduling will fail if the Service user has not got rights to the database.
When setting up a DSN to a SQL server, you must ensure that the "Default Database" setting is set to the database you are connecting to (Windows defaults this to "Master").
- UserID: Enter the User ID CRD should use to log on to the database.
- Password: Enter the password associated with the above user.
- Connect: Click Connect to connect to the Database.
- Click green arrow to continue.

- Table: Select the table to insert the record.
- Column Value: Select a column.
- Value: Provide a value.
- Click green down arrow to add to the list.
- Click green right arrow to continue.
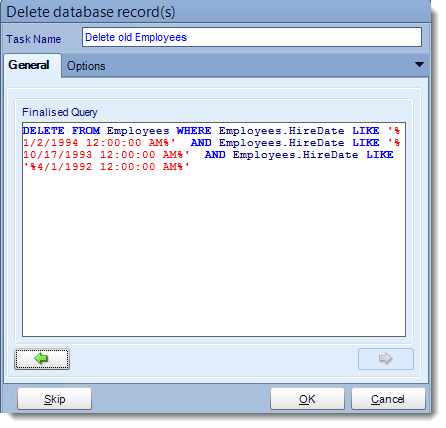
- Review the SQL statement and make modifications manually where required.
- Click OK to save the task.
Options
- In this section, you have the option to run this task before, after or you can choose both the schedules executes.
Run a stored procedure
General
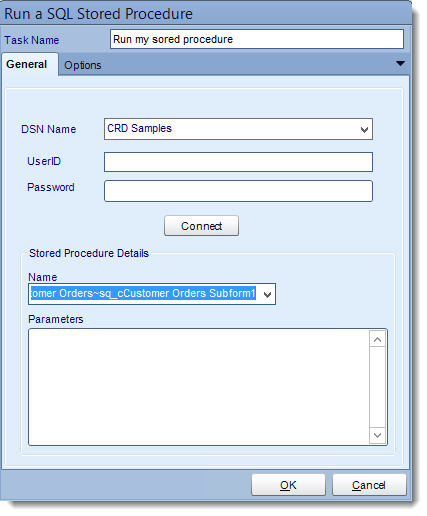
- ODBC Datasource Name: Drop down and select a DSN.
We strongly recommend System DSNs so that the DSN is visible to CRD even when the user associated with the DSN is logged off.
All communication to databases (including Access databases) is done through ODBC, so you must setup a system DSN to the database before you can use this facility.
When setting up DSNs we recommend (if possible) that you use Windows Authentication (Trusted Connection). This ensures that your username and password are not required to be stored in CRD (more secure) and overcomes a large number of security restrictions which Windows places on DSNs. When using Windows Authentication, make sure that the CRD NT service user (or background application service user) has full rights to the database otherwise, though you will connect when you are logged in, automated scheduling will fail if the Service user has not got rights to the database.
When setting up a DSN to a SQL server, you must ensure that the "Default Database" setting is set to the database you are connecting to (Windows defaults this to "Master").
- UserID: Enter the User ID CRD should use to log on to the database.
- Password: Enter the password associated with the above user.
- Connect: Click Connect to connect to the Database.
- Select a Stored Procedure from the list and enter any required parameters.
For example, if you would normally run your stored procedure by using the query
execute myproc para1 para2 para3
then
Connect to the database and select "myproc" from the list.
Enter in the parameters box: para1 para2 para3
- Click OK to save.
Options
- In this section, you have the option to run this task before, after or you can choose both the schedules executes.
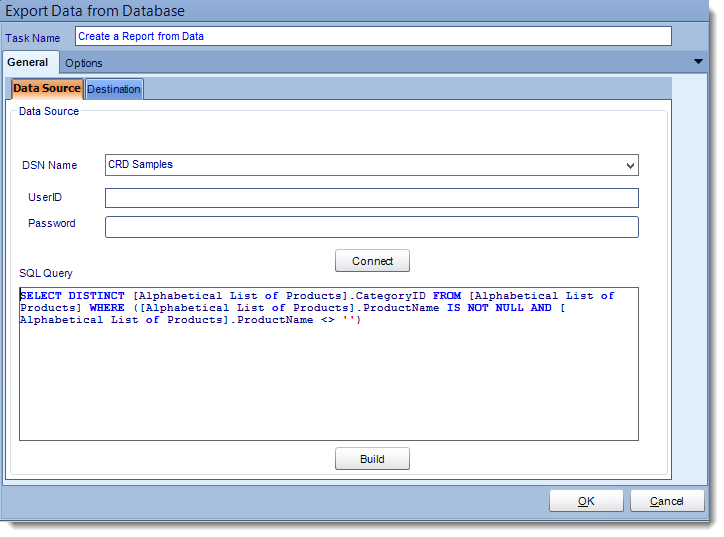
Export data to a report
General
With this task, you can pull data directly from a data source and in any output format, then deliver the report to a destination.
Data Source
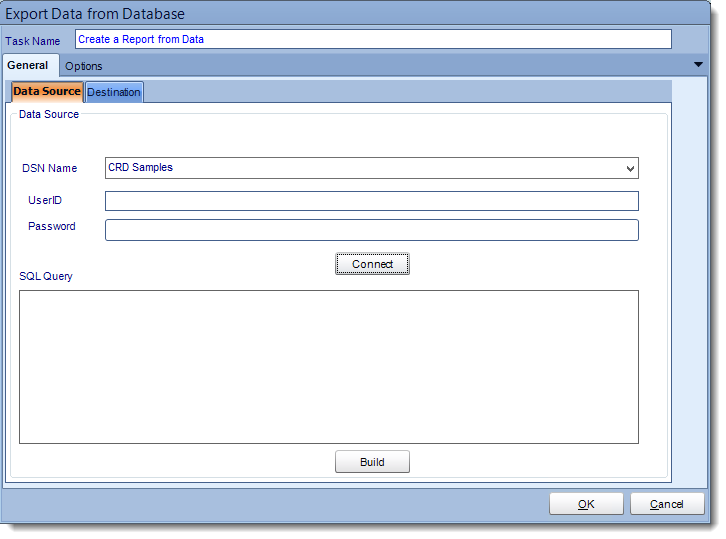
- ODBC Datasource Name: Drop down and select a DSN.
We strongly recommend System DSNs so that the DSN is visible to CRD even when the user associated with the DSN is logged off.
All communication to databases (including Access databases) is done through ODBC, so you must setup a system DSN to the database before you can use this facility.
When setting up DSNs we recommend (if possible) that you use Windows Authentication (Trusted Connection). This ensures that your username and password are not required to be stored in CRD (more secure) and overcomes a large number of security restrictions which Windows places on DSNs. When using Windows Authentication, make sure that the CRD NT service user (or background application service user) has full rights to the database otherwise, though you will connect when you are logged in, automated scheduling will fail if the Service user has not got rights to the database.
When setting up a DSN to a SQL server, you must ensure that the "Default Database" setting is set to the database you are connecting to (Windows defaults this to "Master").
- UserID: Enter the User ID CRD should use to log on to the database.
- Password: Enter the password associated with the above user.
- Connect: Click Connect to connect to the Database.

- Build your query using the Query Tool.
- Parse: Test the Query.
Destination
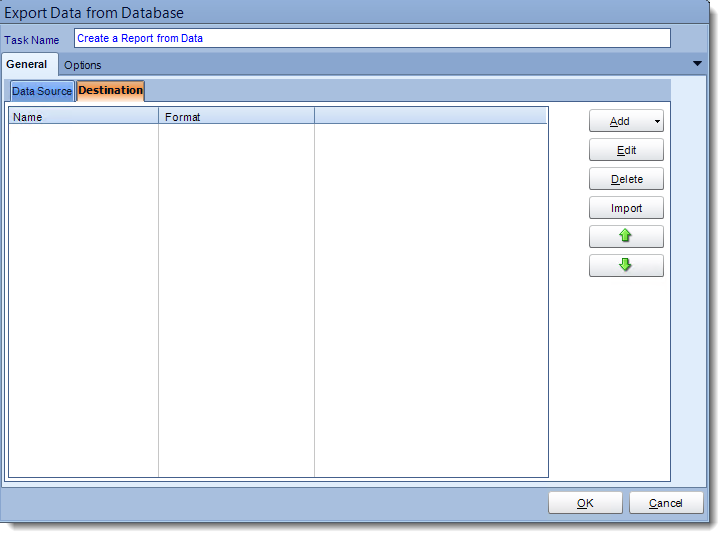
- Go to the Destination Tab. There you can add a destination for the report.
- For more information of Destination, click here.
- Form more information of Output Formats, click here.
Options
- In this section, you have the option to run this task before, after or you can choose both the schedules executes.
Save BLOB to SQL Server
General
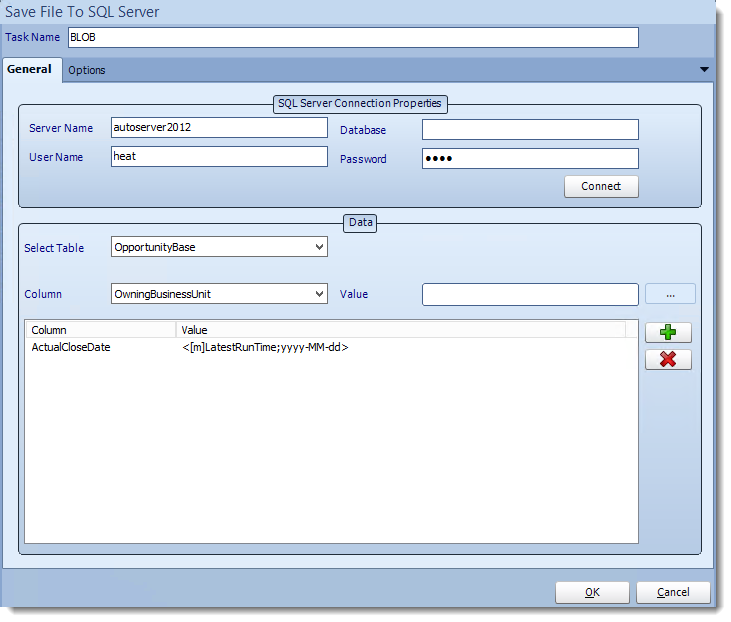
- Task Name: Give the task a name.
- SQL-Server Connection properties: Enter the SQL Server credentials.
- Table: Select the table from the drop down list.
- Column: Select the column.
- Value: set the value of the column.
- Use (+) to add more columns a value as required.
- Click OK to save.
Options
- In this section, you have the option to run this task before, after or you can choose both the schedules executes.
Get BLOB from SQL Server
General
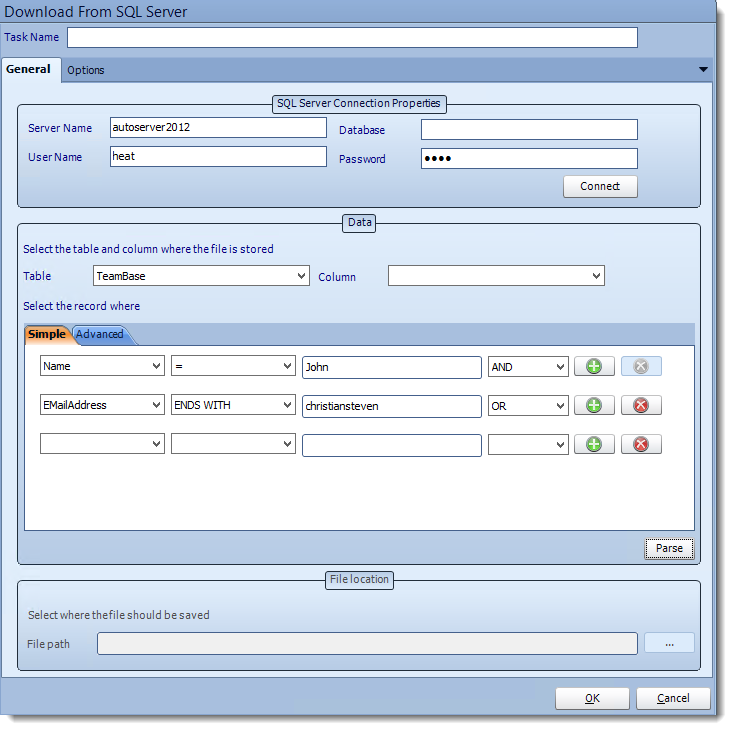
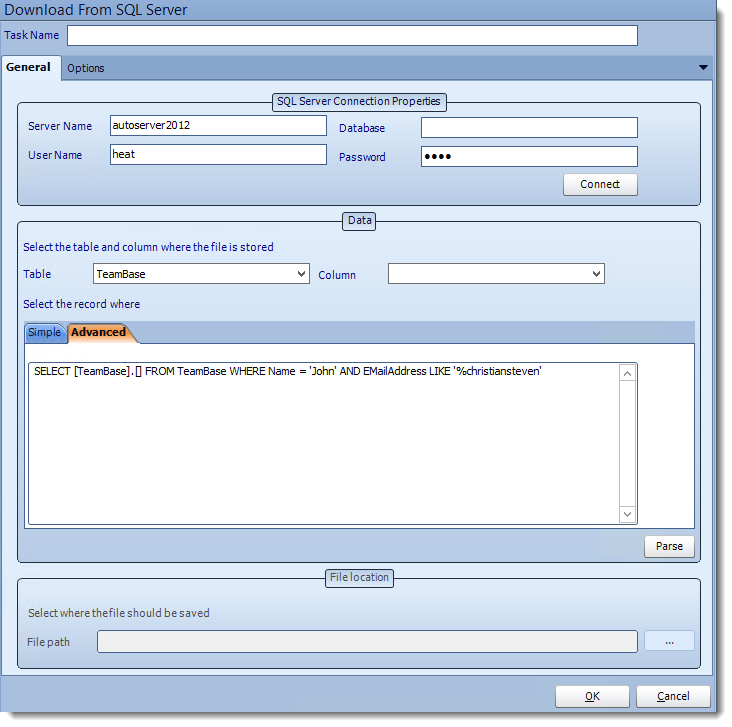
- Task Name: Give the task a name.
- SQL-Server Connection properties: Enter the SQL Server credentials
- Table: Select the table from the drop down list.
- Column: Select the column.
- Records: Define which records are to be downloaded from the table using a SQL Query.
- Parse: Test the query, ensure the correct data is being shown.
- File path: Use (…) button to navigate to the folder where the data is to be stored.
Options
- In this section, you have the option to run this task before, after or you can choose both the schedules executes.
Table
Create a table
General
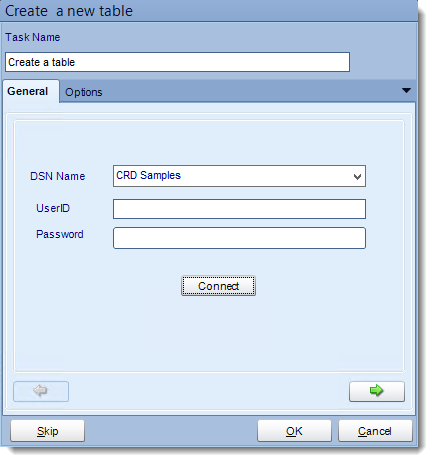
- ODBC Datasource Name: Drop down and select a DSN.
We strongly recommend System DSNs so that the DSN is visible to CRD even when the user associated with the DSN is logged off.
All communication to databases (including Access databases) is done through ODBC, so you must setup a system DSN to the database before you can use this facility.
When setting up DSNs we recommend (if possible) that you use Windows Authentication (Trusted Connection). This ensures that your username and password are not required to be stored in CRD (more secure) and overcomes a large number of security restrictions which Windows places on DSNs. When using Windows Authentication, make sure that the CRD NT service user (or background application service user) has full rights to the database otherwise, though you will connect when you are logged in, automated scheduling will fail if the Service user has not got rights to the database.
When setting up a DSN to a SQL server, you must ensure that the "Default Database" setting is set to the database you are connecting to (Windows defaults this to "Master").
- UserID: Enter the User ID CRD should use to log on to the database.
- Password: Enter the password associated with the above user.
- Connect: Click Connect to connect to the Database.
- Click green arrow to continue.
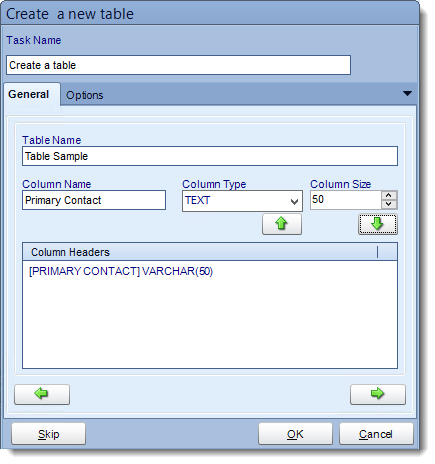
- Table Name: Give the new table a name.
- Column Name: Give the column a name.
- Column Type: What type of data will be written in the column.
- Column Size: How many characters will be allowed in the column.
- Click down arrow to save the column information. Continue adding as many columns as required.
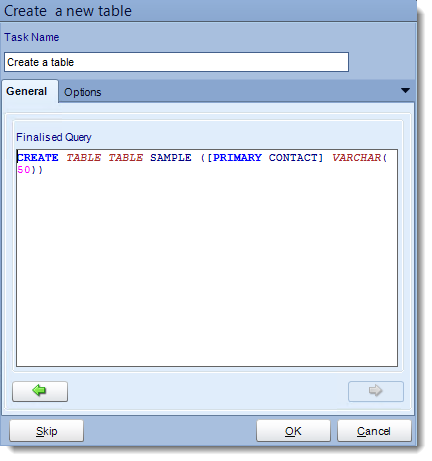
- Review the final script and make manual adjustments if required.
- Click OK to continue.
Options
- In this section, you have the option to run this task before, after or you can choose both the schedules executes.
Delete a table
General
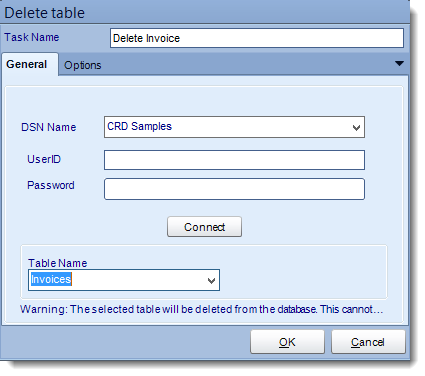
- ODBC Datasource Name: Drop down and select a DSN.
We strongly recommend System DSNs so that the DSN is visible to CRD even when the user associated with the DSN is logged off.
All communication to databases (including Access databases) is done through ODBC, so you must setup a system DSN to the database before you can use this facility.
When setting up DSNs we recommend (if possible) that you use Windows Authentication (Trusted Connection). This ensures that your username and password are not required to be stored in CRD (more secure) and overcomes a large number of security restrictions which Windows places on DSNs. When using Windows Authentication, make sure that the CRD NT service user (or background application service user) has full rights to the database otherwise, though you will connect when you are logged in, automated scheduling will fail if the Service user has not got rights to the database.
When setting up a DSN to a SQL server, you must ensure that the "Default Database" setting is set to the database you are connecting to (Windows defaults this to "Master").
- UserID: Enter the User ID CRD should use to log on to the database.
- Password: Enter the password associated with the above user.
- Connect: Click Connect to connect to the Database.
- Table Name: Select the table you wish to delete from the list.
- Click OK to save.
*Important* This operation CANNOT be undone. Be sure of your settings before you commit to this task. It is highly recommended that you backup the database as well.
Options
- In this section, you have the option to run this task before, after or you can choose both the schedules executes.
Add column to table
General
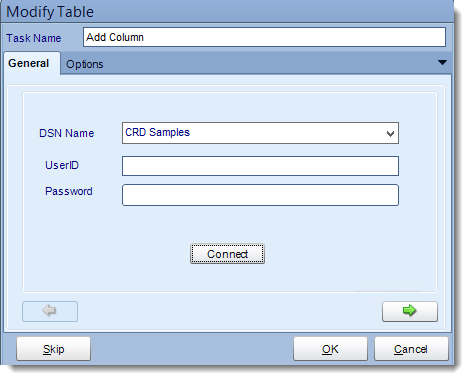
- ODBC Datasource Name: Drop down and select a DSN.
We strongly recommend System DSNs so that the DSN is visible to CRD even when the user associated with the DSN is logged off.
All communication to databases (including Access databases) is done through ODBC, so you must setup a system DSN to the database before you can use this facility.
When setting up DSNs we recommend (if possible) that you use Windows Authentication (Trusted Connection). This ensures that your username and password are not required to be stored in CRD (more secure) and overcomes a large number of security restrictions which Windows places on DSNs. When using Windows Authentication, make sure that the CRD NT service user (or background application service user) has full rights to the database otherwise, though you will connect when you are logged in, automated scheduling will fail if the Service user has not got rights to the database.
When setting up a DSN to a SQL server, you must ensure that the "Default Database" setting is set to the database you are connecting to (Windows defaults this to "Master").
- UserID: Enter the User ID CRD should use to log on to the database.
- Password: Enter the password associated with the above user.
- Connect: Click Connect to connect to the Database.
- Click green arrow to continue.
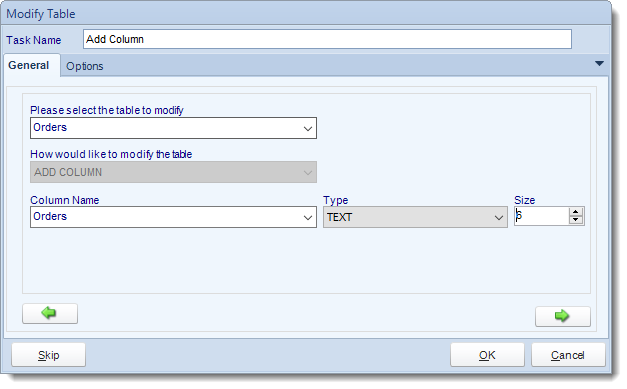
- Task Name: Give the task a name.
- Table to Modify: Select the Table that you need to modify.
- How to modify the Table: Select ADD COLUMN.
- Column Name: Give the column a name.
- Type: Select the type of data that will be written in the column.
- Size: How many characters should be allowed in the column.
- Click green arrow to continue.
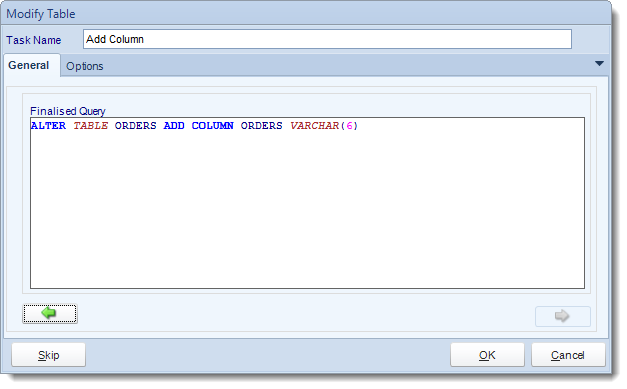
- Review the script and make modifications manually if required.
- Click OK to save.
Options
- In this section, you have the option to run this task before, after or you can choose both the schedules executes.
Delete column from table
General
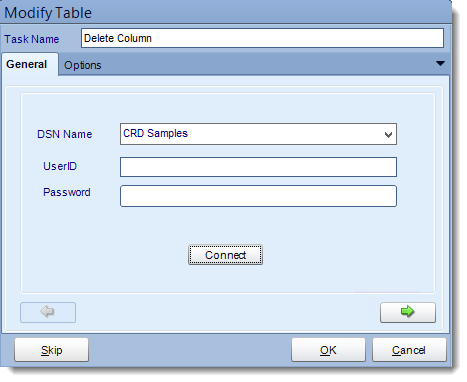
- ODBC Datasource Name: Drop down and select a DSN.
We strongly recommend System DSNs so that the DSN is visible to CRD even when the user associated with the DSN is logged off.
All communication to databases (including Access databases) is done through ODBC, so you must setup a system DSN to the database before you can use this facility.
When setting up DSNs we recommend (if possible) that you use Windows Authentication (Trusted Connection). This ensures that your username and password are not required to be stored in CRD (more secure) and overcomes a large number of security restrictions which Windows places on DSNs. When using Windows Authentication, make sure that the CRD NT service user (or background application service user) has full rights to the database otherwise, though you will connect when you are logged in, automated scheduling will fail if the Service user has not got rights to the database.
When setting up a DSN to a SQL server, you must ensure that the "Default Database" setting is set to the database you are connecting to (Windows defaults this to "Master").
- UserID: Enter the User ID CRD should use to log on to the database.
- Password: Enter the password associated with the above user.
- Connect: Click Connect to connect to the Database.
- Click green arrow to continue.
- Task Name: Give the task a name.
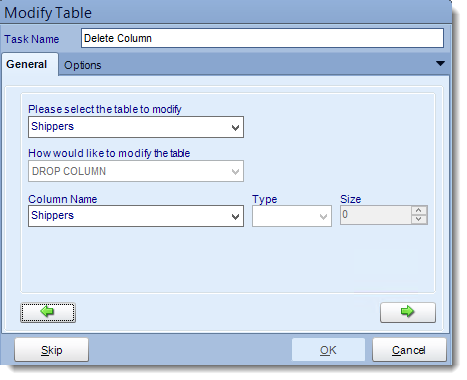
- Table to Modify: Select the Table that you need to modify.
- How to modify the Table: Select DROP COLUMN.
- Column Name: Select the column that needs to be deleted.
- Type: This will be greyed out.
- Size: This will be greyed out.
- Click green arrow to continue.
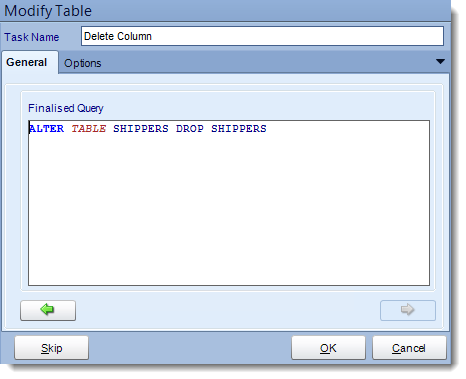
- Review the script and make modifications manually if required.
- Click OK to save.
Options
- In this section, you have the option to run this task before, after or you can choose both the schedules executes.