Options - General
- Go to Options.

- Select General.
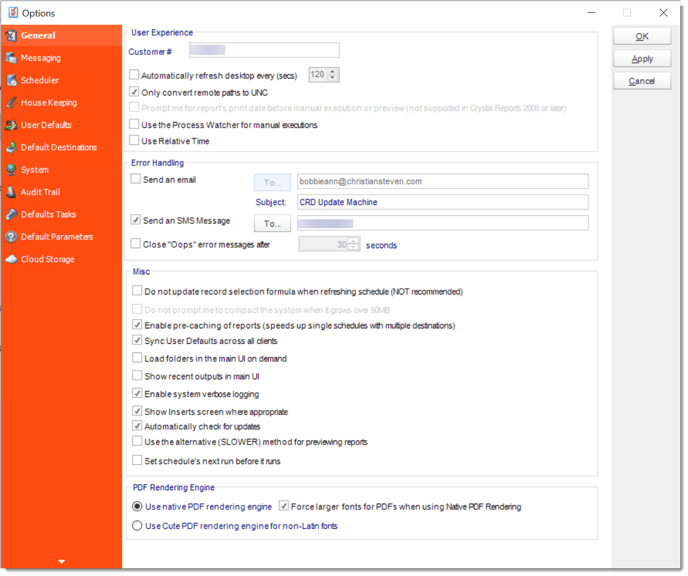
The General tab is broken down into four sections: User Experience, Error Handling, Misc. & PDF Rendering Engine. Below, we will take a closer look at each of these sections.
User Experience
- Customer #: The value that should be listed here is your individual customer number, which is provided by ChristianSteven when you purchase CRD. It identifies you in our billing and tech support system and allows you to log support tickets through CRD itself. Once you receive your customer number from ChristianSteven, you should input it here (if it is not already listed).
If you are using the free trial version of CRD, no value will be listed here and this field will be left blank until you purchase CRD. If you are experiencing issues with CRD during your free trial, contact your Sales Manager. You will be unable to log a support ticket through CRD.
- Automatically Refresh Desktop: When viewing the CRD desktop (especially when using the Detail option), this option will refresh the screen at the interval of seconds you specify. This will allow you to see an up to date status of your schedules at a glance without having to refresh the system manually.
- Only convert remote paths to UNC: This setting instructs CRD only to convert remote paths to UNC. This option helps prevent any path resolution problems you may otherwise have. Local paths are not affected if you are a system administrator. (network or shared paths)
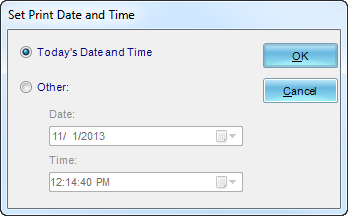
- Prompt me for reports print date…: This setting instructs CRD to prompt you for the print date for the report when carrying out manual execution of schedules or when previewing reports. You can then choose between today's date or another date you specify.
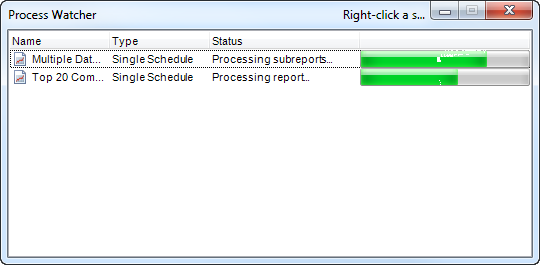
- Use the Process Watcher for manual executions: The Process Watcher is a monitoring facility for manually executed schedules.
- Use Relative time: This setting lets you select whether timings should be displayed and saved in the time zone of the scheduler or the time zone of the user(if they are different).
Error Handling
The Error Handling section tells CRD what to do when CRD encounters a problem. You can choose between the following options:
- Send an Email: Choose to be notified by email if a report fails to run successfully. You can specify any email address in this field as long as it is valid.
- Send an SMS: Choose to receive an SMS text message on your cellphone if a report fails to run successfully. This can be any phone number as long as it is valid.
- Close Oops Messages after X Seconds: Automatically close any error messages after a specified amount of time.
An error log file is stored in the installation folder (typically, Program Files\Christiansteven\CRD). You can also view the log file from the System Monitor.
Misc
- Do not update record selection…: CRD stores a copy of your Crystal report locally. If you make changes to the source file, you will need to refresh the local copy (See "Refresh"). CRD will not only refresh the report structure, but will also replace the record selection formula. If you have made local changes to the record selection formula, then check this option if you DO NOT want CRD to replace the local record selection formula.
- Do not prompt me to compact..: The compacting process reduces the size of the database, and re-indexes the records, repairing any corrupted records in the process. Similar to a ‘Compact & Repair’ in Access
- Enable pre-caching of reports…: Pre-caching is effective when there are multiple destinations in a single schedule. When switched on the report is exported once and then CRD works on the result locally to produce the various formats required by the different destinations.
If your report takes a long time to complete (e.g. 1 hr), then the second and third destinations could end up having different data if the database was updated during that time. Switching on Pre-caching ensures that all destinations receive identical data in their report.
- Sync User Defaults across all clients: If you have multiple installations of CRD and all of them are connected to the same database, you can select this checkbox to sync the User Defaults on this installation of CRD with the other installations.
- Load folders in the main UI on demand: This opens schedules located within folders more quickly.
- Show recent outputs in main UI: Recent outputs selected will show in the main User Interface.
- Enable system verbose logging: Verbose logging allows CRD to record more details regarding schedules, outputs, files, errors, etc. It is especially helpful should CRD experience issues where technical support or Development would need to troubleshoot. Having this enabled does not impact user functionality in any way. Unless otherwise advised, please leave this option checked.
- Show insert screen where appropriate: Unchecked, this option will require the user to right click to activate the Insert menu.
- Automatically check for updates: Checking this option will ensure that CRD automatically checks for and alerts you when an update is available. If you do not have this option checked in CRD, you will need to manually check for updates to CRD by following our Product Info & Updates blog.
- Use the alternative (SLOWER) method for previewing reports: Renders the report as PDF for preview purposes.
- Set schedule's next run before it runs: Checking this option automatically updates a schedule's next run time at the beginning of the schedule. This means that there is less chance for the schedule to get picked up twice.
PDF Rendering Engine
- Use native PDF rendering engine: Crystal Rendering will be used to create PDF.
- Use Cute PDF rendering engine for non-Latin fonts: Use Print Driver to create PDF.
- Force larger fonts for PDFs when using Native PDF Rendering: Check this option to have larger fonts when using PDF as output format.