![CSS-CMYK-logo-2015-2.png]](https://go.christiansteven.com/hs-fs/hubfs/social-suggested-images/CSS-CMYK-logo-2015-2.png?height=40&name=CSS-CMYK-logo-2015-2.png)
Before You Begin
Before creating a Data-Driven SSRS Package Schedule, make sure:
- You have access to the PBRS Web Application and permission to create schedules.
- The SSRS reports you want to include are available through configured SSRS accounts.
- You have access to the database or data source that will provide the Data Driver values.
- The required database connection or DSN is configured.
- You have a query that returns the fields needed for report parameters and supported destination settings.
- You know which SSRS parameters need to be populated dynamically.
- Any required delivery destinations are available and configured.
Tip: Test your Data Driver query before creating the schedule. Confirm that it returns the expected records and fields, particularly those that will be used for report parameters or delivery information.
Create a Data-Driven SSRS Package Schedule
- Sign in to the PBRS Web Application.
- From the main navigation menu, select Schedules.
- On the Schedules page, select New in the upper-right corner.
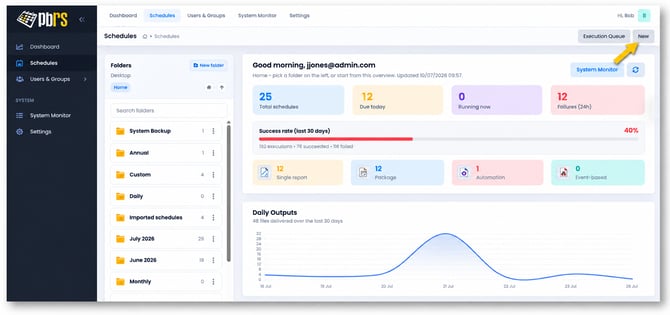
Selecting New opens the Create a new schedule window, where you can choose the type of schedule to create.
Select the Data-Driven Package Schedule
- The Create a new schedule window opens, displaying the available schedule types.
- Under Packages, select Data-Driven Package Schedule.
- The Data-Driven Package Schedule wizard opens, allowing you to configure the package and its Data Driver.
.png?width=670&height=558&name=Create%20a%20New%20Schedule%20Dialog%20(1).png)
Configure the General Settings
The General section is the first step in creating a Data-Driven Package Schedule. Here, you specify where the package will be saved and assign a name to identify it within PBRS.
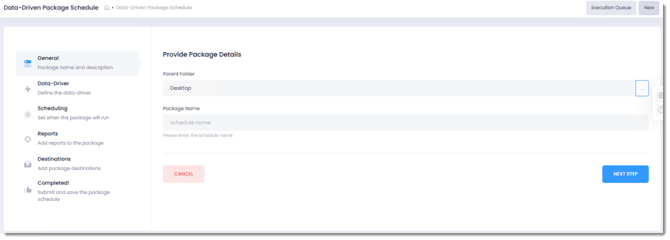
- Under Parent Folder, select the PBRS folder where the package schedule should be saved. In this example, Desktop is selected.
- In Package Name, enter a descriptive name for the new Data-Driven Package Schedule.
- Review the selected folder and package name to ensure they are correct.
- Select Next Step to continue to the Data-Driver configuration.
Tip: Use a descriptive package name that identifies the reports or business process the schedule supports. This makes the package easier to locate and manage within PBRS.
Configure the Data Driver
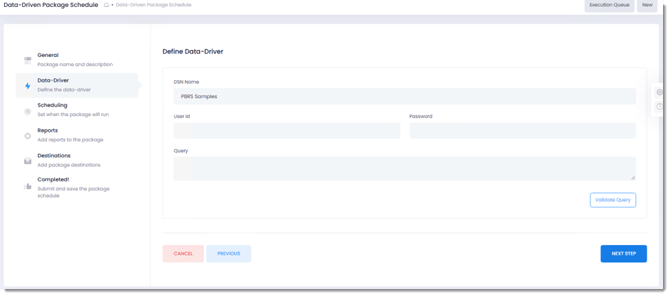
The Data-Driver section allows you to define the data source and query that PBRS will use to control the Data-Driven Package Schedule.
The query returns records containing values that can be used to dynamically populate report parameters and supported delivery settings.
- In DSN Name, select or enter the Data Source Name (DSN) for the database connection. In this example, PBRS Samples is selected.
- If the database connection requires authentication, enter the appropriate User Id and Password.
- In Query, enter the SQL query that will retrieve the records required to drive the package.
- Select Validate Query to verify that PBRS can connect to the database and execute the query successfully.
- Confirm that the query validates before continuing.
- Select Next Step to proceed to the Scheduling section.
Important: Ensure that the Data Driver query returns all the fields required for the package. Each returned record can provide values used to control supported report parameters and delivery settings.
Tip: Test the query against a small, representative dataset before configuring the remaining package settings. This helps confirm that the returned records and column names match the values you intend to use.
Configure When the Package Schedule Runs
The Scheduling section determines when the Data-Driven Package Schedule starts, how frequently it runs, and whether it is enabled for automatic execution.
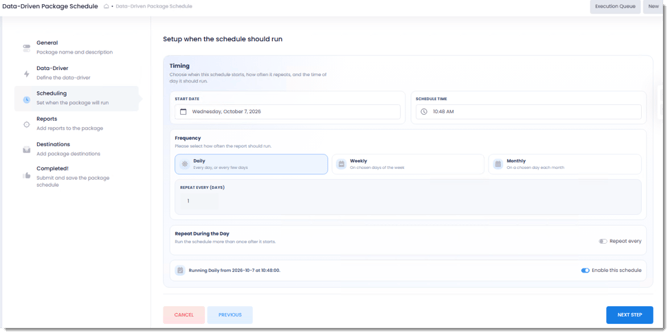
- Under Timing, select the Start Date for the package schedule.
- Set the Schedule Time when the package should begin running.
- Under Frequency, select how often the package should run:
- Daily — Run the package every day or at a specified interval of days.
- Weekly — Run the package on selected days of the week.
- Monthly — Run the package on selected days each month.
- Configure the additional settings for the selected frequency. For example, when Daily is selected, enter the required interval under Repeat Every (Days).
- If the package needs to run multiple times during the same day, enable Repeat During the Day and configure the repeat interval.
- Review the scheduling summary at the bottom of the screen to confirm the selected recurrence.
- Use Enable this schedule to determine whether the package should execute automatically.
- Select Next Step to continue.
Important: If Enable this schedule is turned off, the package schedule can be saved but will not execute automatically. This is useful when you want to review or manually test the package before enabling automatic execution.
Add SSRS Reports to the Data-Driven Package
The Reports section allows you to add and configure the reports that will be included in the Data-Driven Package Schedule.
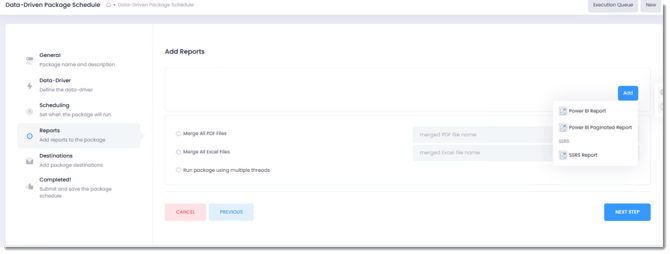
PBRS supports different report types within a Data-Driven Package. For this article, we will focus on adding SSRS Reports.
- In the Package Schedule wizard, select Reports.
- Under Add Reports, select Add in the upper-right corner.
- A drop-down menu displays the available report types:
- Power BI Report — Reports hosted in the Power BI Service.
- Power BI Paginated Report — Paginated reports hosted in the Power BI Service.
- SSRS Report — Reports hosted in SQL Server Reporting Services.
- Select SSRS Report.
- The Add SSRS Report wizard opens, allowing you to select and configure the report before adding it to the package.
The Add SSRS Report wizard opens, allowing you to select and configure the report before adding it to the package.
Configure the SSRS Report Details
After selecting SSRS Report from the Add menu, the Add SSRS Report wizard opens.
The General section allows you to select the SSRS report to include in the Data-Driven Package Schedule and configure its basic settings.
- In Report Name, enter a descriptive name to identify the report within the package.
- Under SSRS Report, select the Account used to connect to SQL Server Reporting Services.
- In Virtual Directory, confirm or enter the virtual directory used by the SSRS report server. This is typically
reports. - Select Browse Reports to display the reports available through the selected SSRS account.
- Browse the available reports and select the SSRS report you want to include in the package.
- Confirm that the selected report appears in the Report section.
- Select Next Step to continue.
Important: The selected SSRS account must have permission to access the report. If the report is not available, verify the account, virtual directory, and report server permissions
Additional Package Options
The Reports screen also provides options for controlling how the reports are combined and processed.
|
Option |
Description |
|---|---|
|
Merge All PDF Files |
Combines compatible PDF report outputs into a single PDF file. Specify the merged PDF file name. |
|
Merge All Excel Files |
Combines compatible Excel report outputs into a consolidated Excel file. Specify the merged Excel file name. |
|
Run package using multiple threads |
Allows PBRS to process reports in the package using multiple execution threads. |
Note: PDF and Excel merging apply when reports are generated in the corresponding formats. Configure these options according to the required package output.
Configure the SSRS Report Details
After selecting SSRS Report from the Add menu, the Add SSRS Report wizard opens.
The General section allows you to select the SSRS report to include in the Data-Driven Package Schedule and configure its basic settings.
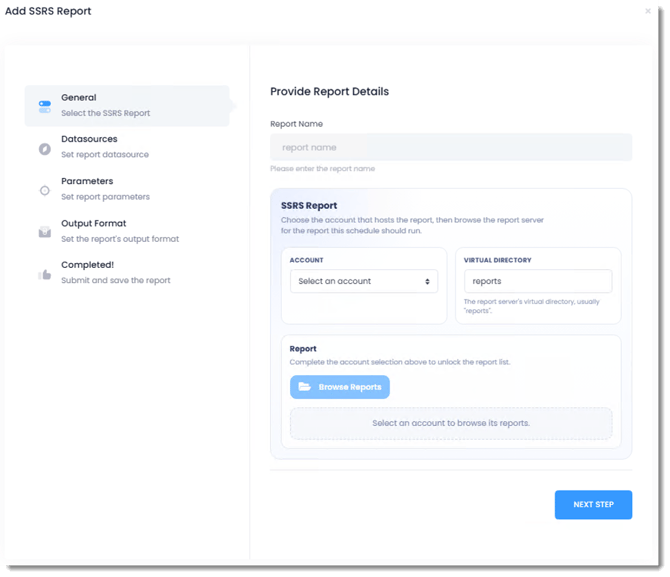
- In Report Name, enter a descriptive name to identify the report within the package.
- Under SSRS Report, select the Account used to connect to SQL Server Reporting Services.
- In Virtual Directory, confirm or enter the virtual directory used by the SSRS report server. This is typically
reports. - Select Browse Reports to display the reports available through the selected SSRS account.
- Browse the available reports and select the SSRS report you want to include in the package.
- Confirm that the selected report appears in the Report section.
- Select Next Step to continue.
Important: The selected SSRS account must have permission to access the report. If the report is not available, verify the account, virtual directory, and report server permissions
Configure the SSRS Report Datasource
The Datasources section displays the datasource associated with the SSRS report selected in the previous step.
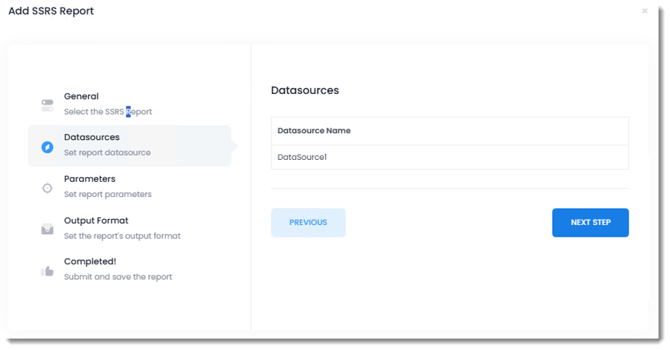
This allows you to verify that the correct report datasource is available before configuring its parameters and output format.
- Under Datasource Name, review the datasource associated with the selected SSRS report.
- Confirm that the expected datasource is displayed. In this example, the datasource is DataSource1.
- Select Next Step to continue to the Parameters section.
Note: The datasource displayed here belongs to the SSRS report being added to the package. It is separate from the Data Driver configured earlier, which supplies the dynamic values used by the package.
If the expected datasource is not displayed, return to General and verify that the correct SSRS report was selected.
Configure the SSRS Report Parameters
The Parameters section allows you to configure the values that will be passed to the SSRS report when it runs as part of the Data-Driven Package Schedule.
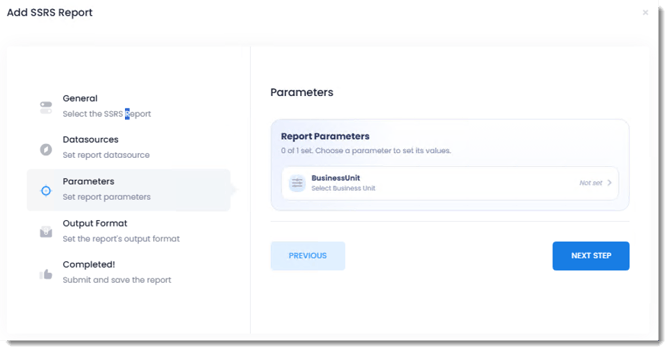
PBRS displays the parameters associated with the selected SSRS report. These parameters can use fixed values or values returned by the Data Driver, allowing the report output to vary according to the data being processed.
- Under Report Parameters, review the parameters available for the selected SSRS report.
- Select the parameter you want to configure. In this example, select BusinessUnit.
- The Set Parameter Value window opens, allowing you to configure the parameter.
- Select the required parameter value or assign a corresponding field from the Data Driver.
- Save the parameter configuration.
- Repeat the process for any additional report parameters.
- Confirm that all required parameters have been configured before selecting Next Step.
Important: When using Data Driver values, ensure that the selected field returns values compatible with the SSRS parameter's expected data type and available values.
Set the SSRS Report Parameter Values
The Set Parameter Value window allows you to configure the values passed to the SSRS report when it runs as part of the Data-Driven Package Schedule.
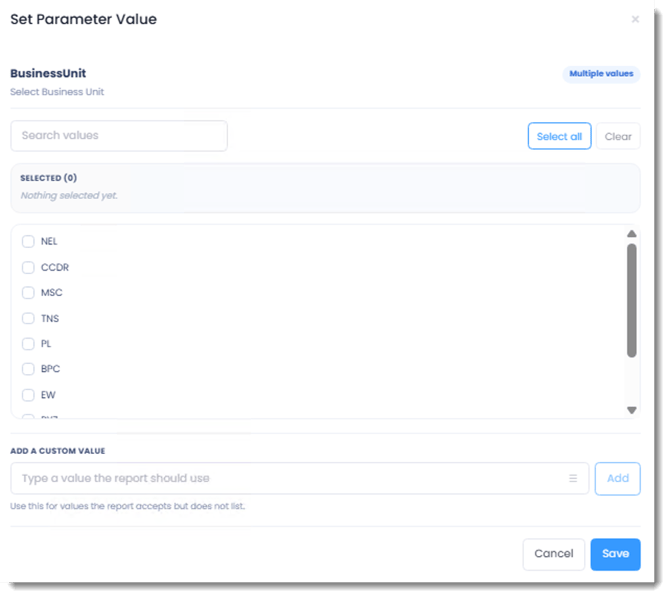
In this example, the BusinessUnit parameter supports multiple values. You can select values from the available list or enter a custom value, including a Data Driver field reference where supported.
- Review the available values for the BusinessUnit parameter.
- Use Search values to locate a specific value if required.
- Select the checkbox beside each value you want to include.
- To select every available value, select Select all.
- To remove the selected values, select Clear.
- Review the Selected section to confirm the values you have chosen.
- To specify a value not displayed in the list, enter it under Add a Custom Value and select Add.
- Select Save to apply the parameter configuration.
- Confirm that the parameter has been updated before selecting Next Step.
Important: For a Data-Driven Package Schedule, parameter values can be supplied dynamically from the Data Driver. Ensure that the selected Data Driver field returns values compatible with the SSRS parameter.
Configure the SSRS Report Output Format
The Output Format section determines the file format in which the SSRS report will be generated when the Data-Driven Package Schedule executes.
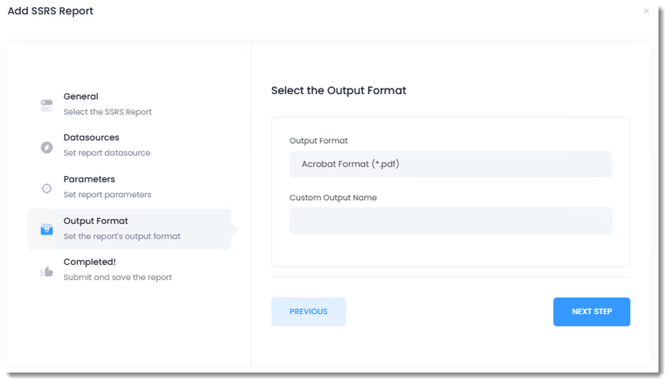
You can also specify a custom output name to identify the report within the package.
- Under Output Format, select the required format for the SSRS report. In this example, Acrobat Format (*.pdf) is selected.
- If required, enter a Custom Output Name to specify the name of the generated report file.
- Review the selected output format and custom output name.
- Select Next Step to continue.
Note: If you intend to use Merge All PDF Files or Merge All Excel Files in the Package Schedule, ensure that the reports are configured to generate output in the corresponding format.
Tip: Use descriptive custom output names to make individual reports easier to identify, particularly when a package contains multiple reports.
Review and Add the SSRS Report to the Data-Driven Package
The Completed! section displays a summary of the SSRS report configuration before it is added to the Data-Driven Package Schedule.
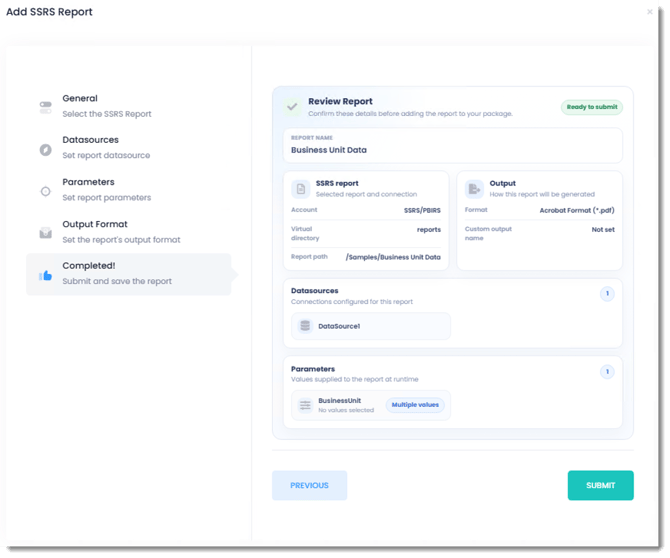
Review the information carefully to ensure that the correct report, datasource, parameters, and output settings have been configured.
- Under Report Name, confirm that the correct report name is displayed.
- Under SSRS report, verify the selected Account, Virtual Directory, and Report path.
- Under Output, confirm the selected output format and any custom output name.
- Under Datasources, verify that the expected datasource is listed.
- Under Parameters, review the configured report parameters and their values.
- If any settings are incorrect, select Previous to return to the appropriate section and make changes.
- When the configuration is correct and the status displays Ready to submit, select Submit.
- PBRS saves the report configuration and adds the report to the Data-Driven Package Schedule.
Important: In the example screenshot, the BusinessUnit parameter displays No values selected. Before submitting, confirm whether the report requires a parameter value or can use its default settings. If the parameter should be populated dynamically, verify that the appropriate Data Driver value has been configured.
Configure the Package Destinations
The Destinations section determines where the reports generated by the Data-Driven Package Schedule will be delivered.
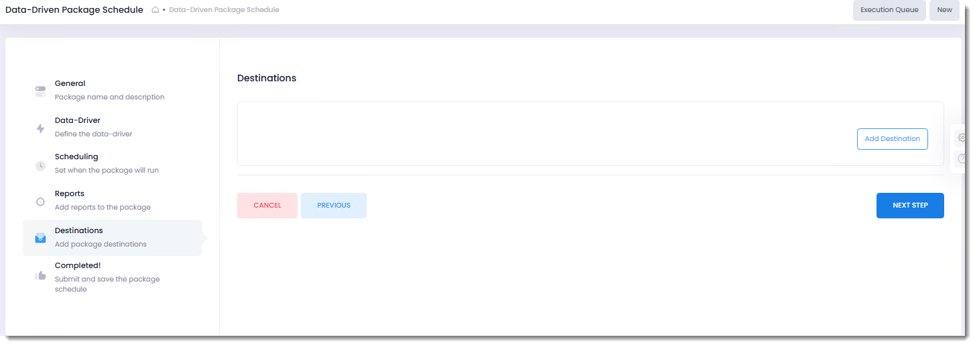
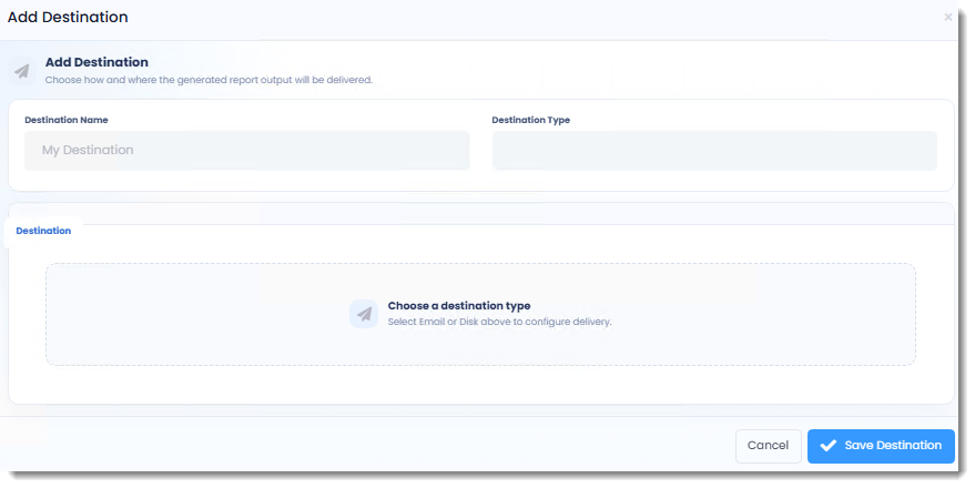
You can configure one or more destinations depending on your reporting and delivery requirements.
- In the Destinations section, select Add Destination.
- The Add Destination window opens.
- Enter a descriptive Destination Name.
- Select the required Destination Type, such as Email or Disk.
- Complete the delivery settings associated with the selected destination.
- Select Save Destination to add the destination to the package.
- Repeat these steps if additional destinations are required.
- Once all destinations have been configured, select Next Step.
Important: If you intend to use values returned by the Data Driver for destination settings, ensure that the query returns the required fields and that the corresponding destination fields are configured correctly.
Review and Create the Data-Driven Package Schedule
The Review Schedule screen provides a summary of the package settings, including the schedule name, folder, reports, scheduling frequency, Data Driver query, and delivery destinations.
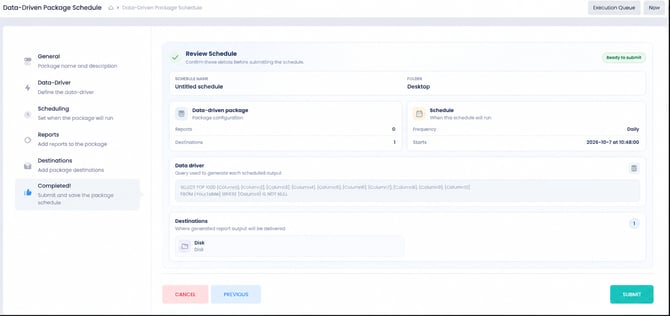
- Under Schedule Name, confirm that the package name is correct.
- Under Folder, verify that the package will be saved in the intended PBRS folder.
- Under Data-driven package, review the number of reports and destinations configured.
- Under Schedule, confirm the frequency and start date/time.
- Under Data driver, review the query used to generate the data-driven report outputs.
- Under Destinations, confirm that the required delivery destinations are listed.
- If any information is incorrect, select Previous to return to the appropriate section and make changes.
- When the configuration is correct and the status displays Ready to submit, select Submit to create the Data-Driven Package Schedule.
Confirm the Data-Driven Package Schedule Was Created
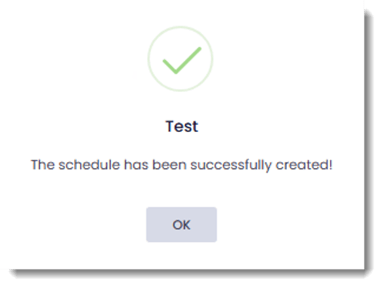
After selecting Submit, PBRS displays a confirmation message indicating that the Data-Driven Package Schedule has been successfully created.
- Confirm that the message “The schedule has been successfully created!” appears.
- Select OK to close the confirmation window.
- Return to Schedules in the PBRS Web Application.
- Navigate to the folder selected during configuration.
- Verify that the new Data-Driven Package Schedule appears in the folder.
Important: Successfully creating the schedule does not confirm that the reports will execute or be delivered correctly. Before enabling the schedule for production, confirm that all required reports have been added and perform a controlled test execution.
Troubleshooting
The following troubleshooting steps address common issues encountered when creating and configuring a Data-Driven SSRS Package Schedule in the PBRS Web Application.
The Data Driver Query Does Not Validate
Possible cause: PBRS cannot connect to the selected database, the credentials are incorrect, or the query contains an error.
Resolution:
- Return to the Data-Driver section of the schedule.
- Confirm that the correct DSN Name is selected.
- Verify the User Id and Password, if required.
- Confirm that the DSN is configured and accessible from the PBRS server.
- Test the query directly against the database to confirm that it executes successfully.
- Verify that the database account has permission to access the required tables, views, or stored procedures.
- Select Validate Query again.
If validation continues to fail, review the PBRS Error Log for additional information.
The Data Driver Returns No Records
Possible cause: The query executes successfully but does not return any records matching its conditions.
Resolution:
- Execute the query directly against the database.
- Confirm that the query returns the expected records.
- Review any
WHEREconditions or filters that may exclude records. - Verify that the database contains the expected data.
- Confirm that the returned columns contain the values required by the package.
- Update the query if necessary and select Validate Query again.
Note: A query that returns no records may prevent the package from generating the expected report outputs, even when the query itself is valid.
An SSRS Report Cannot Be Added to the Package
Possible cause: The selected SSRS account cannot access the report server, or the report is unavailable through the configured connection.
Resolution:
- Return to Reports and select Add > SSRS Report.
- Confirm that the correct Account is selected.
- Verify the Virtual Directory.
- Confirm that the account has permission to access the SSRS report.
- Test the report directly in SQL Server Reporting Services.
- Select Browse Reports again and choose the required report.
SSRS Report Parameters Are Missing or Incorrect
Possible cause: A required parameter has not been configured, or the value returned by the Data Driver is incompatible with the SSRS parameter.
Resolution:
- Open the affected SSRS report within the package.
- Navigate to Parameters.
- Review the parameters associated with the selected report.
- Confirm that all required parameters have valid values.
- If a parameter uses a Data Driver value, verify that the correct field is referenced.
- Confirm that the Data Driver query returns the expected value for each applicable record.
- Check for blank,
NULL, or incorrectly formatted values. - Save the parameter configuration and test the report again.
Important: If an SSRS parameter accepts multiple values, do not assume that a comma-separated string returned by the Data Driver will automatically be interpreted as separate parameter values. Verify the supported configuration before using the schedule in production.
The Package Contains No Reports
Possible cause: The SSRS report configuration was not submitted successfully, or no reports were added to the package.
Resolution:
- Return to the Reports section.
- Select Add > SSRS Report.
- Complete the report configuration.
- On the Review Report screen, select Submit.
- Confirm that the report appears in the package.
- Review the report count before submitting the Data-Driven Package Schedule.
Important: If the final Review Schedule screen displays 0 reports, return to the Reports section and add the required reports before using the package.
PDF or Excel Reports Are Not Merging as Expected
Possible cause: The package merging options are not configured correctly, or the individual reports use incompatible output formats.
Resolution:
- Open the Reports section.
- Confirm that Merge All PDF Files or Merge All Excel Files is selected as required.
- Verify that the reports are configured to generate the corresponding output format.
- Confirm that a merged output file name has been specified where required.
- For Excel outputs, check for duplicate worksheet names or names exceeding Excel's 31-character limit.
- Test the package with a small number of reports before processing the complete dataset.
The Data-Driven Package Does Not Run Automatically
Possible cause: The schedule is disabled, the recurrence is incorrectly configured, or the PBRS Scheduler is not running.
Resolution:
- Open the package and navigate to Scheduling.
- Confirm the Start Date and Schedule Time.
- Verify the selected Daily, Weekly, or Monthly frequency.
- Review any repeat settings.
- Confirm that Enable this schedule is turned on.
- Verify that the PBRS Scheduler service is running.
- Review the schedule history and PBRS Error Log for any execution errors.
The Package Is Created but Reports Are Not Delivered
Possible cause: The destination configuration is incomplete, the Data Driver returns invalid delivery values, or PBRS cannot access the selected destination.
Resolution:
- Open the Destinations section.
- Confirm that the required destinations have been added.
- Review the configuration of each destination.
- For Email destinations, verify the recipient addresses and mail server configuration.
- For Disk destinations, confirm that the destination path exists and that PBRS has the required write permissions.
- If destination settings use Data Driver values, confirm that the query returns valid values for each record.
- Test the schedule using controlled recipients or delivery locations.
- Review the PBRS Error Log if delivery continues to fail.
Need Additional Help?
If you cannot validate the Data Driver, configure SSRS reports and parameters, merge report outputs, or successfully execute a Data-Driven Package Schedule, review the PBRS Error Log for additional information.
Before contacting ChristianSteven Support, collect the PBRS build number, the Data Driver query, DSN details, SSRS report configuration, parameter mappings, destination settings, the exact error message, and relevant PBRS Error Log entries.
Remove passwords, credentials, and other sensitive information before sharing configuration details or screenshots.