Bursting Schedules for Crystal Reports.
Bursting schedules are specifically designed to burst individual groups in a report and deliver each group to a different destination. For example, you can tell CRD to burst a sales report into individual groups based on the "Department" and to email each department's group to the head of that department. The purpose of the wizard will be to guide you through the process of setting up a single report to be generated at defined intervals and delivered to one or more defined destinations.
Example: Management now wants Khan to break a report up by customer so they can more closely detail the customer's order profile. Rather than changing the report, or writing a new one, he can automatically burst the different groups.
How do I create a bursting schedule for Crystal Reports?
- Go to Bursting.

General Wizard
- Parent Folder: Select the folder where you wish the schedule to be stored. These are CRD specific folders.
- Report Path: Select the Crystal report that needs to be scheduled. A crystal report can only be added if the CRD server can reach the report path.
- Schedule Name: Name the schedule.
- Description: Add a Description to the schedule to help identify it.
- Keyword (optional): Enter some keywords which can be used later by Smart Folders to categorize this schedule.
Schedule Wizard
In this section, you will decide when the report will execute. There are a variety of options:
- Daily: Run a report every day or at a frequency of days.
- Sub options: Repeat every X Days.
Example: Run the schedule every 3 days.

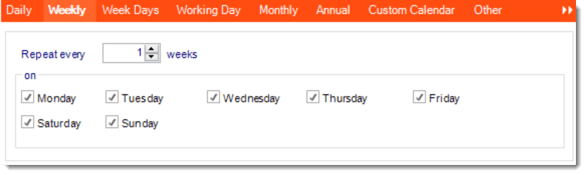
- Weekly: Run a report on a weekly time frame.
- Sub options: Repeat every X weeks.
Example: Run the schedule every 2 Weeks.
- On: Select the specific days of the week the schedule will run. If only once a week, select only the day of the week it will run.
Example: Run every Monday, Wednesday, and Friday.
- Week Days: Run the schedule Monday through Friday.

- Working Day: Run the schedule starting on a specific day of the month. Indicate which day of the month the schedule will run. E.G. run the schedule on the 4th working day of the month.

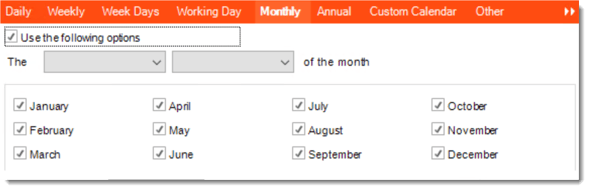
- Monthly: Run the schedule on a monthly time frame.
- Use the following options: Checking this box will enable you to select frequency options such as the “last Thursday of the month.” Also you can include or exclude specific months from the schedule.
- Annual: Run the schedule every year at a specified time.

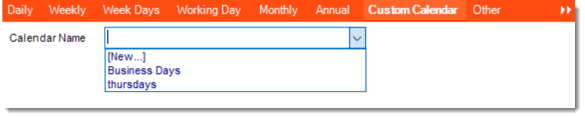
- Custom Calendar: Select the custom Calendar you wish to use. You can create a new custom calendar from the menu as well. Please see Custom Calendars for more information.
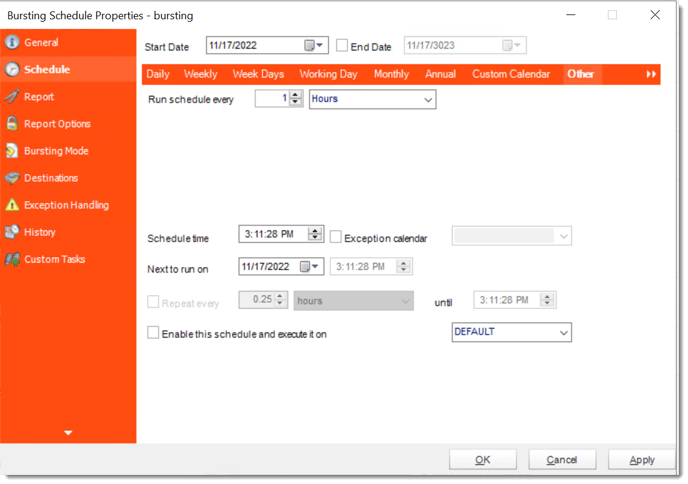
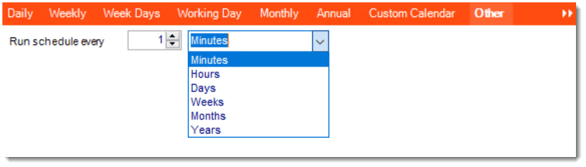
- Other: Other scheduling options.
- Run Schedule every X Minutes, hours, days, weeks, months, years.
- None: No scheduling is required for this item.

- Start Date: Enter the desired starting date for the schedule. This section can be the current date (providing the schedule time has not already passed) or a date in the future.
- End Date: If the schedule is due to end after a certain date enter that here. If the schedule is to run indefinitely, then leave it blank.
- Schedule time: On the Next Run date, the package will run at this time.
- Exception Calendar: Choose a calendar that will instruct the schedule to NOT run on those specified days. Please see Custom Calendars for more information.
- Next to run on: The package will next run on this date.
- Repeat Every: Rerun the package every x minutes from the scheduled time until your specified time.
For example, you can set up a daily package to run every day at 8 am, and to run every hour until 5 pm.
- Until: After this date, there will be no automated scheduling of this package.
- Enable this Schedule: Uncheck this option to Disable the package. Disabled packages are not deleted, but they do not execute automatically. You can re-start the automatic scheduling at a later date by checking this option again. Or right-clicking this schedule from the main screen and selecting Enable.
Click Next to continue to the next wizard section.
Report Wizard
- In this section, you will determine the parameters for your report (if any) and select options for your subreport. If your report has no parameters, you may skip this section by clicking next.
- There are 3 requirements in order for CRD to detect your Crystal Report parameters and their parameter values:
- The parameter must be in use in the report.
- The parameter must be visible.
- The parameter must be set to be prompted at runtime.
- If these three requirements are achieved, you should see the parameters in your report listed on this screen.
- For each parameter, select from the drop down list the value the report must use. In a single schedule, only one parameter value can be run at a time per parameter. You can type a value into the field as well.
- Set as Null: Set no value for this parameter.
- Ignore: Do not run this parameter, ignore it at runtime.
- Insert Menu: You can insert constants, formulas and database field values instead of a static "typed in" value. Right-click in the parameters field to expose the Insert menu.
To enable a report parameter to run for a date constant (Current Date, Yesterday etc.), select CRD Constants from the insert window, then drag and drop your desired constant to the parameter field.
- Selecting Date Parameters via Calendar: If your report contains a date parameter, you can either manually enter dates as described earlier in this topic, or select the desired date from the built in calendar. Simply click in the date parameter field to open the calendar. Select the desired date. Click OK.
- If the parameter is also a time parameter, this can be selected as well. The buttons below enable you to preview the report, adjust formulae, and review sub reports. You can re-query the report for parameters as well.
- Formulae: View edit and Parse the Record Selection Formulae.
- Subreports: Set parameters, authenticate, and re-query sub report parameters.
- Preview: Shows you a preview of the report.
The preview function only works if Crystal Reports is installed on the PC.
Click Next to continue to the next wizard section.
Report Options Wizard
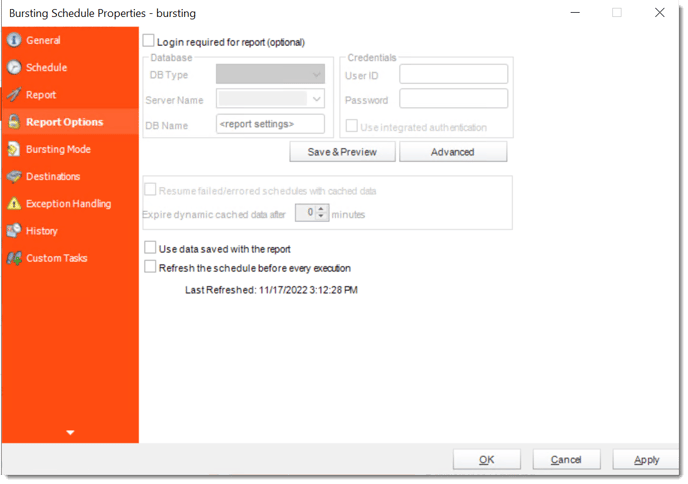
- Database Login: If the database requires logon credentials, check this option and enter the required username and password. If credentials are not required, uncheck the option and continue as normal (default). All values are optional. You only need to enter a value if your database, security, networking or infrastructure require it.
- DB Type: Select the type of Database.
- Server Name: Enter the server name of the database.
- DB Name: Enter the name of the database.
- Credentials: Enter the User ID and Password for the Database. Clicking on the Advanced tab, you can set logins for each table.
- Advanced: Enables you to specify credentials at the table level. Double click the table to set its login information.
- Resume failed/errored with cached data: If the schedule fails, resume the schedule from where it left off. You can then select how long the cached data should be kept.
- Use data saved with the report: By default, CRD will always attempt to run the report using the very latest data in your database. If your report is saved "with data" and you want CRD to simply export the data in the report, then check this option.
- Refresh the schedule: This refreshes the schedule before every execution.
- Save snapshots of the execution and keep them for (days): Keep a copy of the report for how many days.
Click Next to continue to the next wizard section.
Bursting Type Wizard
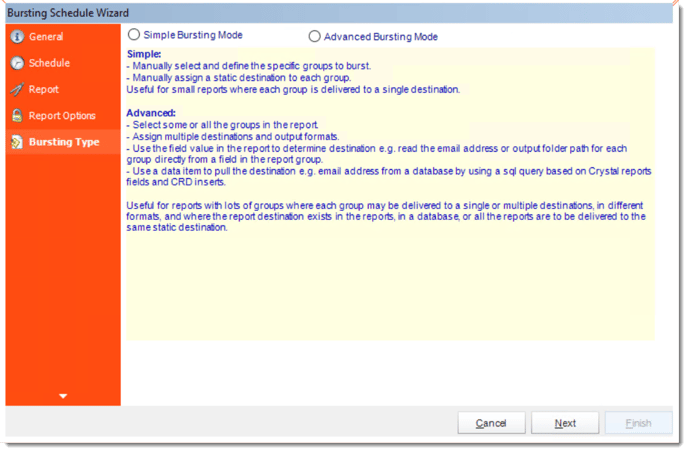
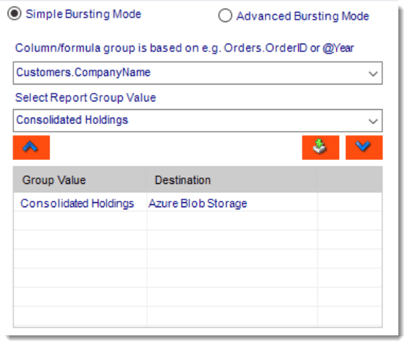
Simple Bursting
- Manually select and define the specific group to burst.
- Manually assign a static destination to each group.
- Useful for small reports where each group is delivered to a single destination.
- Once selected you are prompted to specify what group you will be bursting on.
- Click the down blue arrow.
- This will bring up the destination setup screen. Set up a destination for the selected group. When this is completed, the group and its destination are added to the list, and you may choose another group and determine a destination for it. A destination has to be determined for each group in your report.
- You can use the button to add Default Destinations for a selected group.
- Then select specific group values, hit the down arrow and complete a custom destination for every group you want to send the report to. Once you have all the values you want, click Next.
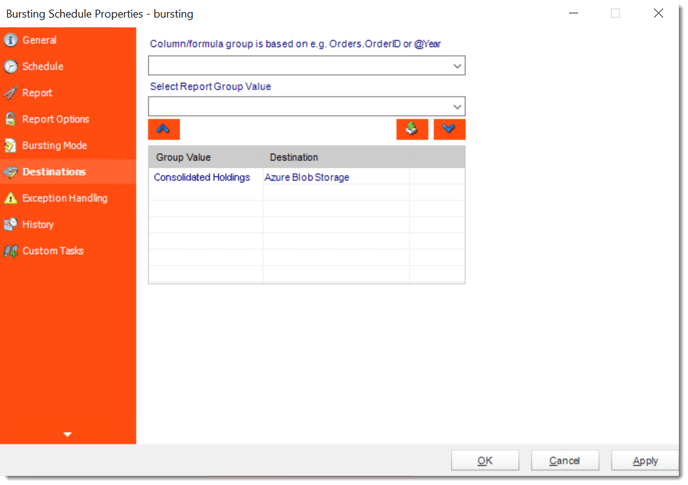
Advanced Bursting
- Select some or all of the groups in the report.
- Assign multiple destinations and output formats.
- Use the field value in the report to determine destination e.g. read the email address or output folder path for each group directly from a field in the report group.
- Use a data item to pull the destination e.g. email address from a database by using a SQL query based on Crystal Reports field and CRD inserts.
- Useful for reports with lots of groups where each group may be delivered to single or multiple destinations, in different formats, and where the report destination exists in the reports, in a database, or all the reports are to be delivered to the same static destination.
- On selecting the advanced bursting mode option you will be promoted to instruct CRD to enable Crystal Reports Fields parsing for the destinations. (This will only work if the destinations are contained in the report)
- You can select groups individually and add them to the list for bursting by clicking the single down arrow. You can add all the available groups by clicking the double down arrow. If you need to remove any groups from the list you can select the group and click the up arrow to remove the selected group(s).
- Click Next to continue to the next wizard section.
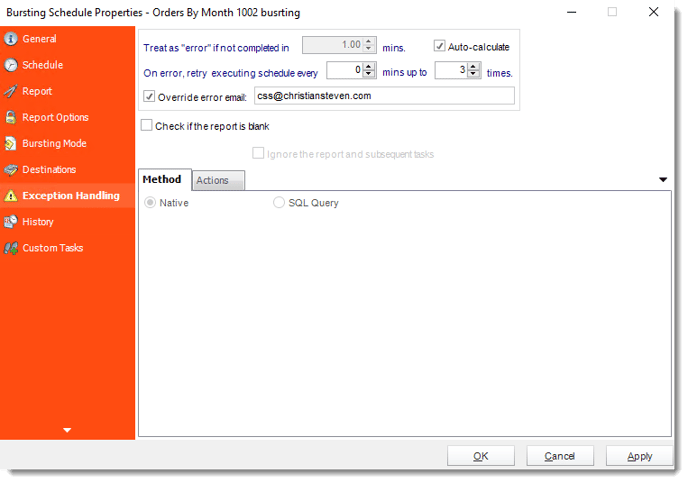
Exception Handling Wizard
In this section you will determine Schedule Retries should an error occur and set up what action should be taken if a Report Export is Blank or if an Exception occurs.
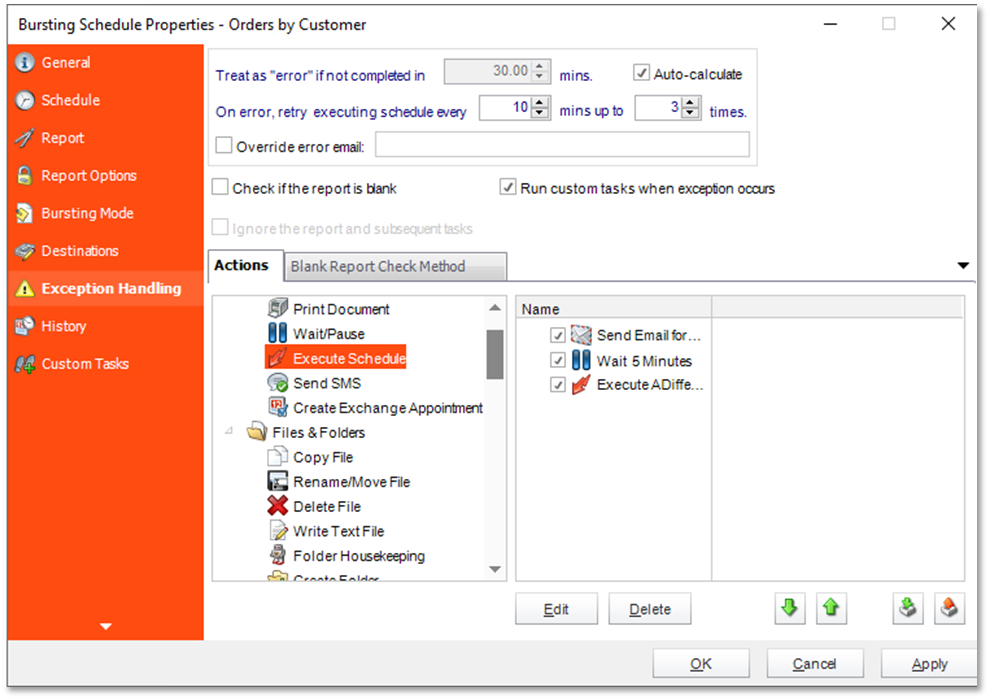
- Treat as “error” if not completed in X minutes: If a report takes longer than the specified amount of time to run, this option will treat the schedule as an error and follow the appropriate action. The “Auto-calculate” option instructs CRD to automatically determine how long a schedule should take to run the report. If it takes longer than the calculated amount of time, then it is an error.
If manually determining the error timing, please double-check the run time of the report in order to get the correct time estimate.
- On error, retry executing schedule every: If set to 0, CRD will deem the schedule as "Failed" the first time it encounters an error. The schedule will not run again until its next scheduled time. Change the value to tell CRD how many times you want it to retry running the report before declaring it as "Failed."
- Override error email: Check this option if you want to specify an email address that receives the error alert when it fails. This overrides the default email specified in Options.
- Check if the Report is Blank: If a report is blank because it genuinely returned no data, recipients can misconstrue this as an error with the scheduler. This option allows you to identify genuine empty reports and instruct CRD on what to do with them.
- Ignore the report and subsequent tasks: If the report is blank, do not send the report. The report will not be delivered to the destination. No custom tasks will be run.
Method

- Select the Method that will determine whether a report is blank.
- Native: CRD will check to see if the report returns any data. If not, the report is considered blank.
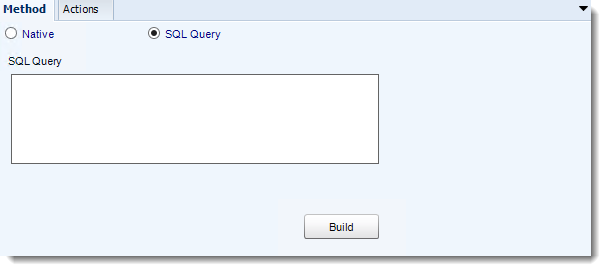
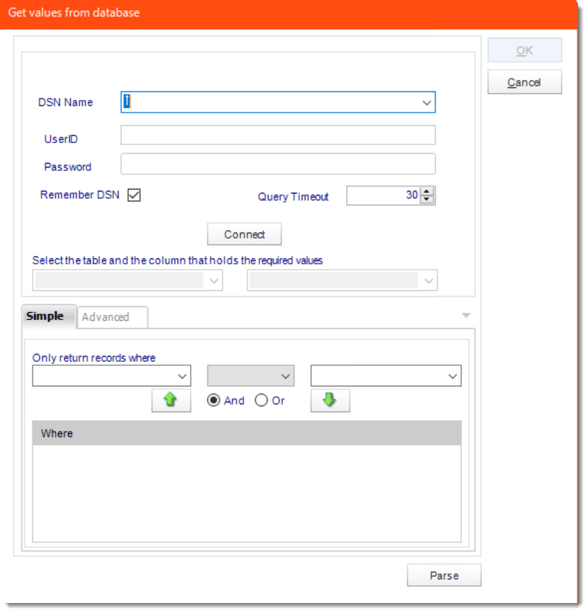
- SQL Query: Select this option to use a user made query that will determine if the report is blank. If the query returns no results, the report is blank.
- Click Build.
- Get values from a database window will appear. For more information about Get values from database, click here.
Actions
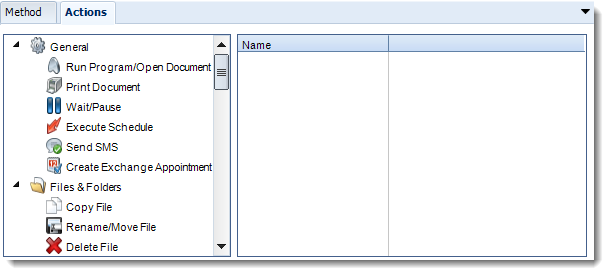
- Select an action from the task list. This task will be executed in the event that a schedule is blank.
- For more information about tasks, click here.
Tip: You can send a notification if a report is considered blank instead of sending the report. Simply select “check if a report is blank” then select “Ignore the report.” In the actions tab, select “Send Email” from the list. Compose your email and save.
Click Next to continue to the next wizard section.
Custom Tasks Wizard
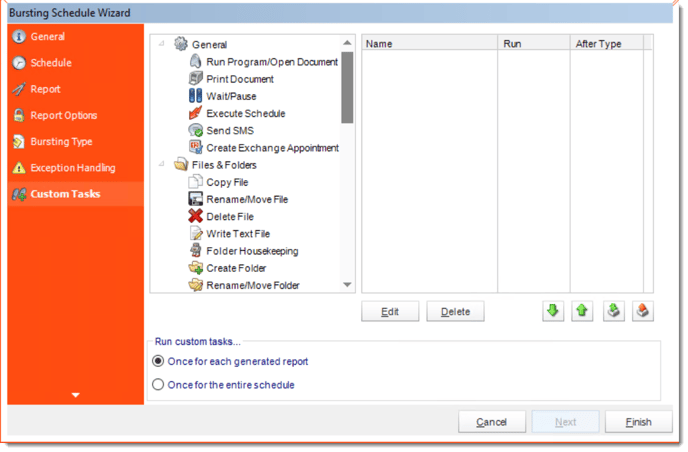
- In the section you have the option of setting up custom tasks. Custom tasks are business process automation tools that can be auto triggered before or after a report runs.
- For more information on Custom Tasks, click here.
- If you have no desire to add a Custom Task, you can click finish to complete the schedule.
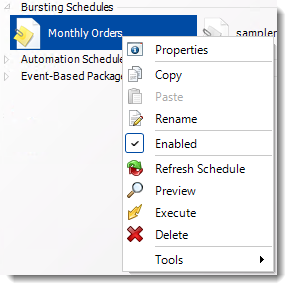
Bursting Schedule Context Menu
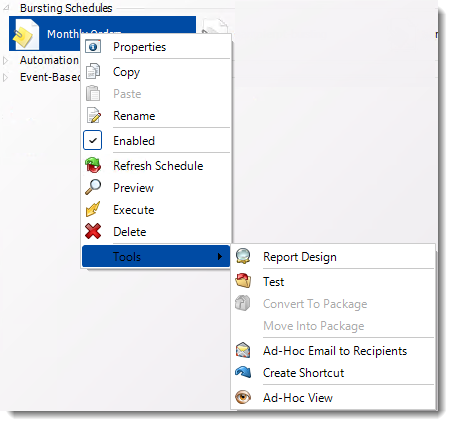
- Right-Click on a schedule to see the following actions:
- Properties: Edit the schedule from here. Or you can just double click on the schedule.
- Copy: Use this to copy the schedule. Right-click in the "white space" of the folder you wish to copy it to and select the Paste button.
- Rename: Rename the package.
- Enabled: Schedules are enabled when there is a check icon beside this option. To stop a schedule from running, or to "pause" it for a while, select this option to remove the check icon. Disabled schedules will not run until they are enabled again.
- Refresh: When a schedule is first created, CRD caches (saves) a copy of the report. All executions of the schedule are performed using this copy. If you make changes to your master report, you must select this option in order to pull the changes into CRD.
- Preview: Preview the report before execution.
- Execute: This button will execute the schedule immediately. Note that the next run date and time is not moved on as a result of a manual execution. They only move on if the schedule is run automatically by one of the schedulers
- Delete: Selecting this option will delete the schedule.
- Report Design: Preview the report Design.
- Test: Use this option to test the schedule and export it to selected "test" destinations.
- Convert To Package: This button will convert this report into a package. The package will have the name of the single schedule report.
- Move into a package: Use this option to move the report into an existing package.
- Ad-Hoc Email to Recipients: Select this option to send an ad-hoc email to all recipients of this package. You can use this to alert recipients to a planned system outage, or any other useful information.
- Create Shortcut: Use this option to create a shortcut you can save in any location on your PC. Execute the shortcut to execute the schedule in CRD.
- Ad-Hoc View: This button allows you to preview the report.
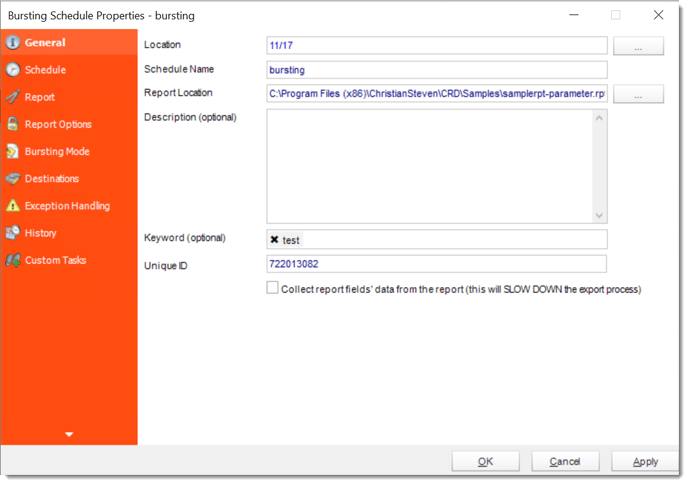
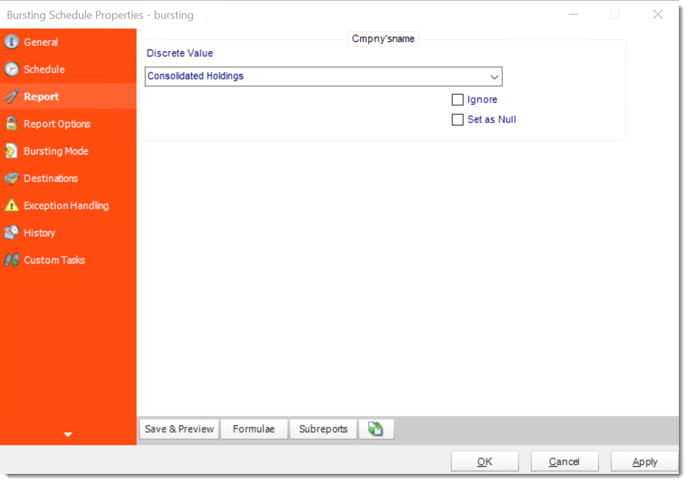
Bursting Schedule Properties
- To access your schedule properties, right click on a schedule and select properties.
- Similar to the schedule wizard, you adjust settings to your schedule such as timing, error handling, or custom tasks.
- General
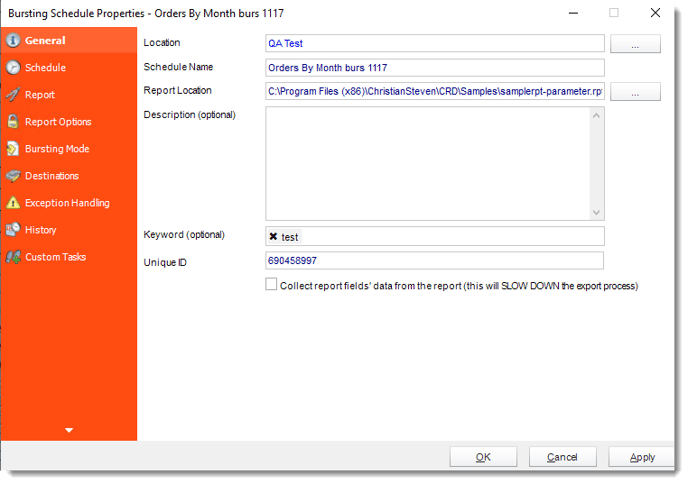
- Schedule
- Report
- Report Options
- Bursting Mode
- Destinations
- Exception Handling
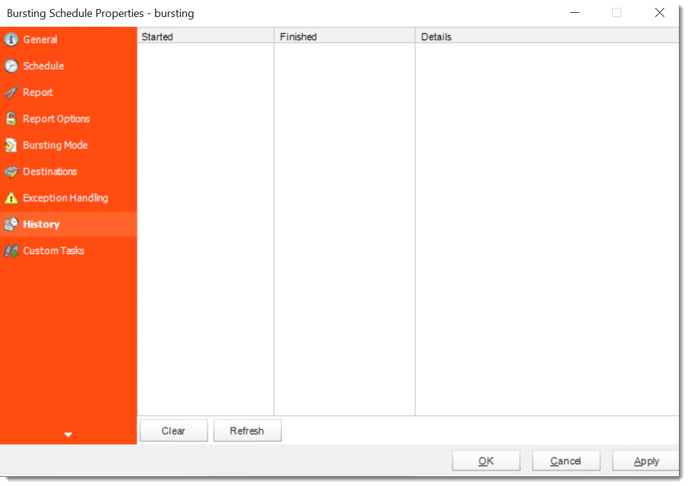
- History: Review the schedule's history. Successes, failures, and other data is located here.
- Custom Tasks