![CSS-CMYK-logo-2015-2.png]](https://go.christiansteven.com/hs-fs/hubfs/social-suggested-images/CSS-CMYK-logo-2015-2.png?height=40&name=CSS-CMYK-logo-2015-2.png)
User Manager - Users & Groups
The User Manager area allows you to create, edit, and delete users. After you create the user, you can associate the user to a group using the Group Manager interface. Users who have User/Group Management permissions will have access to the User Manager.
How do I create a new user?
- Go to Users & Group and select User Manager.

- Or select Users from the card on the home screen.

- From the User page click Add New User.
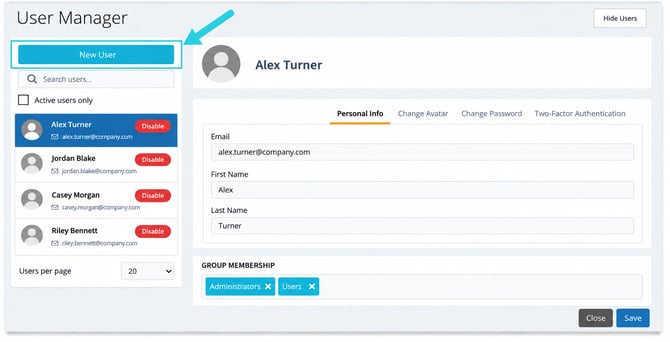
- On the User profile page complete the new user information.
User Profile
Personal Info
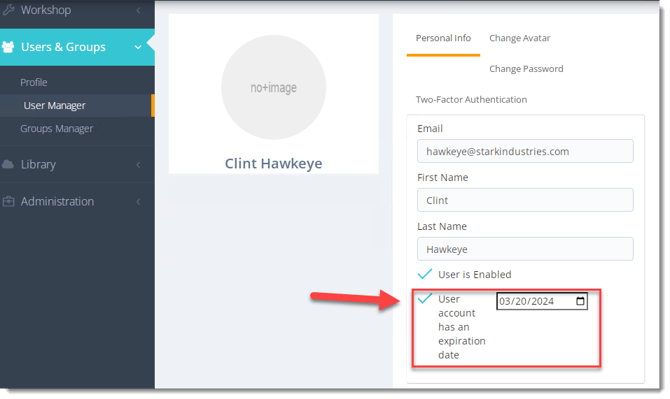
- Fill in the new user information:
- First Name
- Last Name
- Password
- Re Type the Password
- User is Enabled: Check the checkbox to enable the user to log in to IntelliFront.
- User account has an Expiration Date: Check the checkbox to set an expiration date for the user. When the date arrives, the user's account will be disabled.
You can enable and disable users.
- Group Membership: Assign a Group Membership if required. Please note Groups must have already been set up in order to be selected. To learn more about Groups, click here.
Change Avatar

- To change the Avatar, click on the Change Avatar Tab and upload a new avatar image for this user.
Two Factor Authentication

- Check the option to enable Two Factor Authentication and send the invitation to the key user to complete the process.
Editing a User
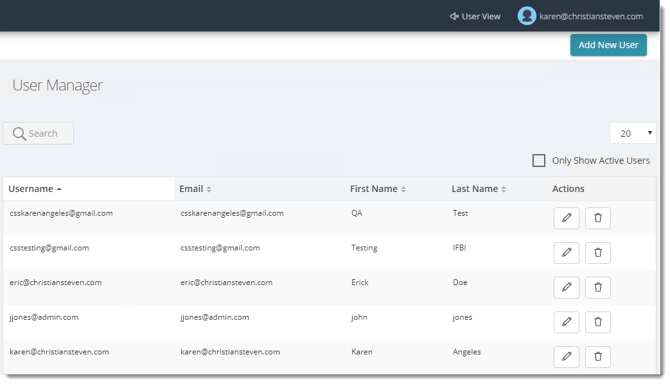
- You can edit a user by the edit button in the Actions section on their username. It will go back to the user profile.
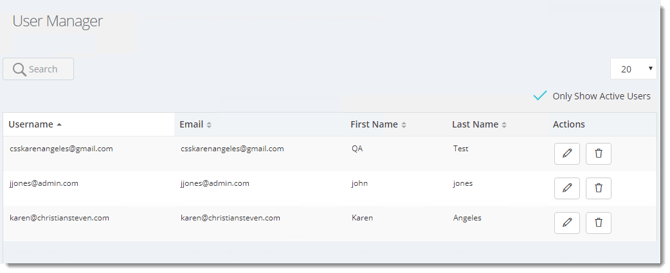
- Only Show Active Users: Check this option to show only the active users in IntelliFront BI.
Deactivating User Accounts
IntelliFront BI allows administrators to enable or disable user accounts directly from User Manager. This provides a convenient way to control user access without permanently removing an account from the system.
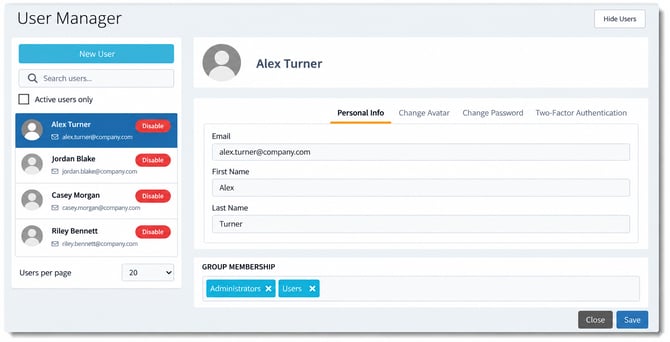
Deactivating a User Account
To deactivate an existing user account:
- Navigate to Users & Groups → User Manager.
- Locate the user in the left-hand panel. Use the Search users... field if necessary.
- Click the red Disable button next to the user's name.
- The user account is disabled, preventing the user from logging in to IntelliFront BI.
Activating a User Account
To restore access for a previously deactivated user:
- Navigate to Users & Groups → User Manager.
- Locate the disabled user account in the left-hand panel.
- If necessary, uncheck Active users only to display disabled accounts.
- Click Enable next to the user's name.
- The user account is enabled, allowing the user to log in to IntelliFront BI again.
Note: Deactivating a user does not delete the account or its associated group memberships. The account can be re-activated when access is required again.
Manage users through an application integration
The public API includes supported user registration and update operations. Choose an API identity with the required permissions and follow the operation’s request and response model. Keep credentials and authentication information private.
Use Manage users, groups and content access alongside Authenticate users and service clients. After a change, verify group membership, content assignments and the actual reader experience. See Get Started with the IntelliFront BI API for the initial connection.