Step 1: Navigate to Options


From here you can manage the following:
User Experience

- Customer #: Your unique customer number is required in this field, which is provided by ChristianSteven upon purchasing an ATRS license. This number helps identify you in our billing and tech support system, enabling you to easily log support tickets through ATRS. Be sure to input your customer number here once you receive it.
If you are trying out the free trial version of ATRS, this field will remain empty until you decide to purchase ATRS. If you encounter any problems with ATRS during your trial, feel free to reach out to our Support Team for assistance.
- Automatically Refresh Desktop: When viewing the ATRS desktop, especially in Detail mode, this feature automatically refreshes the screen based on the interval you set. This allows you to quickly see the most current status of your schedules without the need to manually refresh the system.
- Only convert remote paths to UNC: This option in ATRS ensures that only remote paths are converted to UNC, preventing any potential path resolution issues. If you are a system administrator, local paths will not be affected. This setting is particularly useful for network or shared paths.
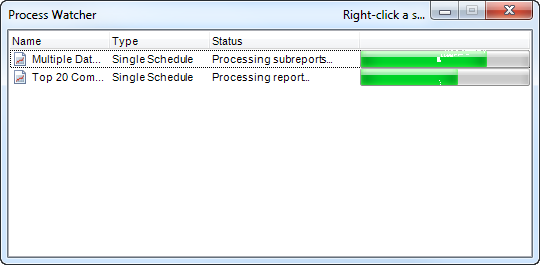
- Use the Process Watcher for manual executions: The Process Watcher serves as a monitoring tool for schedules that are manually executed.
- Use Relative time: This option allows you to choose whether the timings should be displayed and saved based on the scheduler's time zone or the user's time zone (if they differ).
Error Handling
When ATRS encounters an issue, the Error Handling section specifies how ATRS should respond.

- Send an Email: Choose to receive email notifications if a report fails during execution. You can enter any valid email address for this purpose. Alternatively, you can select to send an email to the schedule owner instead of a generic email address for all Error Handling.
- Send an SMS: Opt to receive an SMS notification on your mobile phone in case a report encounters an unsuccessful execution. You can input any valid phone number for this purpose.
- Close Oops Messages after X Seconds: Automatically close any error messages after a specified amount of time.
An error log file is stored in the installation folder (typically, Program Files\Christiansteven\ATRS). You can also view the log file from the System Monitor.
Misc
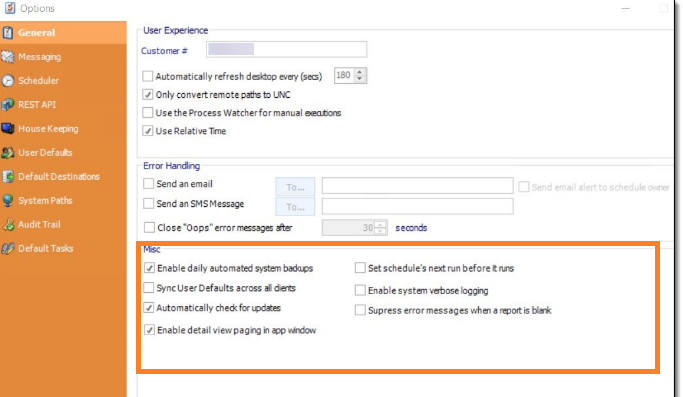
- Enable Daily Automated System Backups:
- Sync User Defaults across all clients: If you have multiple installations of ATRS and all of them are connected to the same database, you can select this checkbox to sync the User Defaults on this installation of ATRS with the other installations.
- Automatically Check for updates: Checking this option will ensure that ATRS automatically checks for and alerts you when an update is available. If you do not have this option checked in ATRS, you will need to manually check for updates to ATRS by following our Product Info & Updates blog.
- Enable Detail view paging in App Window:
- Enable system verbose logging: Verbose logging allows ATRS to record more details regarding schedules, outputs, files, errors, etc. It is especially helpful should ATRS experience issues where technical support or Development would need to troubleshoot. Having this enabled does not impact user functionality in any way. Unless otherwise advised, please leave this option checked.
- Set schedule's next run before it runs: Checking this option automatically updates a schedule's next run time at the beginning of the schedule. This means that there is less chance for the schedule to get picked up twice.
- Suppress Error Messages when a report is Blank: Selecting this option will prevent error messages from appearing on the screen, eliminating the need for human intervention when a report export is blank.
Messaging
Upon accessing the Messaging tab within ATRS's Options window, you will find two distinct messaging options: Email Settings and SMS Settings. In this section, we will explore the different email options provided by ATRS and guide you on how to configure them for use.

No separate server is required in order for ATRS to send an e-mail. However, if you are unfamiliar with your organization's e-mail settings, you may want to have a system administrator set these for you.
SMTP
To establish a connection with an SMTP mail server, follow these steps:
Step 1: Select SMTP from the dropdown.
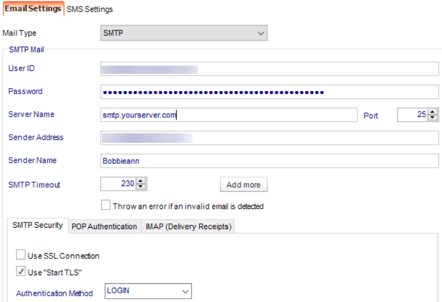
Step 2: Enter the required credentials for the SMTP Mail.
-
- User ID: Enter the User ID provided by your email administrator.
- Password: Enter the password provided by your email administrator.
- Server name: Enter your SMTP server details. You can use the mail server name or the IP address.
- Sender Address: When the email is received, this will be the From address displayed.
- Sender Name: When the email is received, this will be the displayed Sender Name.
- SMTP Timeout: This option allows you to set the duration for which ATRS will wait to establish a connection with your SMTP server before marking it as a failure. The default time is set to 30 seconds, but you can modify this based on your requirements.
- If you need to set up options such as POP before SMTP (if they are required by your SMTP server) or you would like to set your server settings for Read Receipts, click Advanced. Then, select the appropriate option from the drop down and enter the requested credentials.
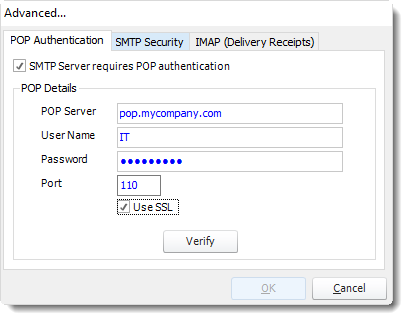
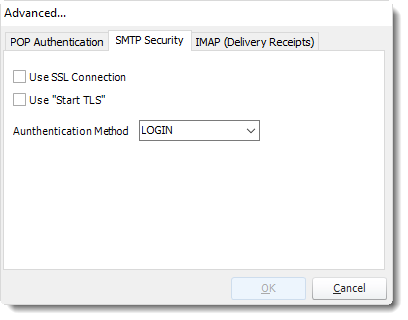
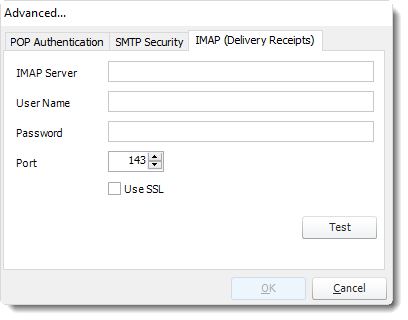
You must select Verify or Test after entering the relevant credentials in the Advanced pop-up window. If you do not verify or test the settings, you will not be able to save them.
If you wish to be alerted by ATRS when an incorrect email address is inputted, simply tick the box labeled "Throw an error if an invalid email is detected."
Step 3: Test Settings
Navigate to the Test Settings section located at the bottom of this page to finalize the setup of your Email Settings configuration.
Office 365
If you require Modern Authentication (Auth2.0 token-based authorization) for setting up your messaging, simply choose Office 365 as your mail type.
Step 1: Select Office 365 from the Drop Down

Step 2: Select your Office 365 Account from the dropdown. If your Office 365 Account does not appear in the list it may need setting up in Integrations.
Step 3: After selecting your settings, be sure to click on "Test Settings" to verify all the information.

Step 4: Choose an email address for testing and click on the OK button. A pop-up will then display, confirming that the email test was successful.
If you receive an error message, verify that your server information is listed correctly. Make any necessary changes and Test Settings again.
Testing the settings is essential to save the Messaging configuration successfully.
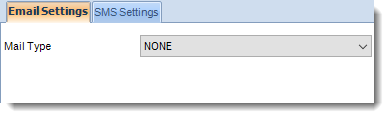
NONE
If you do not plan to use ATRS for sending emails, follow these steps:
This does not affect other aspects of ATRS. You will still be able to use ATRS to print, export to folder, or export to an FTP destination, etc.
Hints and Tips
Testing the Messaging settings ensures that ATRS will not encounter errors when trying to send out emails while running schedules.
- If you wish to clear the currently entered mail settings and start over, click Clear Settings.
- If you would like ATRS to keep trying to send emails after they've failed to send once, click the checkbox next to Try re-sending failed emails.

- If you would like ATRS to Automatically embed related images into HTML emails, verify the checkbox next to this option is checked.

By default, ATRS will automatically embed an image if the link is placed in the body of an HTML email. Keep this box checked if you wish for this to occur. If you would rather the image link be placed in the HTML email body (rather than the image itself), then uncheck this box.
If you would like to change the Text Character Encoding, select the appropriate choice from the drop-down. 
Encoding is used by Operating Systems to determine how to display emails on the recipient's PC. US-ASCII is standard for most languages. However, if you are using Japanese characters, then you should select ISO-2022-JP.
Scheduler
The Scheduler is the key function that determines when and how tasks are triggered. Rather than using Windows Task Scheduler, ATRS uses ChristianSteven's proprietary scheduler to execute tasks. This creates a far more reliable, dedicated scheduling system.

Within ATRS, the following scheduling options are available:
- No Scheduling required
- Use background scheduling application (recommended)
- Use Windows Service.
No Scheduling required
If you prefer not to have automated scheduling, ATRS can still be utilized as an ad-hoc report management tool. By selecting this option, you will need to manually execute each schedule as needed.
This option is also used to uninstall any previously installed scheduling services.
To choose this options, perform the following steps:
Step 1: Select the option that says "No Schedule Required" by clicking on the radio button next to it.
Step 2: Click Apply setting. This will uninstall any previously installed schedulers and apply the new settings.
Use Background Scheduling application
The background application scheduler is a windows application which monitors ATRS and fires off reports when they become due.
The background scheduler is an application independent of ATRS. Therefore, it will stop working if the user logs off or the server is shut down. If you want to be able to log off the server without stopping ATRS scheduling, then you must install and use the Windows Service Scheduler.
To use the background application scheduler, perform the following steps:
Step 1: Choose the option by clicking on the radio button next to "Use background scheduling application."
Step 2: Click on the Apply Setting button.
Step 3: Initiate the scheduler by clicking on the "Start Service" button.
Step 4: Click on the "Apply" button located at the bottom right corner of the Options window to save the settings.

Use Windows Service
This is a Windows service that is installed in the Windows "Services" control panel. This service allows scheduled reports to continue running even when no user is logged onto the PC.
The server MUST be powered on in order for the Windows Service to work. If the server is not on, the windows Service cannot run and schedules will not kick-off as scheduled.
IMPORTANT
Prior to selecting the windows Service option as your Scheduler, you must ensure that the following pre-requisites have been met:
- You are logged onto the server as the Windows Service user
- The above listed Windows Service user has the following windows security rights on the PC you are installing it on:
- Act as part of the operating system
- Log on as a service.
- Is a member of the Local Administrators security group
- If you are using MS Exchange Server, the above listed Windows Service user must have full rights to the designated email account.
These security requirements are required by Windows. If you are unsure how to set up Windows security settings, your system administrator will be able to help.
Setting up the Windows Service
Once you have ensured that the above prerequisites have been met, perform the following steps:
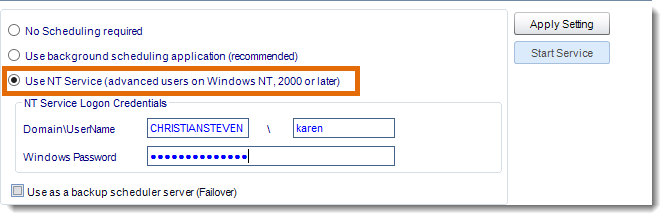
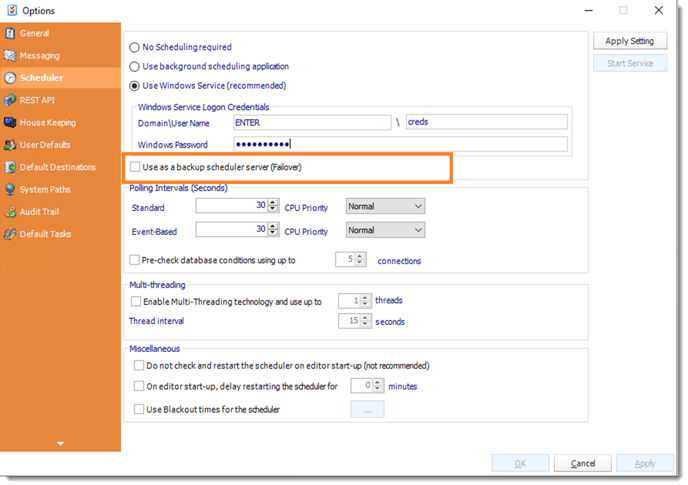
Step 1: Choose the option by clicking on the radio button next to "Use Windows Service"
Step 2: Enter the following credentials:
-
- Windows Domain: Type in the Domain name. If you are using MS Exchange Server, then this must be your network domain so that ATRS can connect to your Exchange server.
- Windows User Name: Enter the username for the above user.
- Windows Password: Enter the password for the above user.
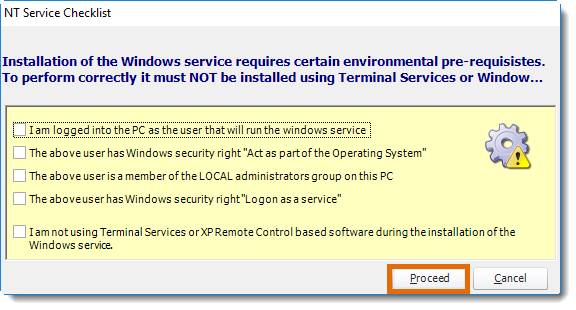
The following screen will be displayed, verify that each of the requirements listed on the NT Service Checklist window have been met. If so, check each of the boxes and click Proceed.
If you have not completed the listed requirements and/or do not check all of the boxes, you will be unable to continue setting up the Windows Service.
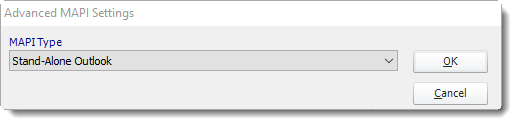
Step 4: At this time you may be promoted to select the type of email system you are using with ATRS : Stand Alone Outlook, Exchange Server, or Exchange Web Service. Once you have selected the appropriate option from the drop-down menu, click OK.
The NT Service will now install. Once completed, the service will be visible in the windows "Services" control panel and will be known as ATRS . You should also see ATRS Monitor. This is a monitoring service which ensures that the ATRS service is continually running.
Step 5: If the "Start Service" option is not already disabled, click on it to initiate the service.
Step 6: Click Apply at the bottom right of the Options window, if available.
If any of the above credentials are changed (e.g. the password is changed or times out), the service will stop running. Under these circumstances, you will have to uninstall it and re-install it ensuring you enter the new credentials correctly. We recommend that your system administrator ensures that the Windows user's credentials never change and never time out.
Backup Scheduler Server (Failover)
Use as a Backup Scheduler Server (Failover)
The Failover module in ATRS allows for the transfer of processing tasks from a failing server to a backup server. This feature ensures that your scheduled tasks will continue to run smoothly even if the primary server experiences issues.
-
- The primary server must have its scheduler active.
- The primary ATRS server must have its database stored in an ODBC compliant database.
- The intended backup installation must be connected to the ODBC compliant database.
Polling Intervals

- Standard: The schedule polls the ATRS schedule database at regular intervals to see if there are any schedules to execute. The polling interval defines how often you wish scheduler to check.
- Event Based: Event-Based Schedules run on their own thread.
- Pre-Check Database conditions using multiple threads: Using Multi-threading technology, AYTS will check multiple conditions for multiple schedules using up to 5 threads. This option can increase the speed at which ATRS runs Event Based Schedules.
Multi-Threading

- This section allows up to 8 reports to be exported simultaneously.
System resources will be shared, so this will not always mean that reports will take 1/8 the normal time.
EXAMPLE: You have 4 reports. Each one takes 15 minutes to export. Using a single thread, it would take 1 hour to complete the export. Using multiple threads, you would expect it to take 15 minutes for all 4. However, the sharing of your system resources by 4 reports may result in each report taking longer than 15 minutes and the total time for 4 reports may be more than 15 minutes, but it will be less than an hour.
Miscellaneous

- Do not check and restart: Used if multiple people are logging into the server while using background scheduling.
- On editor start-up, delay restarting: Upon logging into server the scheduler should be delayed to restart.
- Use blackout times for scheduler: Set days and times when you do not want the scheduler to run.
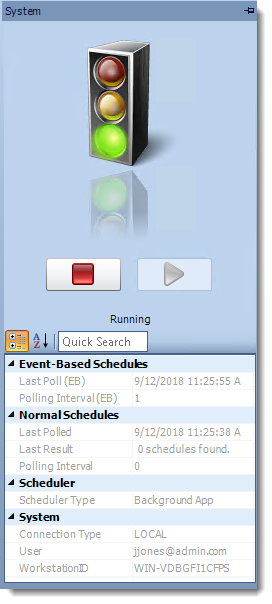
- Stopping the Scheduler: To stop the scheduler using the Agent, simply open the scheduler agent and click on the Stop button. When the stop light changes from Green, to yellow to red, the scheduler will be disabled, preventing any reports or tasks from executing. If access ATRS, the scheduler will automatically restart.
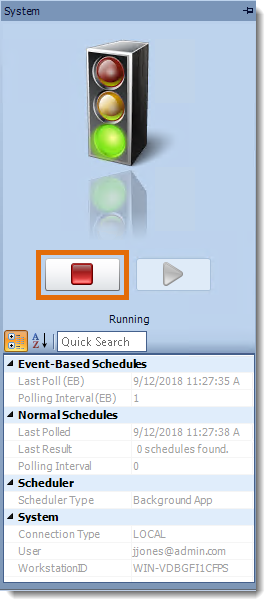
You can turn off the automatic restart of the Scheduler using the instructions listed in the Miscellaneous section above.
- Starting the Scheduler: To initiate the Scheduler through the Agent, simply access the Scheduler Agent and click on the Start button. The indicator light will transition from red to yellow and finally to green. Once activated, your scheduled tasks will recommence as usual.
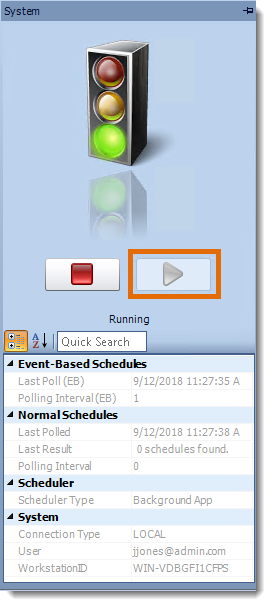
You can also review other system information such as the polling interval, the number of schedules found during the last poll, and the type of Scheduler the system is using.
Installing the ATRS REST API
The ATRS API is used for collaboration and other system functions. The ATRS API allows you to run schedules as well as control the scheduling services. Here is how to install and configure it if needed.
Step 1:: Click Install API.

Step 2: Enter your windows credentials to install the API.
Step 3: Click OK to save the credentials and begin installation.


The ATRS API has been successfully installed/ is installed.
Step 6: In the API status section click Start to start the ATRS API Service. Once the service has started successfully this button will read 'stop' and may be used to stop the API service.

- The ATRS API is configured and the ATRS API Service is running.
API Clients
The API Clients section is used to give another application access to the ATRS API.

Step 1: Click Add.
You only need to provide the Client name as the Client ID and Secret are automatically generated by ATRS.
- Step 2: Ener the Client name is added, click Save & close
Housekeeping
Step 1: Select Options.

Re-registering Components
From time to time, the main DLLs required to run ATRS successfully will need to be re-registered into your system registry. This need may arise as a result of the install or uninstall process of other applications you may be running on your PC.

IMPORTANT
During the component re-registering process, you must ensure that you are logged into the PC as the Local Administrator in order to ensure that you have full security rights to the complete system registry.
To re-register a component, perform the following steps:
Step 1: Click Components.
Step 2: From the list that presents, select the component you wish to re-register.
Step 3: Click Register Component.
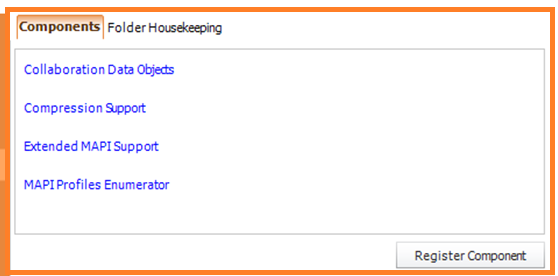
Once the component has been re-registered, restart the PC to ensure that the new settings are stored by Windows.
Archiving
ATRS provides you with the capability to transfer inactive schedules to an Archive folder. These schedules can later be reactivated and relocated to different folders, maintaining a tidy and manageable folder structure.
To enable archiving, perform the following steps:
Step 1: Check Archive schedules that have been disabled for.
Step 2: Specify the number of days a disabled schedule can remain at its current location before being moved to the archive folder.

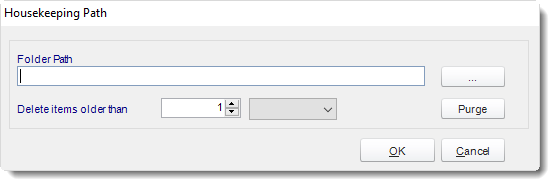
Folder Housekeeping
Managing your folders through folder housekeeping is an effective way to prevent them from becoming overcrowded. Unlike the folder housekeeping feature within a schedule, this option allows you to monitor any folder and automatically remove items that are older than a specified timeframe. Folder Housekeeping operates through the system maintenance thread, which runs every 5 to 10 minutes, ensuring your folders stay organized and clutter-free.

To enable Folder Housekeeping, perform the following steps:
Step 1:Click on the green plus button to add a new folder path.
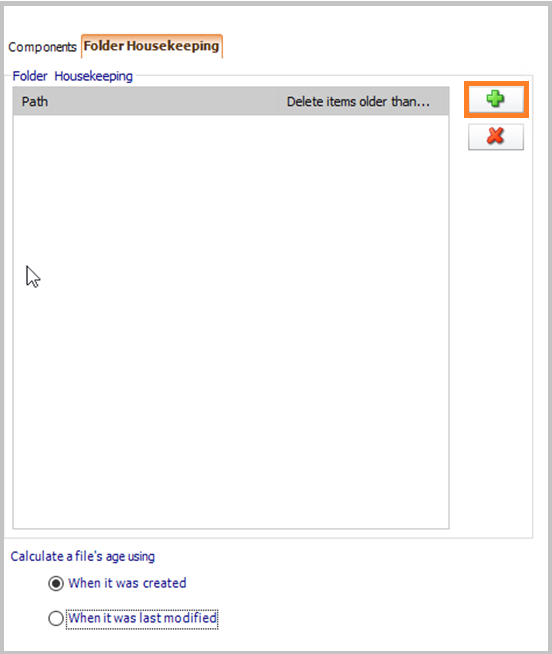
Step 2: Click (...) button and navigate to the specific folder you wish to monitor.
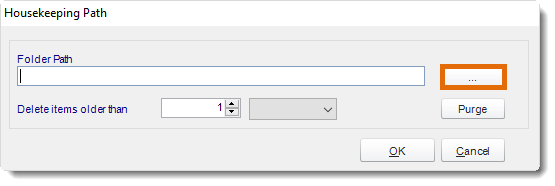
Step 3: Once you have selected the folder you wish to monitor, indicate how old items in the folder should be before they are deleted.
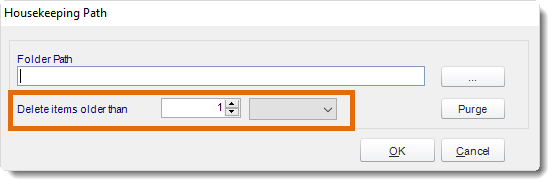
Step 4 Optional: If you want to immediately delete all items in the folder that are older than the specified value, click Purge. Otherwise, click OK.
Step 5: Click Apply at the bottom of the Options window.
You can delete a housekeeping item by selecting the folder path, then clicking the red X button.
User Defaults
By utilizing User Defaults, users can streamline their workflow and ensure consistency in their tasks. Here is a step-by-step guide on how to access and set up User Defaults within the application.
Step1: Navigate to Options.

Step 2: Select User Defaults.

Upon accessing the User Defaults window in ATRS, users will be presented with three tabs: Messaging Defaults, Database Defaults, and Miscellaneous.
Messaging Defaults
Step 3: Messaging Defaults (Optional)
Within the Messaging Defaults tab, you have the option to create a standard email message or signature. This allows you to use the same message and signature for your scheduled reports, making it easier to maintain consistency in your communications.

- To establish a default Email Subject, Email Message, or Email Signature, just input the text you want to use in the corresponding field.
- To set a default Attachment, click (...) button and select the appropriate file. Then, click Open.
How to use Messaging Defaults?
Once you have set Messaging Defaults in the Options window, they can be used in the email output of your schedule. Defaults are applied on a schedule by schedule basis by using the User Defaults inserts on the Email Destination window.

To use the Messaging Defaults inserts, perform the following:
- In your email output section, go to User Defaults in the Inserts Menu.
- Drag and drop the default item to the appropriate field.

You can then edit the default message if needed.
For each schedule, you can overwrite the default email text and enter your own. For more information on how to do this, see the Export to Email page.
Database Defaults
Step 4: Setting up Database Defaults
If your reports all connect to the same database, you can input and save the database credentials in this section. Simply enter a User ID and Password to avoid repetitive data entry for each schedule.

Miscellaneous
Step 5: Customize Miscellaneous Defaults like Default Report Location and Default Date Stamp here.

- Default Report Location: When a path is entered here, ATRS will always take you to this folder when you are browsing for a report.
- Default Date Stamp: This will be what is used when you select to append a date/time stamp of a report destination. If this field has a value, this default format will be prefilled when it is selected, saving you from having to select a format each time you write a schedule.
Step 6: After configuring the Messaging Defaults, make sure to click on the Apply button to save your changes.

Step 7: To exit Options Menu, click Ok. Alternatively select any other Options menu item.

Default Destinations
Default destinations saves time and effort by streamlining the scheduling process and ensuring consistency in destination settings across multiple schedules. By setting default destinations, users can easily select pre-defined destinations for their schedules, making the scheduling process more efficient and user-friendly.
Step 1: Navigate to Options.

Step 2: Select Default Destinations.

Step 3: To add a destination click Add
Step 4: Choose the desired destination type from the dropdown menu options.
In this example, a default email destination will be set up.
Step 5: Enter a Destination Name, this will need to be unique.
Step 6: Complete all the required details of the desired destination.

Step 7: Click OK to save the destination settings
Repeat Steps 3 to 7 for each default destination you wish to establish.
Testing Using a Default Destination
One of the features of ATRS is the ability to set up specific default destination for testing purposes (such as a test folder on the server's C: drive or a testing e-mail address).
To test a schedule using a default destination instead of the schedule's actual destination, perform the following:
Step 1: Right-click on the schedule you wish to test.
Step 2: Click Tools. Then, click Test.

Step 3: Select the destination you want to use from the available Default Destinations list and then click on OK.

Once you click OK, the schedule will automatically execute to the test destination, and you will receive a success or failure message.
Sharing Default Destinations
- Default Destinations can be assigned to specified user groups. These groups are created in the (User Manager). If you want to "pre-make" a destination so that a certain group of users can only have schedules export to that location, you would do that here.
System Paths
Step 2: Select System Paths.

- Cached Data Folder: ATRS stores information which is used by event-based and other schedules.
- Snapshots folder: This is where Snapshots will be stored. Snapshots are a feature in ATRS that allows users to capture a snapshot of a report at a specific point in time. These snapshots can be useful for comparing changes in data over time or for preserving a specific version of a report for future reference. By storing Snapshots in this folder, users can easily access and manage these saved versions of their reports.
- Copy Snapshots to Secondary Location: If you choose to utilize this option you may also wish to append a unique identifier to these duplicate snapshots and may make use of the Inserts menu here to dynamically append an item to these files.
- Path to DT Exec (For SSIS Tasks):
- Path to Adobe Reader / Acrobat ( For Print PDF Tasks)
- Cached Reports Folder: ATRS stores copies of your report files (*.rpt) and executes these copies. The copies are cached in this folder.
- Temporary Output Folder: ATRS uses this folder to store temporary files. To automatically clear down this folder so that your PC does not run out of disk space, you can set how long the items in the temporary folder should be kept.
- Sent Messages Repository (SMTP): ATRS will use this folder to store information on your sent email messages via your configured SMTP server.
- You can also set ATRS to convert the files to *.msg format for viewing in MS Outlook. Please note that the files are converted on the fly upon viewing them from the sent messages section in the System Monitor.
If you do not check the box next to "convert files to MSG format", sent messages will save to this folder as .eml files. However, if you navigate to the Email Log in the System Monitor and click on one of the entries, the .eml file will be converted to a .msg file so that it can be viewed successfully.
Audit Trail
An audit trail is a chronological record of changes that have been made to a database or file. ATRS can be configured to create an audit trail that will be stored in a given database.
The audit trail will display which users have executed, refreshed, or edited schedules.
This audit trail will show common activities, such as which user executed a given schedule, what the user did, the schedule that was manipulated, and the type of schedule.
Audit information is not stored in ATRS and you must create and designate an external ODBC compliant database for storage.
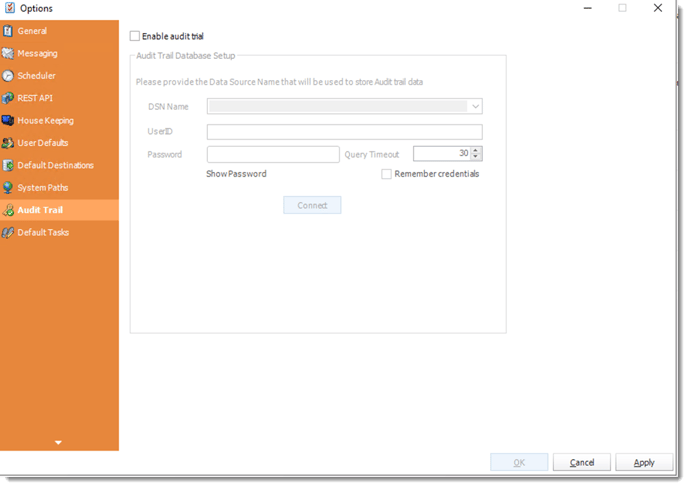
Enabling the Audit Trail
To allow ATRS to create an audit trail, perform the following:
Step 1: Check the box next to "Enable Audit Trail" on the Audit Trail tab of the Options window to activate the Database Setup fields for modification.
Step 2: Input the name of the database and the relevant login information into the fields labeled DSN Name, UserID, and Password. Afterward, click on the Connect button.

Step 3: If successful, a pop-up will appear: Database connection established. Click OK
Step 4: Click Apply at the bottom of the Options window to save these settings.

Step 5: Click OK to exit Options, or choose another Options Menu Item to check or edit settings.
Default Tasks
Default tasks are pre-defined tasks that can be easily inserted into schedules without the need to recreate them each time. Here is how to set them up.

Step 1: From the list of custom tasks, click on the one you want to use. Then, drag and drop it into the right-hand pane.

- This action will prompt a window to appear, providing you with the opportunity to configure the default custom task.
The picture shown below may differ from the pop-up window you see. This window varies based on the type of custom task you select.

Once you have created the default task, it will display in the Custom Tasks window. Click Apply.

Importing a Default Task into a Schedule
To import a default task, perform the following:
Step 1: Navigate to the Tasks tab of the schedule you wish to add the default task to.
This can be done by right-clicking the schedule, selecting Properties, and then clicking Tasks.
Step 2: Click Import.

Step 3: From the context menu, select Default Task.

Step 4: From the list that displays, click on the default task you would like to add to this schedule. Then, click OK.
You may create additional default tasks in this window as well.

Step 5: The default task will now be added to the schedule as a custom task. Click OK to save the Task List, then Click Apply & OK to save the Schedule Changes.
How to Create a Task List
Task Lists are a great way to import multiple task groups into a schedule. To create a Task List, perform the following:
Step 1: On the Default Tasks tab of the Options window, select Export.
Step 2: Enter a name for this task list. Then, click OK.

If the default task list was created successfully, you will see a success message.

Step 3: Click OK to clear the message.
The Task list is now saved and can be imported into a schedule.
Importing a Default Task List
To import a default task list, perform the following:
Step 1: Navigate to the Custom Tasks tab of the schedule you wish to add the default task to.
This can be done by right-clicking the schedule, selecting Properties, and then clicking Tasks.
Step 2: Click Import.
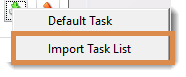
Step 3: Click Import Task List.
Step 4: From the list that appears, click the task list you wish to import for this schedule. Then, click Select.

Step 5: All tasks associated with that task list will now be added to the schedule. Click Apply & OK to save the changes to the Schedule.